Stop and Go to Beginning — Logic Pro X keyboard command of the day

Logic Pro X keyboard command of the day. #LogicProX @StudioIntern1

  Stop and Go to Beginning

Defining keyboard commands for the various stop and play commands can speed up repetitive work. I need to practice setting my transport buttons (and commands) to better match how I am working — mixing a song, segmenting a live audio session into multiple songs or chapters.

Use transport key commands — Logic Pro X

Stop and Go to Beginning: Stops playback and moves the playhead to the project start position.

⇧ SHIFT – ⌃ CONTROL – ⌥ OPTION – ⌘ COMMAND

Create Multiple Lanes… — Logic Pro X keyboard command of the day

Logic Pro X keyboard command of the day. #LogicProX @StudioIntern1

  Create Multiple Lanes…

I quoted the help document below.

I keep thinking back to Vision in the 1990s and how I wouldn’t even consider Notator…I think I may have missed out on a true power tool.

⇧ SHIFT – ⌃ CONTROL – ⌥ OPTION – ⌘ COMMAND

Create lanes — Logic Pro X

Create lanes for all event types in a region
Select the region.

Choose Lanes > Create Multiple Lanes (or use the corresponding key command).

In the dialog that appears, click the All button to confirm that you want to create lanes for all types of events in the region.

Tip: It’s a good idea to create a new Lane Set before creating a group of new lanes. For more information, see Use Lane Sets.

Use Lane Sets — Logic Pro X

You can store a combination of lanes as a Lane Set. When a Lane Set is saved, the vertical zoom setting of the Step Editor is stored. You can save as many Lane Sets as required in each project.

Step Editor overview — Logic Pro X

The Step Editor is a graphical editor that can be used to create or edit MIDI note and controller data. You can use the Step Editor to view and edit different MIDI event types, shown as vertical beams—or steps—along a timeline within a region.

Select Soloed Tracks  — Logic Pro X keyboard command of the day

Logic Pro X keyboard command of the day. #LogicProX @StudioIntern1

  Select Soloed Tracks


Selects all tracks that are currently soloed. This can be very useful. At the minimum a quick way to be able to pan or level control the current group of playing tracks. Only available in the Edit>Select Tracks> menu, or by command. The command only works when the Arrange window is the current focus.

Solo tracks — Logic Pro X

You can solo a track, silencing all tracks that are not also soloed. Soloing tracks is useful when you want to work on a track individually, or work on a few tracks, without hearing the other tracks in the project.

⇧ SHIFT – ⌃ CONTROL – ⌥ OPTION – ⌘ COMMAND

Set Marquee Tool ⌥2⃣ — Logic Pro X keyboard command of the day

Logic Pro X keyboard command of the day. #LogicProX @StudioIntern1

  Set Marquee Tool   ⌥2⃣

A predefined way to turn on the Marquee tool. I currently have Logic set to switch to the Marquee tool when the cursor is in the lower half of a track (upper half for Fade tool).

I should remember to switch the command-tool to something other than Marquee.

Previously posted here.

The Marquee Tool — Logic Pro X — learning at the elbow of the internet

I keep trying to use the marquee tool to make things easier. I keep forgetting.

Select parts of regions in the Tracks area — Logic Pro X

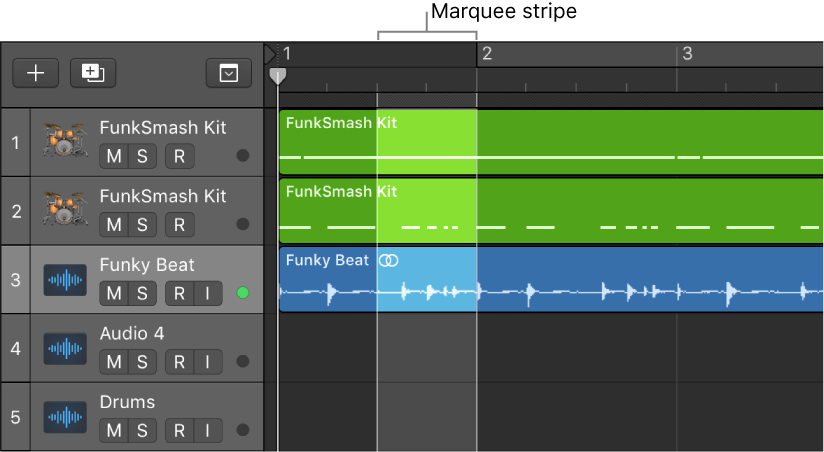
Only the part of the region inside the marquee is selected, letting you select inside, or across portions of, regions. You can perform most edits, such as moving, cutting, copying, and deleting, in the selected area. After editing, the selected area becomes a new, separate region. The marquee selection uses the current Tracks area Snap value.

If you play a project after making a marquee selection, playback starts at the left edge of the selection, and ends at the right edge. If you create a marquee selection while the project is playing, playback continues past the end of the selection.

If you start recording after making a marquee selection, Autopunch mode is activated, and the marquee selection is replaced by the punch locators. All tracks within the marquee selection are record-enabled, and all other tracks are record-disabled.

⇧ SHIFT – ⌃ CONTROL – ⌥ OPTION – ⌘ COMMAND

Apply Transform User Preset 3 to selected Events — Logic Pro X keyboard command of the day

Logic Pro X keyboard command of the day. #LogicProX @StudioIntern1

  Apply Transform User Preset  3 to selected Events

The MIDI Transform window can be opened from the Window menu, or by entering ‘⌘9’. There are 30 ‘Apply Transform User Preset … to selected Events’.

Use transform sets — Logic Pro X:

1. Choose Create New Transform Set from the Presets pop-up menu.

2. Set conditions and operations.

3. Select the “Hide unused parameters” checkbox. This helps to avoid changes to conditions and operations that aren’t required for (or may disturb) your transform set.

4. Choose New Parameter Set (Number) from the Presets pop-up menu. Enter a new name for your transform set.

This transform set now appears at the bottom of the Presets list in all MIDI Transform windows for this project. You should consider saving your user transform sets in one or more template projects. This way, they are always available to you in all future projects.

Tip: Renaming an existing transform set creates a new transform set that is identical to the original. The existing (source) transform set is retained.

⇧ SHIFT – ⌃ CONTROL – ⌥ OPTION – ⌘ COMMAND