Scroll to Inputs — Logic Pro X keyboard command of the day

  Scroll to Inputs

Scroll the mixer window to at least the first channel strip that has an input assigned. Probably a whole lot more useful to scroll to auxiliaries which can be far away. I guess if you are looking at the aux strips you might want to scroll back to the inputs….

Channel strip types in Logic Pro — Apple Support

When you have more channel strips than can be viewed in the Mixer at once, scroll the mixer in Logic Pro by doing one of the following:

Set Left Locator numerically… — Logic Pro X keyboard command of the day

  Set Left Locator numerically…

I have tried many ways to get the locators where I want them. Sometimes just entering the numbers from the keyboard is the simplest approach.

I set the locators numerically by double-clicking the locator in the LCD and typing in the bar number I want. I certainly don’t want to eat up control bar space with buttons that select a field in a dialog box. I would rather dedicate some key command to bring up the box.

The entry box does provide a decent way to focus on what you want, and lets you skip the command to set the other locators…

“Current” is the location of the playhead.

Use the cycle area in Logic Pro — Apple Support

You can use the cycle area to repeatedly play a particular part of a project. The cycle area can be used for composing, practicing a part before recording, recording multiple takes, and other purposes.

Randomize Current Edit Mode Values for Row ⌥⌘R — Logic Pro X keyboard command of the day

  Randomize Current Edit Mode Values for Row    ⌥⌘R

Someday I will return to my MIDI roots. I started working with Opcode’s “CZ Editor” for my CZ-101. When I added a TX81Z I was ready. Opcode’s “Vision” and “Studio Vision” were my tools. Sequencing was the game.

Time to see what 30 years of progress has made possible.

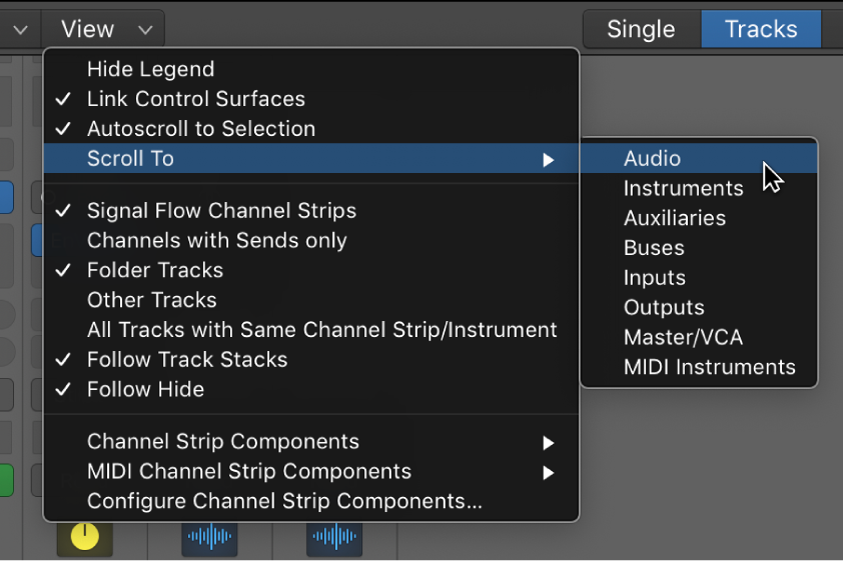
Logic Pro Step Sequencer overview — Apple Support

Step Sequencer is inspired by classic hardware step sequencers that have rows of configurable switches or knobs used to generate repeating musical patterns. In Step Sequencer, you create patterns by editing multifunctional steps in the step grid. Each row controls either a sound (which can be a drum kit piece, a note on an instrument, or a range of notes) or an automation parameter (letting you create automation changes over time in the pattern). Each step represents a definable length of musical time–by default, steps are of equal length, but you can change the length for individual rows or steps. You can adjust a wide range of parameters for individual steps, including velocity, pitch, gate time, and more; and edit pattern and row settings including pattern length, row loop start and end points, playback position, and rotation.

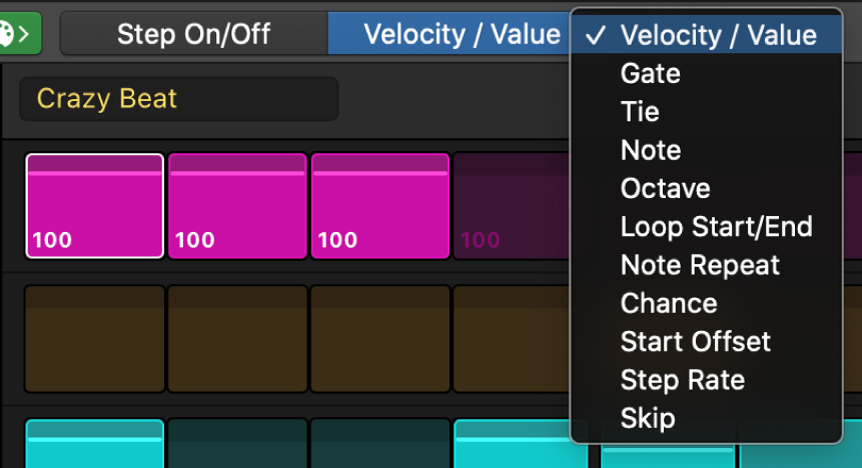
Use Step Sequencer edit modes in Logic Pro — Apple Support

You can control different aspects of the event triggered by a step using edit modes. You can choose the edit mode for a pattern, and view multiple edit modes for each row using subrows. Some edit modes are common to both note rows and automation rows, while others are specific to one row type.

Undo — ⌘Z

I don’t need to keep all the “text chrome”. Undo the previous action.

Go to Marker Number 16 ⌃6 — Logic Pro X keyboard command of the day

#LogicProX @StudioIntern1

  Go to Marker Number 16    ⌃6

I won’t repeat my statements about knowing why I would want to go to marker 16. Of course I remember why it is marker 16. I know what each of the 20 markers that I want to go to are. A marker would never get inserted before marker 16 causing it to move.

I like my markers. I like them so much I like to name them.

⇧ SHIFT – ⌃ CONTROL – ⌥ OPTION – ⌘ COMMAND