Set main finger 2 ⌃⌥⇧2 — Logic Pro X keyboard command of the day

Logic Pro X keyboard command of the day. #LogicProX @StudioIntern1

  Set main finger 2    ⌃⌥⇧2
 

I am having no luck with this one. Best guess is that I might use it if I was working with tablature, chord grids, and the like.

Chord grids overview
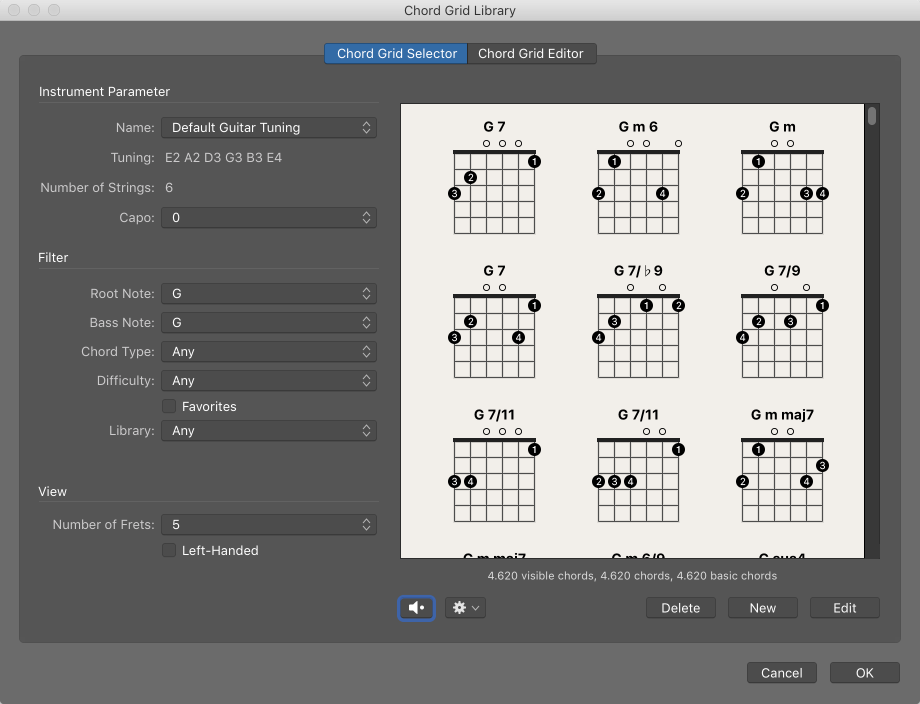
When Show Advanced Tools is selected in the Advanced preferences pane, you can add chord grid symbols from the Part box. Logic Pro includes a large library of chord grids, in standard tuning and in a variety of alternative tunings.

You can review and edit existing chord grid libraries and chord grids, as well as create your own, in the Chord Grid Library.

The Chord Grid Library window contains three panes: the Instrument Editor, Chord Grid Selector, and Chord Grid Editor. The Instrument Editor may not be available, depending on which method you use to open the Chord Grid Library.

Excerpt From: Apple Inc. “Logic Pro X User Guide.” iBooks.

⇧ SHIFT – ⌃ CONTROL – ⌥ OPTION – ⌘ COMMAND

Gearslutz — View Single Post — Best mixing controller for Logic Pro X: 2017

Gearslutz — View Single Post — Best mixing controller for Logic Pro X: 2017:

In EQ mode the channels represent the 4 parameters for each band, 2 bands per “page”.

You would probably be happier with the “Alternate EQ Edit mode”. Press and hold “EQ”. The V-Pots can be pressed to choose the mode. Press V-Pot 8 to get into
Frequency/Gain Channel view.

V-Pot 8 or F8 Switches to Frequency/Gain Channel view.

In this mode, you can edit the frequency and gain parameters for all EQ bands of the selected channel strip. Each pair of channel strips corresponds to one EQ band.

The mode display shows FG.
V-Pots 1 to 8 control the frequency of EQ bands 1 to 8.
Mute buttons 1 to 8 control the bypass of EQ bands 1 to 8.
Faders 1 to 8 control the gain of EQ bands 1 to 8.
Note: The faders form a frequency response curve in this mode, if the EQ bands have ascending frequency values.

Tip: You can edit another channel strip’s EQ without leaving this view by selecting the channel strip in Logic Pro or by pressing the appropriate SELECT button on the Mackie Control.

Excerpt From: Apple Inc. “Logic Pro X Control Surfaces Support.” iBooks.

Or you can simply put the “Vintage Console EQ” on the channel and use “Smart Controls” “Shift”+”INST” buttons. You get close to what you ask for.

I’m thrilled to discover “Frequency/Gain Channel” view, and the “Frequency/Gain Mixer” view.

Gearslutz — View Single Post — Best mixing controller for Logic Pro X: 2017

Gearslutz — View Single Post — Best mixing controller for Logic Pro X: 2017:

1) Took me about half an hour to realize that I had to hit the EQ twice to bring up all the parameters
2) Apple have decided that you need an 8 band eq (incl low/high cut) with 4 parameters (incl on/off) for each band. Hence you would need 32 knobs to control the entire EQ for a single channel strip. I have to lean over, read the small scribble, perhaps flip to the next “page” before I can do any adjustments

This is the forum post that started me digging into the X-Touch and how it performs in Logic Pro X.

I can now go back, review the discussion, and make cogent comment.

X-Touch — Logic Pro X — “Single” mode on mixer

X-Touch — Logic Pro X — “Single” mode on mixer:

I have track stacks, summing, for things like DRUMS, VOX, what have you. I arrange them such that the “Arrange” window as well as the mixer has things in order like VOX, v1, v2, v3… where I can collapse VOX and only deal with the plugins and faders on the bus.

That’s nice. I like it.

I am losing track of where I get involved in discussions and question/answer dialogue.

Time to start posting blog entries with links to the topics. Not clear if these links work for non members of the forums, but hey, this is for me 😉

Drag Mode: X-Fade — Logic Pro X keyboard command of the day

Logic Pro X keyboard command of the day. #LogicProX @StudioIntern1

Drag Mode: X-Fade 

Main Window Tracks

Set the drag mode for the Tracks area
Choose one of the following modes from the Drag pop-up menu in the Tracks area menu bar:

Overlap: Preserves the current region borders when you drag one region over another.

No Overlap: When two regions overlap, the overlapped area of the left (earlier) region is shortened.

X-Fade: When two audio regions overlap, the overlapped area is crossfaded.

Shuffle R: Aligns regions when you move, resize, or delete them, in the following ways:

Move: Moving a region to the right aligns the end point of the region with the start point of the region that follows, so there is no space (gap) between them.

Resize: When you resize the left edge of a region, the preceding regions move by the change in length. If this causes preceding regions to move past the start of the project, the resized region then overlaps the preceding ones by the corresponding amount.

Delete: The remaining regions on the track move by the length of the deleted region.

Shuffle L: Aligns regions when you move, resize, or delete them, in the following ways:

Move: Moving a region to the left aligns the start point of[…]”

Excerpt From: Apple Inc. “Logic Pro X User Guide.” iBooks.

⇧ SHIFT – ⌃ CONTROL – ⌥ OPTION – ⌘ COMMAND