link642 link643 link644 link645 link646 link647 link648 link649 link650 link651 link652 link653 link654 link655 link656 link657 link658 link659 link660 link661 link662 link663 link664 link665 link666 link667 link668 link669 link670 link671 link672 link673 link674 link675 link676 link677 link678 link679 link680 link681 link682 link683 link684 link685 link686 link687 link688 link689 link690 link691 link692 link693 link694 link695 link696 link697 link698 link699 link700 link701 link702 link703 link704 link705 link706 link707 link708 link709 link710 link711 link712 link713 link714 link715 link716 link717 link718 link719 link720 link721 link722 link723 link724 link725 link726 link727 link728 link729 link730 link731 link732 link733 link734 link735 link736 link737 link738 link739 link740 link741 link742 link743 link744 link745 link746 link747 link748

Create 1 Track Automation Point at Region Borders ⌃⇧⌘1 — Logic Pro X keyboard command of the day

Logic Pro X keyboard command of the day. #LogicProX @StudioIntern1

  Create 1 Track Automation Point at Region Borders  ⌃⇧⌘1

Creates automation points that can be used to change the automation of the entire region. Create the points, grab the “curve” and move it.

Region-based vs. track-based automation — Logic Pro X

Logic Pro offers two types of automation: track-based automation, and region-based automation. Track-based automation can be applied to the entire track, from the beginning to the end of your project. Region-based automation only applies to the specific region the automation parameters are connected to. With track-based automation, if you re-record, move or copy regions (either to another point on the same track, or to another track) the automation data remains tied to the initial point on the track in which it was created. With region-based automation, if you re-record the region, the automation is lost; if you move or copy the region (either to another point on the same track, or to another track) the automation remains with the region. Region-based automation is particularly useful when you are automating instrument parameters.

⇧ SHIFT – ⌃ CONTROL – ⌥ OPTION – ⌘ COMMAND
Autoscroll to Selection — Logic Pro X keyboard command of the day

Logic Pro X keyboard command of the day. #LogicProX @StudioIntern1

  Autoscroll to Selection

The normal behavior of the Mixer window is to scroll to reveal the channel strip of a track that is selected in the Arrange window. If you want the mixer to remain where it is, possibly focused on AUX strips, when you select a track in the Arrange window you need to turn off Autoscroll to Selection.

The command is not mapped to any key. The command is located in the View menu Mixer windows. The command is a “toggle”. Mapping a key command allows you to toggle Autoscroll on and off.

What’s new in Logic Pro 10.4 — Logic Pro X

The responsiveness and performance of the Mixer is improved, particularly for projects with high channel strip counts. In addition, the Mixer provides several new capabilities, including creating a default channel strip configuration, disabling autoscrolling to the selected channel strip, and highlighting channel strips corresponding to a send or routing destination. In addition, selecting multiple channel strips also selects the tracks assigned to them.

⇧ SHIFT – ⌃ CONTROL – ⌥ OPTION – ⌘ COMMAND
Deselect All ⇧D — Logic Pro X keyboard command of the day

Logic Pro X keyboard command of the day. #LogicProX @StudioIntern1

  Deselect All   ⇧D

I keep looking for this command every time I have the entire window filled with selected regions. No convenient place to “click on an empty area” of the Arrange window. I should practice using this.

2021-04-22 — as far as I can tell the key assignment changed from option-shift-D to shift-D

⇧ SHIFT – ⌃ CONTROL – ⌥ OPTION – ⌘ COMMAND

Go to Marker Number 14 — Logic Pro X keyboard command of the day

Logic Pro X keyboard command of the day. #LogicProX @StudioIntern1

  Go to Marker Number 14

Another of the numbered marker commands. Not happening for me. I name my markers or use the forward/backward marker commands and buttons on the X-Touch.

Markers overview — Logic Pro X

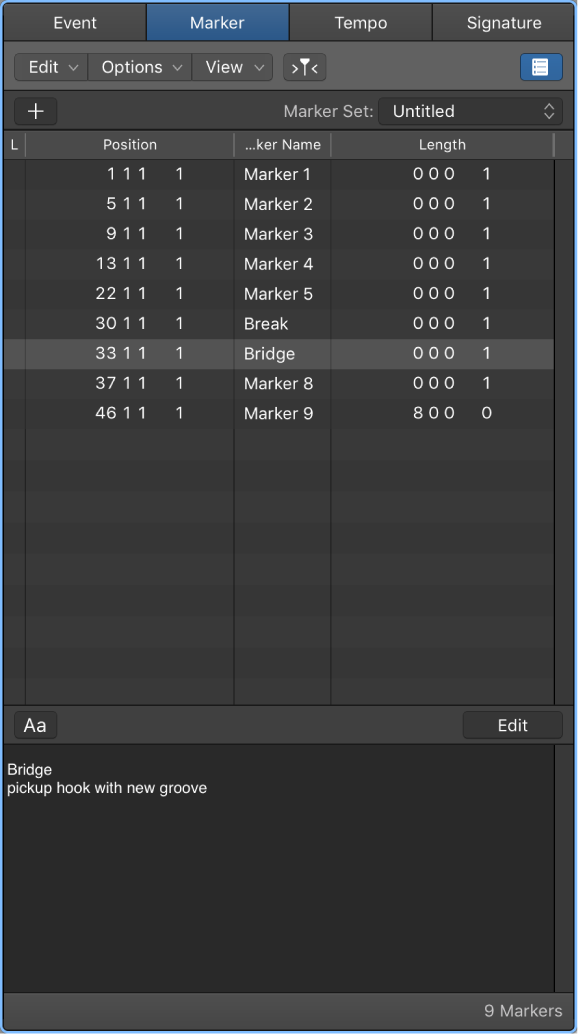
There are several ways to create and edit markers in Logic Pro. You can view and edit markers in the following work areas:

Navigate using markers — Logic Pro X

You can navigate through your project using markers. This is useful when you want to quickly jump to, and edit, regions or events at a specific position in your project, for example.

⇧ SHIFT – ⌃ CONTROL – ⌥ OPTION – ⌘ COMMAND

Cycle Preview On/Off ⌃C — Logic Pro X keyboard command of the day

Logic Pro X keyboard command of the day. #LogicProX @StudioIntern1

  Cycle Preview On/Off    ⌃C

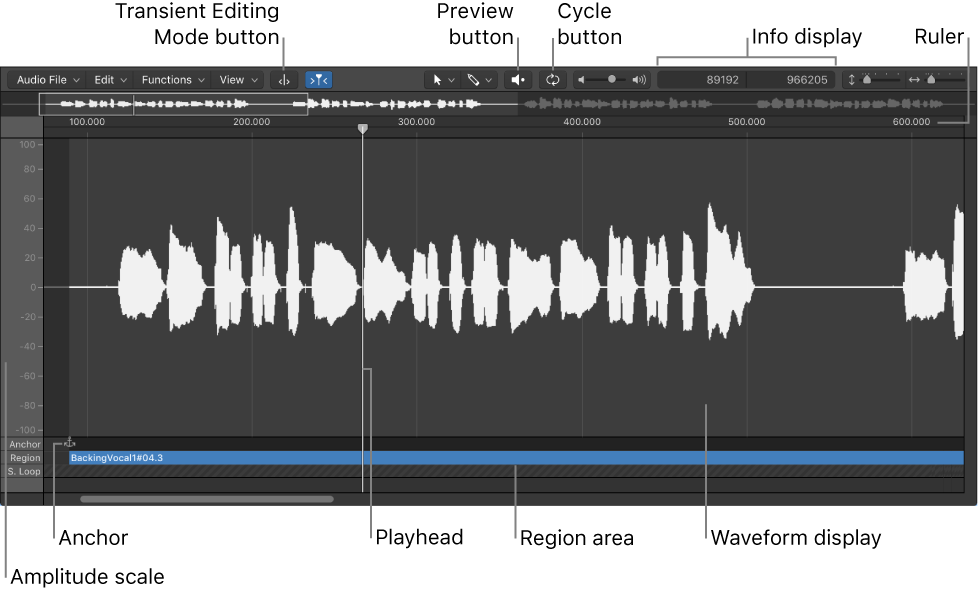
There is a Preview button in the Audio File Editor, the Smart Tempo Editor, and the Project Audio window. When it is on and you press Play the selected audio will loop.

Audio File Editor interface overview — Logic Pro X

Cycle button: Loops playback of the selected area.

Work in the Smart Tempo Editor — Logic Pro X

Cycle button: Turn Cycle mode on or off. If a selection exists, the Cycle region matches the selection. If no selection exists, Cycle mode extends the length of the audio file.

Project Audio Browser interface — Logic Pro X

Cycle button: Loops playback of the selected audio file or region. Use in combination with the Play button.

⇧ SHIFT – ⌃ CONTROL – ⌥ OPTION – ⌘ COMMAND