Show Detailed Help ⌘/ — Logic Pro X keyboard command of the day

Logic Pro X keyboard command of the day. #LogicProX @StudioIntern1

  Show Detailed Help    ⌘/

This is the fastest way to find out how something works. Open the Key Commands Edit window (⌥K), type in a bit of the command name so it appears in the list. Move the cursor over the command and type ⌘/ — if there is help available it will open in the help window.

Remarkably useful.

How to get help — Logic Pro X

Logic Pro provides several ways for you to get answers to questions, learn about controls and functions while you’re working, and view detailed information about all aspects of the app. You can also view information directly in the app using the Quick Help feature.

⇧ SHIFT – ⌃ CONTROL – ⌥ OPTION – ⌘ COMMAND
Select Equal Colored Channel Strips ⇧C — Logic Pro X keyboard command of the day

Logic Pro X keyboard command of the day. #LogicProX @StudioIntern1

  Select Equal Colored Channel Strips    ⇧C

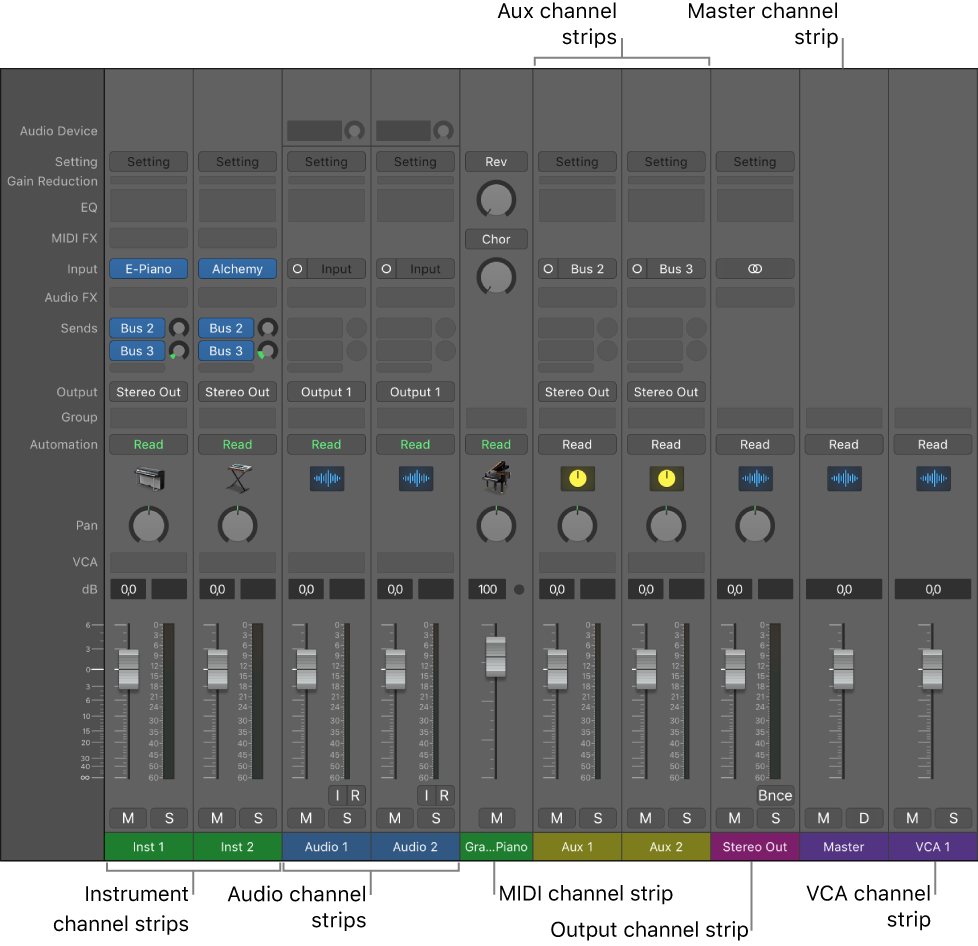
In the Mixer. Using the visual cues to help work with a project seems more useful with larger/multiple screens. Certainly handy when trying to grab all the AUX channels.

This makes a case for being consistent with color coding.

Channel strip types — Logic Pro X

You use channel strips to process audio or MIDI information that is routed from tracks. The Mixer shows all channel strips in your project, including track channel strips, auxiliary and output channel strips, VCA channel strips, and the master channel strip. When you create a new project, the Mixer already includes channel strips for any audio, instrument, and MIDI tracks in your template, as well as the master channel strip and one or more output channel strips depending on your audio interface. As you add audio, instrument, and MIDI tracks to your projects, channel strips are added to the Mixer for each new track.

⇧ SHIFT – ⌃ CONTROL – ⌥ OPTION – ⌘ COMMAND

Projects overview — Logic Pro X

Projects overview — Logic Pro X

A project is a Logic Pro document that contains all of your recordings, the location of media files you add, and all the changes you make. You start working in Logic Pro by creating a project, or opening an existing project. You can have multiple projects open at the same time, and transfer media and other data between them.

This is a good, brief overview of what a project is.

Quick Intro to Logic for Phil — 2019-09-28

Just keeping notes on what has transpired so far

First goal was to get WAV files from ProTools project into Logic, saved and able to be worked with.

First pass we created a project with 1 audio track. Opened the Project Audio window (command-8). Audio File menu — Add Audio File (control-F). Selected all of the tracks from a tune and added them to project audio. From there we did an option-click on the disclosure triangle to see all the file names. Now we do a Select All and Add to Tracks (command-;) choosing Create New Tracks. Save the project (as a folder) and check all the boxes to make sure all audio gets saved in the project.

Repeated the exercise for a second project, but this time instead of using the free-standing Project Audio window we clicked on the Browsers button for media (far right) to open the project audio section of the arrange window.

We are going to take a different approach, well, I am…template coming up soon.

Add Selected Models — Logic Pro X keyboard command of the day

Logic Pro X keyboard command of the day. #LogicProX @StudioIntern1

  Add Selected Models

Control Surfaces Setup. Adds the selected control surface models.

Add a control surface to Logic Pro — Apple SupportSome control surfaces such as Mackie Control are detected automatically when you open Logic Pro. You can add other devices that are not detected automatically using the Setup window. Installation is covered in the setup section for your particular device. Some devices may require different or additional steps, but in most cases you only need to select the name of the device you want to use with Logic Pro, then add it. When you add a control surface device, it is represented by an icon in the Device area of the Control Surface Setup window.

Older versions of the online help documentation have been removed (checked 2020-09-29). Added link to new support version of the documentation. I am not a fan of the modern support version of the help documentation.

⇧ SHIFT – ⌃ CONTROL – ⌥ OPTION – ⌘ COMMAND