Select All Previous Samples ⌃⌥⇧← — Logic Pro X keyboard command of the day

#LogicProX @StudioIntern1

  Select All Previous Samples    ⌃⌥⇧←

Selects all of the samples to the left of the playhead.

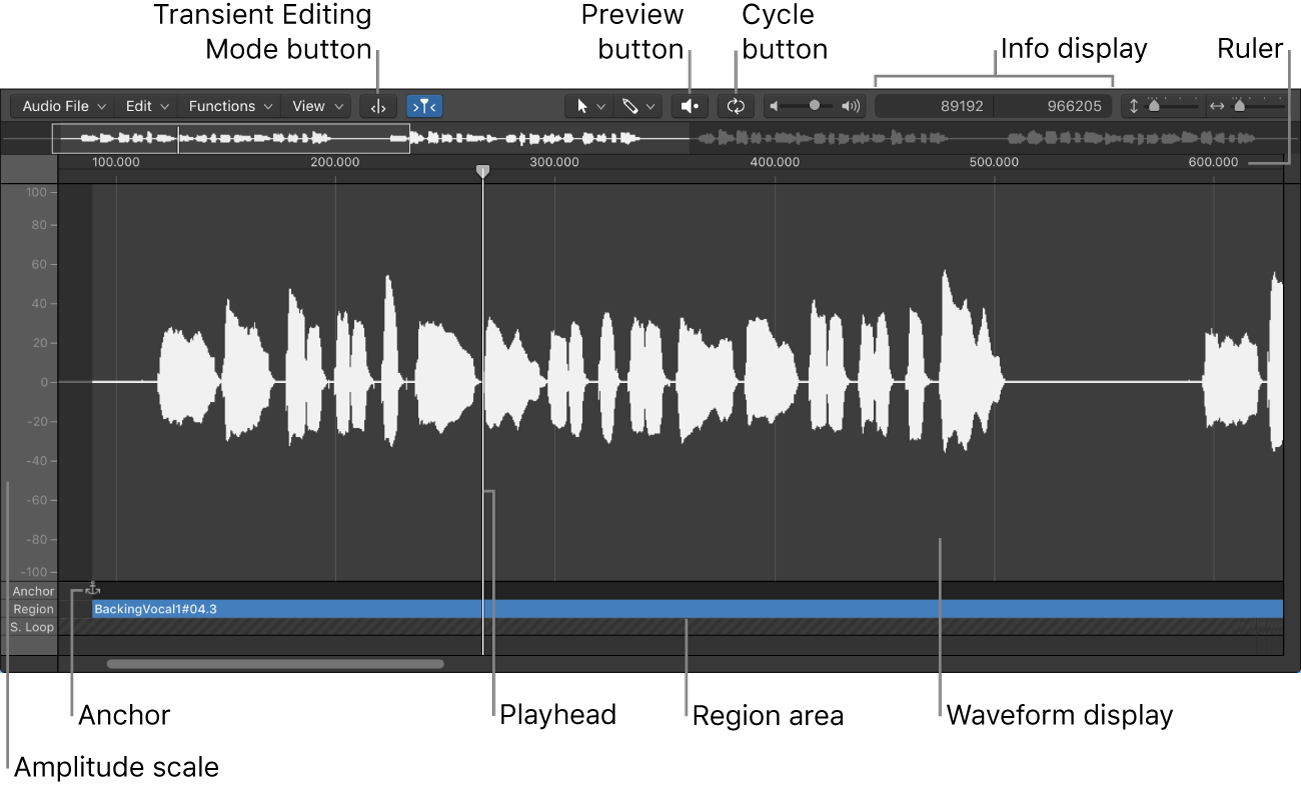
Logic Pro Audio File Editor overview — Apple Support

Most day-to-day audio editing tasks in Logic Pro are performed in the main window and Audio Track Editor. The Audio File Editor is useful for removing pops and clicks in audio material, setting accurate crossover points for looped playback, correcting phase cancellation errors, and more.
You can use the Audio File Editor to work with transient markers that indicate significant points—or transients—in an audio file. The audio on a track is analyzed for transients the first time you enable that track for Flex Time editing. Any detected transients in the file are marked.

⇧ SHIFT – ⌃ CONTROL – ⌥ OPTION – ⌘ COMMAND

Paste to New Row ⌃⇧V — Logic Pro X keyboard command of the day

#LogicProX @StudioIntern1

  Paste to New Row   ⌃⇧V

Creates a new row in the Step Sequencer with the contents of the clipboard.

Edit Step Sequencer rows in Logic Pro — Apple Support

You can edit Step Sequencer rows in a variety of ways, including copying and pasting rows or row settings, duplicating a row with the next row assignment, changing the row assignment, resetting row values to a default setting, and deleting a row.

Logic Pro Step Sequencer overview — Apple Support

Step Sequencer is inspired by classic hardware step sequencers that have rows of configurable switches or knobs used to generate repeating musical patterns. In Step Sequencer, you create patterns by editing multifunctional steps in the step grid. Each row controls either a sound (which can be a drum kit piece, a note on an instrument, or a range of notes) or an automation parameter (letting you create automation changes over time in the pattern). Each step represents a definable length of musical time–by default, steps are of equal length, but you can change the length for individual rows or steps. You can adjust a wide range of parameters for individual steps, including velocity, pitch, gate time, and more; and edit pattern and row settings including pattern length, row loop start and end points, playback position, and rotation.

⇧ SHIFT – ⌃ CONTROL – ⌥ OPTION – ⌘ COMMAND

Live Loops: Geting started with Logic Pro X’s killer new feature — 9to5Mac

Live Loops: Geting started with Logic Pro X’s killer new feature — 9to5Mac

It takes Apple about 40-pages to explain what this feature is really capable of, but that’s way to much information to take in at once when you just want to get started making music. So we thought it would be a good idea to focus on some of the most important elements and concepts of the grid-based creative environment so we can all get down to business and learn the intricacies naturally along the way. Explaining every in and out of Live Loops could easily fill a 500+ page manual, if not more, but understanding the basics and letting the rest come naturally seems to be the best way for most creatives to come to grips with a completely new way of working.

Quantize 1/16 Swing E — Logic Pro X keyboard command of the day

#LogicProX @StudioIntern1

  Quantize 1/16 Swing E

The fine art of humanizing machine-generated musical sounds.

Logic Pro Quantize parameter values — Apple Support

You can quantize selected audio or MIDI regions (including a mixed region selection) using the Quantize parameter in the Region inspector. This parameter determines the division of the quantization grid.

⇧ SHIFT – ⌃ CONTROL – ⌥ OPTION – ⌘ COMMAND