Move Locators Backwards by Cycle Length ⇧⌘,

Logic Pro X keyboard command of the day. #LogicProX @StudioIntern1

  Move Locators Backwards by Cycle Length    ⇧⌘,
 

Touch bar 7. This is a very handy thing to know. I fumble about with locators, cycle, and other methods of gaining focus on part of the sound. The backward and forward keys are the same (comma, period) as all of the other motion areas.

For me the focus will be on using the marquee tool in conjunction with cycle.

Use the marquee tool to select an area. I have the marquee tool become active in the lower half of a region. Press ⌘U to set locators by marquee and enable cycle. Press ‘space’ to start looping

Assign tools — Logic Pro X:

Marquee Tool Click Zones: When selected, placing the pointer over the lower half of a region (with the exception of the lower-left and lower-right edges) activates the Marquee pointer and behavior.

⇧ SHIFT – ⌃ CONTROL – ⌥ OPTION – ⌘ COMMAND

2019-06-27 — discovered error in narrative. Use the proper key command for ‘set locators and enable cycle’ — ⌘U
Rewind ,  — Logic Pro X keyboard command of the day

Logic Pro X keyboard command of the day. #LogicProX @StudioIntern1

  Rewind    ,
 

In all of the time using Logic I don’t think I have ever purposely used the comma key except in Project Notes or Track Notes.

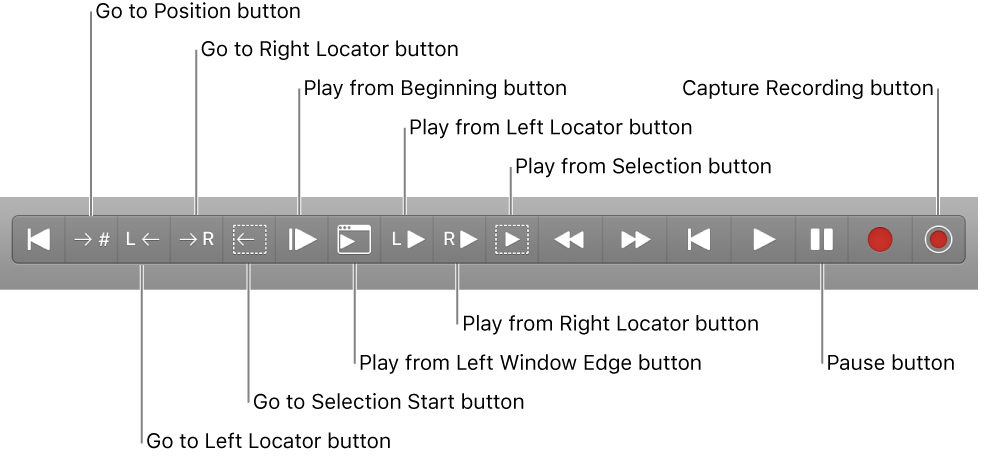
I am almost always using the “additional transport buttons”.

Control playback with the transport buttons — Logic Pro X:

You can use the transport buttons in the control bar to control playback, or to set the playhead position. You can click the buttons to activate or deactivate functions, or use the corresponding key commands to speed up your workflow.

Use transport key commands — Logic Pro X:

Some transport functions are available as key commands. Most of these transport key commands have no default assignment, and need to be assigned manually. See Assign keyboard shortcuts.

For supported USB MIDI controllers, button controls on the device may be automatically assigned to transport key commands. For more information, see Automatic assignment for USB MIDI controllers.

⇧ SHIFT – ⌃ CONTROL – ⌥ OPTION – ⌘ COMMAND

Hide Others ⌥⌘H — Logic Pro X keyboard command of the day

Logic Pro X keyboard command of the day. #LogicProX @StudioIntern1

  Hide Others    ⌥⌘H 
 

Hide all applications except Logic Pro X. Very handy if I have been looking in manuals, or reading web pages.

This command is available in all applications. Well, apparently not Google Chrome

⇧ SHIFT – ⌃ CONTROL – ⌥ OPTION – ⌘ COMMAND

Delete Screenset — Logic Pro X keyboard command of the day

Logic Pro X keyboard command of the day. #LogicProX @StudioIntern1

  Delete Screenset
 

Delete the current screenset. I have been using 3 screensets

  1. Arrange window — tracks and mixer
  2. Tracks — full screen
  3. Mixer window + floating transport

I will probably be adding a screenset — 9 — for documentation and other various things.

Often I will bring up screenset 2 and use my X-Touch to control balance things. It’s also a good place to add markers. I have a keyboard just below the surface. I can use the faders and knobs instead of the mouse. Learning to use this effectively.

Next iteration of the studio computer will probably have me put the X-Touch in front of the screen. 43″ 4K TV.

Create, recall, and switch screensets — Logic Pro X:

You position windows in a layout that suits the way you work. This layout of various windows, including their display size, zoom levels, position, and other settings, is called a screenset. Once defined, you can save, and freely switch between different screensets, much as you might between different computer displays.

⇧ SHIFT – ⌃ CONTROL – ⌥ OPTION – ⌘ COMMAND

Select Previous Track ↑ — Logic Pro X keyboard command of the day

Logic Pro X keyboard command of the day. #LogicProX @StudioIntern1

  Select Previous Track    ↑
 

I use this all the time in the Arrange window.

In the mixer window I use left/right arrow to move channels. The arrow motion is logical based on the way tracks and channels are displayed.

⇧ SHIFT – ⌃ CONTROL – ⌥ OPTION – ⌘ COMMAND