Logic Pro X keyboard command of the day. #LogicProX @StudioIntern1
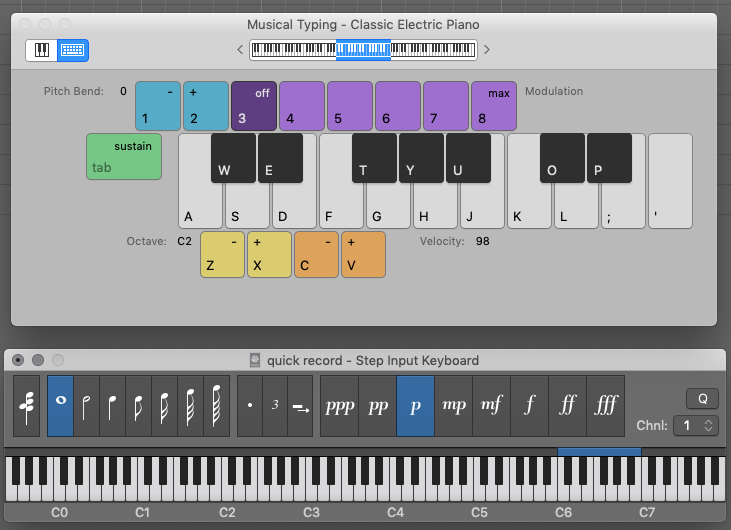
Velocity 64 (mp) N
Certainly a different way to “chord keys”.
Use step input recording techniques — Logic Pro X:
Step input allows you to insert MIDI notes when you’re not recording in real time. You can use step input to create note runs that may be too fast for you to play or to replicate sheet music that’s too difficult for you to play.
To set the velocity of the inserted note: Click the Velocity buttons.
There are eight velocity values—represented by the traditional volume indicators ppp, pp, p, mp, mf, f, ff, and fff. These correspond to MIDI velocity values 16, 32, 48, 64, 80, 96, 112, and 127, respectively.
⇧ SHIFT – ⌃ CONTROL – ⌥ OPTION – ⌘ COMMAND
Command    Key Touch Bar


- Step Input Keyboard


Note “C” A


Note “C#” W


Note “D” S


Note “D#” E


Note “E” D


Note “F” F


Note “F#” T


Note “G” G


Note “G#” Y


Note “A” H


Note “A#” U


Note “B” J


Rest ˽


Next note will be sharp ⇧3


Next note will be flat ⇧B


Chord Mode `


Delete ⌃⌫


Step Backwards ←


Step Forward →


Octave 0


Octave 1


Octave 2


Octave 3


Octave 4


Octave 5


Octave 6


Octave - 2 ⇧Z


Octave - 1 Z


Octave + 1 X


Octave + 2 ⇧X


1/1 Note 1


1/2 Note 2


1/4 Note 3


1/8 Note 4


1/16 Note 5


1/32 Note 6


1/64 Note 7


1/128 Note 8


Triplets on/off 9


Dotted note values on/off 0


Velocity 16 (ppp) C


Velocity 32 (pp) V


Velocity 48 (p) B


Velocity 64 (mp) N


Velocity 80 (mf) M


Velocity 96 (f) ,


Velocity 112 (ff) .


Velocity 127 (fff) /


Quantize note starts On/Off Q