Create Group… ⌃G — Logic Pro X keyboard command of the day

Logic Pro X keyboard command of the day. #LogicProX @StudioIntern1

  Create Group…    ⌃G

From the “Project Audio” section of commands.

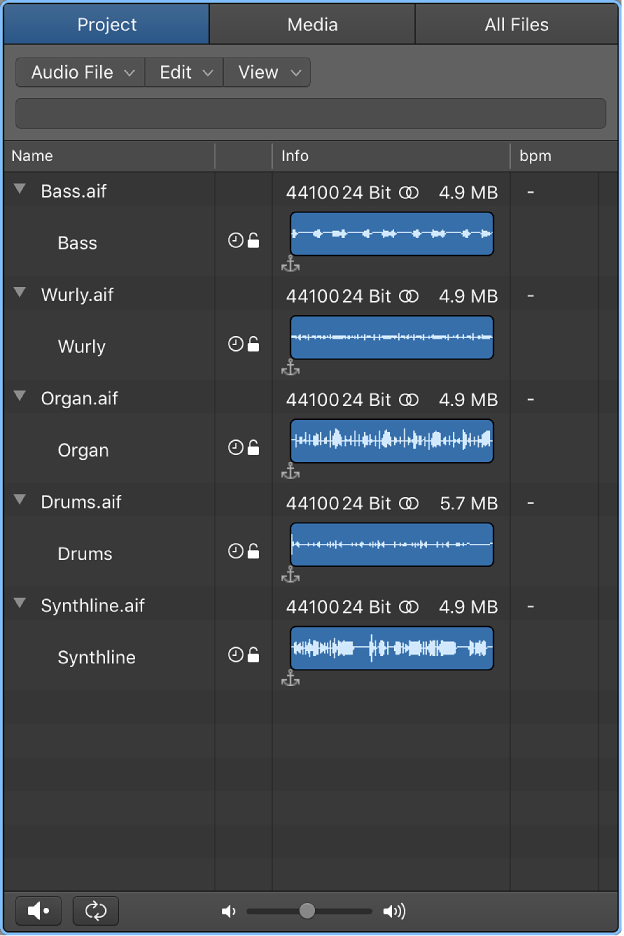
Project Audio Browser overview — Logic Pro X:

The Project Audio Browser shows all audio files and regions that have been added to or recorded in your project, whether or not they are used in the Tracks area. Regions shown in the Project Audio Browser that are not used in the Tracks area are indicated in red.

Fascinating. There is an entire world of collecting and arranging audio files for a project. I am entirely used to working with collections of audio files that are used as a set, and should be contained within the project. An entire world of possibilities of creating projects with audio from many sources with no really good reason to copy into a project.

Certainly something to think about. At the minimum cataloging and filing project audio first might make a lot of sense for larger projects with original recorded tracks and processed tracks. Reference tracks?

⇧ SHIFT – ⌃ CONTROL – ⌥ OPTION – ⌘ COMMAND

Snap Regions to Relative Value — Logic Pro X keyboard command of the day

Logic Pro X keyboard command of the day. #LogicProX @StudioIntern1

  Snap Regions to Relative Value

I should work with some of the options for snapping audio to the grid. I struggle to align reference tracks that I put into the project. This is the visual editing of the regions…something that I don’t do a lot of yet.

It is easy to practice using MIDI loops with the region zoomed horizontally to display fine timing resolution.

Snap items to the grid — Logic Pro X:

By default, the Snap function is relative. When you move or edit an item, it retains the same relative distance from its original grid position. For example, if a region is placed at position 1.2.1.16, and you move the region two beats forward (with the Snap value set to Bar), the region snaps to position 2.2.1.16, not 2.1.1.1 (or 2.2.1.1). You can move items so that they align with the nearest grid value by choosing Snap to Absolute Value from the Snap pop-up menu.

You can show the grid in the Tracks area, to help you visualize the positions of items in the Tracks area relative to the Snap value.

⇧ SHIFT – ⌃ CONTROL – ⌥ OPTION – ⌘ COMMAND

Select Audio Tracks — Logic Pro X keyboard command of the day

Logic Pro X keyboard command of the day. #LogicProX @StudioIntern1

  Select Audio Tracks

I most often select all Audio Channels in the mixer. Show ALL channel strips, turn off all but audio. Now I can select all the channels and add EQ or sends to everything at the same time.

Selecting all Audio Tracks in the arrange window would certainly be a simpler way to do this.

In the Edit menu — “Edit>Select Tracks>Audio”.

The command will only select Audio tracks that are visible in the Arrange window. If the tracks are in Summing Stacks that are collapsed they will not be selected. In fact, the Audio menu item is dimmed if there are no Audio tracks visible.

In the Mixer selecting all Audio channel strips is ‘⇧A’. The same caveat about visible channels applies. The Select All Audio only selects visible audio tracks/channels.

Still a good workflow improvement for me.

Select tracks — Logic Pro X:

Some track operations, such as duplicating tracks or assigning tracks to a different channel strip, require that you first select the track or tracks.

You can select multiple tracks. When multiple tracks are selected, the first selected track is the focused track. Some operations, such as choosing a patch in the Library, only affect the focused track when multiple tracks are selected.

When multiple tracks are selected, the track number of the focused track also appears selected (lighter gray color) on the left edge of the track header, unlike the other selected tracks.

⇧ SHIFT – ⌃ CONTROL – ⌥ OPTION – ⌘ COMMAND

– Piano Roll — Logic Pro X keyboard command of the day

Logic Pro X keyboard command of the day. #LogicProX @StudioIntern1

  - Piano Roll

Include Non-Note MIDI Events
View Mode: One Track
View Mode: Selected Regions
Toggle View Mode
Toggle Time Handles ⌃T ⌃⌥⌘1⃣
Set Note Color By Region Color
Set Note Color By Velocity
Set Note Color By MIDI Channel
Define Brush Pattern and Set Brush Tool ⌃⇧B
Reset Brush Pattern ⌃⇧⌫
Toggle Collapse Mode

Today we get a “section” of commands — the Piano Roll commands.

Piano Roll Editor overview — Logic Pro X:

The Piano Roll Editor shows the notes in a MIDI region as colored bars in a time grid. Horizontal lines show the time position, while vertical lines indicate pitch. A keyboard along the left edge of the Piano Roll Editor provides a reference for the pitches of notes. The info display in the Piano Roll Editor menu bar shows the note name and time position under the pointer.

⇧ SHIFT – ⌃ CONTROL – ⌥ OPTION – ⌘ COMMAND