Select Previous Section for Realtime Comping — Logic Pro X keyboard command of the day

Logic Pro X keyboard command of the day. #LogicProX @StudioIntern1

  Select Previous Section for Realtime Comping

Comping is a mystery to me. It sets apart what can be done in the studio as opposed to recording live performance. Multiple takes I understand, you perform until it’s right. Punch in I understand, fix the spot where it is necessary.

Chopping parts of multiple takes and combining them is just counter to how I perceive music and its creation. Much work needs to be done to figure out the details.

Comping overview — Logic Pro X

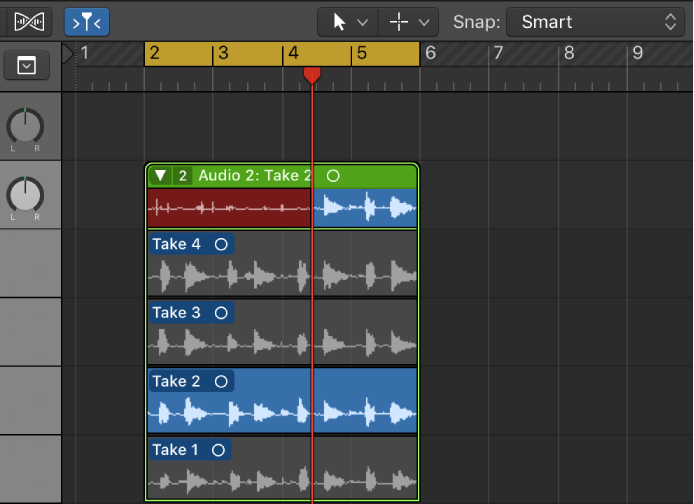
Imagine a scenario in which you have recorded multiple performances of a vocal solo over the same section of a project. You can select the best parts from the different performances and piece them together into a single master take. This is the process of “making a composite take”—commonly referred to as comping—and is achieved by using the Quick Swipe Comping feature. You can also drag or cut the contents of take folders.

Punch in and out of audio recordings — Logic Pro X

Punch recording is a technique you can use to overwrite a portion of a previously recorded track, during playback, without touching any of the recording before or after that portion. You punch in to interrupt playback and make the recording, then punch out to return to playback mode. You can choose between two punch recording modes: Quick Punch-In mode and Autopunch mode.

Record multiple audio takes — Logic Pro X

When you’re recording, you can record multiple versions, or takes, of a phrase or section in quick succession. Take recording can be helpful especially when you’re improvising a lead or solo part and want to capture several versions while you’re feeling inspired.

⇧ SHIFT – ⌃ CONTROL – ⌥ OPTION – ⌘ COMMAND

- Global Commands
Select Previous Section for Realtime Comping ⌃⌥⇧7⃣

- Main Window Tracks and Various Editors
Snap Quick Swipe Comping On/Off

- Main Window Tracks
Rename Take or Comp ⇧T
Delete Take or Comp ⌥⇧⌫
Export Active Take or Comp to New Track
Move Active Take or Comp to New Track
Toggle Take Folder Quick Swipe Comping Mode ⌥Q
Create New Comp
Select Previous Take or Comp ⌥⇧↑
Select Next Take or Comp ⌥⇧↓
Slice at Comp Section Borders
Trim to Active Comp Sections

Nudge Region/Event Length Left by SMPTE Frame — Logic Pro X keyboard command of the day

Logic Pro X keyboard command of the day. #LogicProX @StudioIntern1

  Nudge Region/Event Length Left by SMPTE Frame

I was looking for this command (in milliseconds) the other day and couldn’t find it. Sometimes we need to have the length adjusted just a tiny bit. It would be very nice if there was a way to lengthen/shorten a region from the beginning as opposed to the end.

Resize regions in the Tracks area — Logic Pro X

You can shorten both audio and MIDI regions so that only part of the region plays. You can lengthen MIDI regions to add silence to the beginning or end of the region. In addition, you can resize the common edge of two adjacent regions to control the transition between them and remove overlaps.

⇧ SHIFT – ⌃ CONTROL – ⌥ OPTION – ⌘ COMMAND

- Main Window Tracks and Various Editors
Nudge Region/Event Position Right by Nudge Value ⌥→
Nudge Region/Event Position Left by Nudge Value ⌥←
Nudge Region/Event Position Right by Tick
Nudge Region/Event Position Left by Tick
Nudge Region/Event Position Right by Division
Nudge Region/Event Position Left by Division
Nudge Region/Event Position Right by Beat
Nudge Region/Event Position Left by Beat
Nudge Region/Event Position Right by Bar
Nudge Region/Event Position Left by Bar
Nudge Region/Event Position Right by SMPTE Frame
Nudge Region/Event Position Left by SMPTE Frame
Nudge Region/Event Position Right by SMPTE Bit
Nudge Region/Event Position Left by SMPTE Bit
Nudge Region/Event Position Right by 1/2 SMPTE Frame
Nudge Region/Event Position Left by 1/2 SMPTE Frame
Nudge Region/Event Position Right by 5 SMPTE Frames
Nudge Region/Event Position Left by 5 SMPTE Frames
Nudge Region/Event Position Right by Sample
Nudge Region/Event Position Left by Sample
Nudge Region/Event Position Right by 1 ms
Nudge Region/Event Position Left by 1 ms
Nudge Region/Event Position Right by 10 ms
Nudge Region/Event Position Left by 10 ms
Nudge Region/Event Length Right by Nudge Value ⌥⇧→
Nudge Region/Event Length Left by Nudge Value ⌥⇧←
Nudge Region/Event Length Right by Tick
Nudge Region/Event Length Left by Tick
Nudge Region/Event Length Right by Division
Nudge Region/Event Length Left by Division
Nudge Region/Event Length Right by Beat
Nudge Region/Event Length Left by Beat
Nudge Region/Event Length Right by Bar
Nudge Region/Event Length Left by Bar
Nudge Region/Event Length Right by SMPTE Frame
Nudge Region/Event Length Left by SMPTE Frame
Nudge Region/Event Length Right by SMPTE Bit
Nudge Region/Event Length Left by SMPTE Bit
Nudge Region/Event Length Right by 1/2 SMPTE Frame
Nudge Region/Event Length Left by 1/2 SMPTE Frame
Nudge Region/Event Length Right by 5 SMPTE Frames
Nudge Region/Event Length Left by 5 SMPTE Frames
Nudge Region/Event Length Right by Sample
Nudge Region/Event Length Left by Sample
Nudge Region/Event Length Right by 1 ms
Nudge Region/Event Length Left by 1 ms
Nudge Region/Event Length Right by 10 ms
Nudge Region/Event Length Left by 10 ms

Create Group for Selected Channel Strips — Logic Pro X keyboard command of the day

Logic Pro X keyboard command of the day. #LogicProX @StudioIntern1

  Create Group for Selected Channel Strips

This goes right in there with yesterday’s ‘Create Track Stack for Selected Channel Strips’. Places all of the selected channel strips in a group.

Groups inspector — Logic Pro X

You use the Groups inspector to define the behavior of each Mixer group. The Groups inspector appears in the Track inspector when one or more groups have been created, and it can be opened as a floating window as well. It contains the following settings:

Remember the group “clutch” ⇧G

⇧ SHIFT – ⌃ CONTROL – ⌥ OPTION – ⌘ COMMAND

Create Track Stack for Selected Channel Strips — Logic Pro X keyboard command of the day

Logic Pro X keyboard command of the day. #LogicProX @StudioIntern1

  Create Track Stack for Selected Channel Strips

Good thing to know. I may change my workflow and use this command.

When I create a project to mix a recording I gather tracks and assign them to AUX channels. Once I have all of the tracks properly assigned I move the tracks together (so I can see) and create a summing stack. The summing stack uses an AUX, the one that the tracks are assigned to.

I can do this from the mixer window, which might be more convenient, especially if I want to put the tracks into a Group as well.

This command only seems to work from the Mixer window. It appears dimmed when working with the Mixer view in the Arrange window.

⇧ SHIFT – ⌃ CONTROL – ⌥ OPTION – ⌘ COMMAND

Toggle Automation Quick Access ⌃⌥⌘A — Logic Pro X keyboard command of the day

Logic Pro X keyboard command of the day. #LogicProX @StudioIntern1

  Toggle Automation Quick Access    ⌃⌥⌘A

This is handy. When Automation Quick Access is “on” I can use the selected controller (buttons on my nanoKEY) to adjust selected automation. Nice to know.

Write track automation with external controllers — Logic Pro X

The Automation Quick Access (AQA) feature makes track automation extremely fast and simple if you only have one hardware MIDI controller available—one fader on your MIDI keyboard, or just the modulation wheel, for example. You can use this single hardware controller to automate the currently active automation parameter of the selected track in the main window.

⇧ SHIFT – ⌃ CONTROL – ⌥ OPTION – ⌘ COMMAND