link3317 link3318 link3319 link3320 link3321 link3322 link3323 link3324 link3325 link3326 link3327 link3328 link3329 link3330 link3331 link3332 link3333 link3334 link3335 link3336 link3337 link3338 link3339 link3340 link3341 link3342 link3343 link3344 link3345 link3346 link3347 link3348 link3349 link3350 link3351 link3352 link3353 link3354 link3355 link3356 link3357 link3358 link3359 link3360 link3361 link3362 link3363 link3364 link3365 link3366 link3367 link3368 link3369 link3370 link3371 link3372 link3373 link3374 link3375 link3376 link3377 link3378 link3379 link3380 link3381 link3382 link3383 link3384 link3385 link3386 link3387 link3388 link3389 link3390 link3391 link3392 link3393 link3394 link3395 link3396 link3397 link3398 link3399 link3400 link3401 link3402 link3403 link3404 link3405 link3406 link3407 link3408 link3409 link3410 link3411 link3412 link3413 link3414 link3415 link3416 link3417 link3418 link3419 link3420 link3421 link3422 link3423

Add Region ⌃R — Logic Pro X keyboard command of the day

Logic Pro X keyboard command of the day. #LogicProX @StudioIntern1

  Add Region    ⌃R

Create a region for the selected audio. I still haven’t figured out the utility of having multiple, identical regions in the Project Audio.

I need to experiment with “Delete sections of audio files that are no longer used in the project”

Add and delete audio files — Logic Pro X

When you add an audio file to your project, Logic Pro automatically creates a region that encompasses the entire file length. You can create as many regions as you like from the same audio file. There are no length limitations to regions, as long as they don’t exceed the length of the source audio file. Creating multiple regions from the same audio file is beneficial for many tasks—using different portions of a vocal take that spans the length of the project, for example.

⇧ SHIFT – ⌃ CONTROL – ⌥ OPTION – ⌘ COMMAND

Project Information… ⌥⌘I — Logic Pro X keyboard command of the day

Logic Pro X keyboard command of the day. #LogicProX @StudioIntern1

  Project Information…    ⌥⌘I

All of the important system-level details about the project. I’m not buying the words about project corruption due to memory or drivers…that’s behavior that happened 15 years ago, not so much today.

View project information and reorganize memory — Logic Pro X

In the Project Information window, you can view the number of regions and other objects in a project, the number of different MIDI events, and the amount of memory they use.

⇧ SHIFT – ⌃ CONTROL – ⌥ OPTION – ⌘ COMMAND

Logic Pros: One-click Logic arrangement tricks- 9to5Mac

Logic Pros: One-click Logic arrangement tricks- 9to5Mac

Today we are showcasing some over-looked Logic arrangement tricks. Prying apart a project’s regions in order to make alterations, injecting a gap for a new part or even just moving an entire section of your piece around can be tedious. However, Logic Pro X’s underrated Toolbar houses a number of functions that can get many of these tasks done with a simple selection and a one-click command.

Transpose Region/Event +1 Semitone or Nudge Automation up 1 Step ⌥↑ — Logic Pro X keyboard command of the day

Logic Pro X keyboard command of the day. #LogicProX @StudioIntern1

  Transpose Region/Event +1 Semitone or Nudge Automation up 1 Step    ⌥↑

Raise the pitch of the selected region or event. Works in the Score Editor, Piano Roll, Arrange window. For automation the step is determined by the parameter being automated. Volume is .1 dB. Pan is -63 to +64. Basically the parameter gets 128 values with zero as the center.

Using the nudge keys can help fine-tuning automation curves. Changing pitch is obviously a useful tool.

Change the pitch, duration, and velocity of notes — Logic Pro X

You can change the pitch and duration (length) of selected notes in the Score Editor, as well as their MIDI velocity. The Velocity value signifies how hard the key was struck when the note was recorded. It often corresponds to the volume of the note when played back, but can control other parameters as well.

I can’t seem to locate any specific documentation about using these commands to nudge automation.

Add and adjust automation points — Logic Pro X

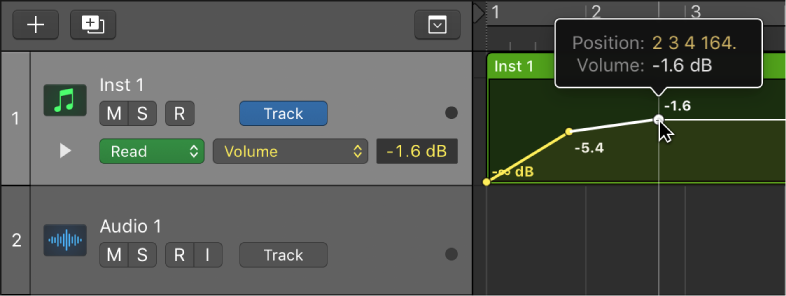
To create changes over time to volume, pan, and effects settings, you add automation points to a track’s automation curve at different places, and then adjust the automation points so the value of the setting changes. You can adjust automation points by moving them up or down to a new value or by moving them left or right to a new point in the timeline. Numerical values are displayed alongside each automation point. You can also raise or lower the value of MIDI parameters associated with notes in instrument tracks or Drummer tracks. Note and numerical values are displayed alongside each MIDI data point. You can also add automation points at selection area or region borders.

⇧ SHIFT – ⌃ CONTROL – ⌥ OPTION – ⌘ COMMAND

Command    Key Touch Bar
- Main Window Tracks and Various Editors
Transpose Region/Event +1 Semitone or Nudge Automation up 1 Step ⌥↑
Transpose Region/Event -1 Semitone or Nudge Automation down 1 Step ⌥↓
Transpose Region/Event +12 Semitones or Nudge Automation up 10 Steps ⌥⇧↑
Transpose Region/Event -12 Semitones or Nudge Automation down 10 Steps ⌥⇧↓

- Views Showing Automation
Nudge Automation up 1 Step
Nudge Automation down 1 Step
Nudge Automation up 10 Steps
Nudge Automation down 10 Steps

You’ve Re-Organized And Customized Logic’s Plug-In Manager — Here’s How To Back It Up | Logic Pro

You’ve Re-Organized And Customized Logic’s Plug-In Manager — Here’s How To Back It Up | Logic Pro

Saturday 08.24.19
Posted by Eli Krantzberg

But how can you back up this new plug-in folder layout? What happens if you have to reinstall Logic or your hard drive crashes, or you are migrating to a new computer? Fortunately, there is a simple way to back up the results of your re-organization. All the information resides in a database folder within your User folder. Here is the exact location:

User —> Music —> Audio MIDI Apps —> Databases —> Tags