Logic Pro | D is For Decay, Density, & Delay and How They Are All Connected in Logic’s ChromaVerb

Logic Pro | D is For Decay, Density, & Delay and How They Are All Connected in Logic’s ChromaVerb:

Deciding how long a reverb tail to use in your mixes encompasses a lot of variables. What is the tempo of the song? How busy are the parts? Are there a lot of open spaces between phrases, or are they densely packed together? Do you want to convey a sense of an intimate closer space, or a larger distant space? These are just some of the considerations that play an important role in communicating the intended emotion of the music.
1/3 Page Left — Logic Pro X keyboard command of the day

Logic Pro X keyboard command of the day. #LogicProX @StudioIntern1

  1/3 Page Left

Move the visible score 1/3 of a page left. OK.

Maybe from a time when monitors were small and scores were large.

OH! MY! If I highlight one or more commands in the key commands window I can copy and past the list of selected commands. I have only ever done that with all of the commands…

Score Editor overview — Logic Pro X:

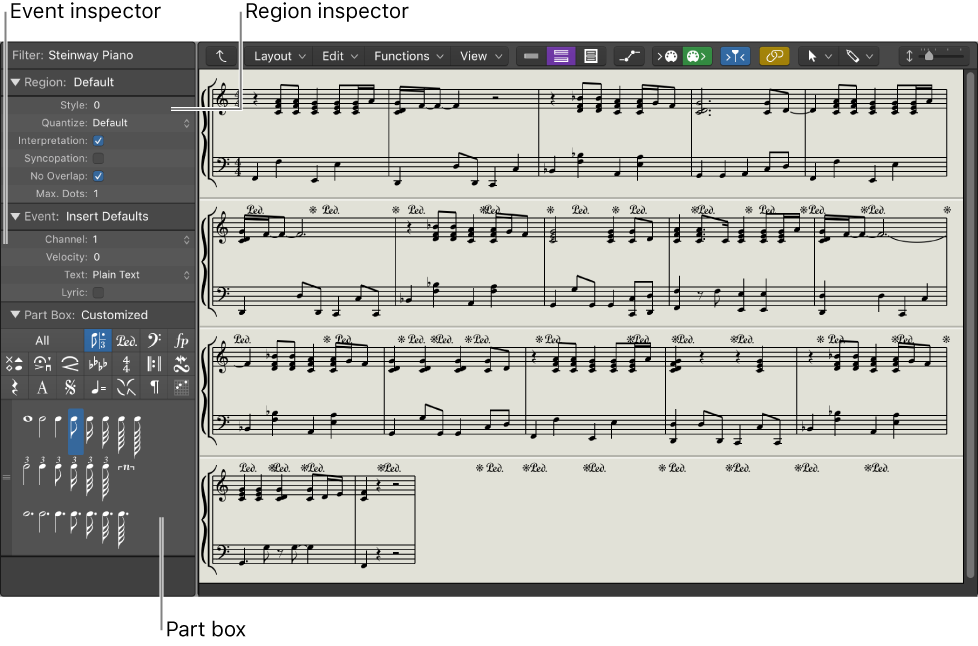
The Score Editor can display a single MIDI region or software instrument track. In the Score Editor, each track appears as a separate staff. Notes, rests, and other musical events in the MIDI regions on the track are displayed in standard musical notation.

⇧ SHIFT – ⌃ CONTROL – ⌥ OPTION – ⌘ COMMAND

Command    Key Touch Bar
- Global Commands
Page Setup…

- Various Windows
Page Up ⇞
Page Down ⇟
Page Left ↖
Page Right ↘
1/3 Page Left ⌃⌥⇧⌘⌦
1/3 Page Right
1/8 Page Left
1/8 Page Right
Page Top
Page Bottom
Page Left-Most
Page Right-Most

- Score Editor
Page View ⌃P
Show/Hide Page Rulers ⌃⇧R ⇧2⃣
Go to Page… ⌃/

Minor scale — Wikipedia

Minor scale — Wikipedia:

In music theory, the term minor scale refers to three scale patterns — the natural minor scale (or Aeolian mode), the harmonic minor scale, and the melodic minor scale (ascending or descending)[1] — rather than just one as with the major scale.

I was listening to a podcast yesterday. There were two speakers, both claim to have been classically-trained with degrees in music theory and/or music performance.

Neither of them could “speak” the difference between the “minor” scales

  • natural
  • harmonic — seventh degree raised semitone — leading tone
  • melodic — raised sixth and seventh degree ascending, not raised descending

You’ll know it when you hear it.

Roman numeral analysis — Wikipedia

Roman numeral analysis — Wikipedia:

In music, Roman numeral analysis uses Roman numerals to represent chords. The Roman numerals (I, II, III, IV, …) denote scale degrees (first, second, third, fourth, …); used to represent a chord, they denote the root note on which the chord is built. For instance, III denotes the third degree of a scale or the chord built on it. Generally, uppercase Roman numerals (such as I, IV, V) represent major chords while lowercase Roman numerals (such as i, iv, v) represent minor chords (see Major and Minor below for alternative notations); elsewhere, upper-case Roman numerals are used for all chords.[2] In Western classical music in the 2000s, Roman numeral analysis is used by music students and music theorists to analyze the harmony of a song or piece.

A great place to find notation conventions. NNS gives me such grief…

Select MIDI Channel Strips ⇧E — Logic Pro X keyboard command of the day

Logic Pro X keyboard command of the day. #LogicProX @StudioIntern1

  Select MIDI Channel Strips    ⇧E

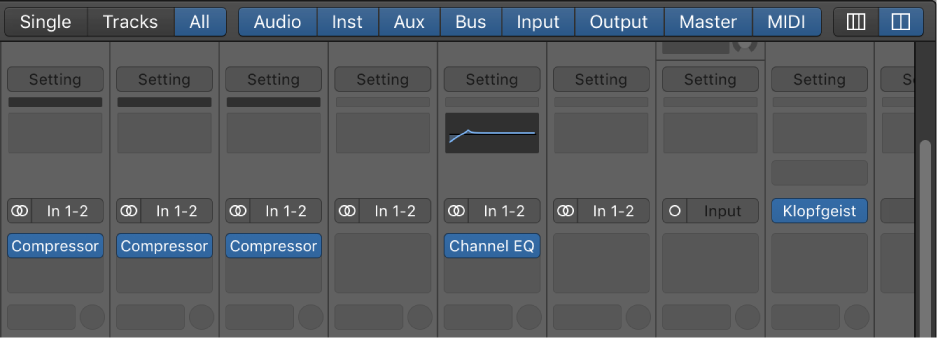
Select MIDI channels in the mixer window “all” or “tracks” view.

Pressing this confuses me when the X-Touch changes state. My current template does have a MIDI track, but only so when I export song information I get a marker track along with other pertinent data.

I have to spend more time adjusting the views of the mixer, and following what happens with my tools.

Mixing overview — Logic Pro X:

When you mix a project, you balance the different parts and blend them into a cohesive whole. You can also add effects to alter the sound, use routing and grouping to control the signal flow, and use automation to create dynamic changes in your project over time. You do this in the Mixer, which opens below the Tracks area or as a separate window.

⇧ SHIFT – ⌃ CONTROL – ⌥ OPTION – ⌘ COMMAND