13 Tips for Using References While Mixing

13 Tips for Using References While Mixing

by Nick Messitte, iZotope Contributor July 16, 2019

Referencing mixes in Ozone 8
There are plenty of articles telling you which reference mixes to use, as different genres demand different approaches to mixing. Indeed, iZotope places hefty importance on referencing—an entire referencing section is built into Ozone 8. But how should you reference? When should you reference? What should you listen for while referencing? And how do you select the best references for your particular track, regardless of genre?

6 Ways to Tame a Bright Mix

‘[6 Ways to Tame a Bright Mix](https://www.izotope.com/en/blog/mixing/6-ways-to-tame-a-bright-mix.html)’

6 Ways to Tame a Bright Mix

by Geoff Manchester, iZotope Video Manager July 17, 2019

Taming a bright mix
There’s nothing worse than an overly bright mix. Sibilant vocals, splashy drums, resonant synths, fizzy guitars—too much top and your mix will burn ears, too little and it will sound lifeless.

Toggle Vertical Auto Zoom — Logic Pro X keyboard command of the day

Logic Pro X keyboard command of the day. #LogicProX @StudioIntern1

  Toggle Vertical Auto Zoom

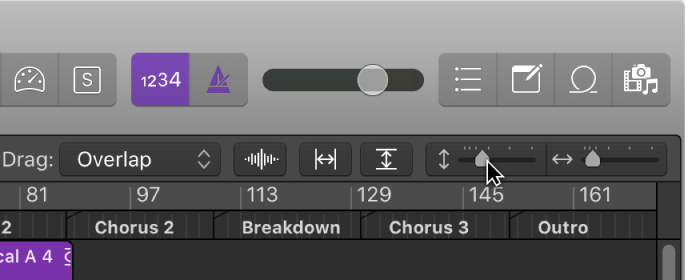
Available as a button in the track displays. I zoom in and out (vertical and horizontal) a bit. I should do it more. I haven’t really spent the time learning zooming, but have found a great use for keypad numbers (I rescued them from jumping to numbered marker positions).

The 3 saved zoom settings are KP1,KP2, and KP3. Setting them is accomplished with ⌃KP1, ⌃KP2, and ⌃KP3. This makes the workflow so much easier!

Zoom windows — Logic Pro X

When you zoom in or out, the top-left (and selected) event or region remains in the visible area of the screen. If no selected region or event is visible, zooming is centered around the playhead. If the playhead isn’t visible, the current center of the window is retained.

⇧ SHIFT – ⌃ CONTROL – ⌥ OPTION – ⌘ COMMAND

Command    Key Touch Bar
- Global Commands
Zoom Window ⌃⌘M

- Various Windows
Set Zoom Tool
Zoom Horizontal Out ⌘←
Zoom Horizontal In ⌘→
Zoom Vertical Out ⌘↑
Zoom Vertical In ⌘↓
Recall Zoom 1 1
Recall Zoom 2 2
Recall Zoom 3 3
Save as Zoom 1 ⌃1
Save as Zoom 2 ⌃2
Save as Zoom 3 ⌃3
Zoom to fit Selection vertically and horizontally, store Navigation Snapshot
Zoom to fit Selection horizontally, store Navigation Snapshot
Zoom to fit Selection vertically, store Navigation Snapshot
Zoom to fit Locators, store Navigation Snapshot ⌃⇧Z
Zoom to fit All Contents, store Navigation Snapshot ⇧⌘F12
Toggle Zoom to fit Selection or All Contents Z
Toggle Horizontal Auto Zoom
Toggle Vertical Auto Zoom

- Main Window Tracks
Individual Track Zoom In ⌃⌥⌘↓
Individual Track Zoom Out ⌃⌥⌘↑
Toggle Individual Track Zoom ⌃⌥⌘Z
Toggle Zoom Focused Track ⌃Z
Reset Individual Track Zoom ⌃⌥⌘⌫
Individual Track Zoom Reset for All Tracks
Waveform Vertical Zoom x 1 (Normal)
Waveform Vertical Zoom x 2
Waveform Vertical Zoom x 4
Waveform Vertical Zoom x 8
Waveform Vertical Zoom Out ⌘-
Waveform Vertical Zoom In ⌘=
Toggle Waveform Vertical Zoom

- Smart Tempo Editor
Zoom All ↑

- Tools Menu
Zoom Tool Y

Snap Mode: Bar — Logic Pro X keyboard command of the day

Logic Pro X keyboard command of the day. #LogicProX @StudioIntern1

  Snap Mode: Bar

Snap to the nearest bar on the grid. I find this best for loops and setting up markers/arrangements. I always forget that the playhead uses the snap value.

Snap items to the grid — Logic Pro X

The Tracks area includes a grid that helps you align regions, automation points, and other items with the time divisions in the ruler. When you perform any of the following actions, the items move according to the current Snap value:

Moving and resizing regions

Moving the playhead

Adjusting the cycle region

Dragging loops to the Tracks area

Moving automation points in automation curves

⇧ SHIFT – ⌃ CONTROL – ⌥ OPTION – ⌘ COMMAND

Show/Hide Beat Mapping Track Only — Logic Pro X keyboard command of the day

Logic Pro X keyboard command of the day. #LogicProX @StudioIntern1

  Show/Hide Beat Mapping Track Only

I have not figured out the difference between “Show/Hide Beat Mapping Track” and the “… Only” version of the command…

In the Arrange window the Beat Mapping track is toggled. In the Audio Editor (Track) there is a difference. The “only” version of the command places the Beat Mapping track above the audio. The other version shows the Arrangement, Marker, Signature, and Tempo tracks as well.

Beat mapping overview — Logic Pro X

Beat mapping lets you map notes that don’t follow a strict tempo with beats in the ruler. When you play the project, the project tempo adjusts so that the beat-mapped notes are aligned with beats in the ruler.

⇧ SHIFT – ⌃ CONTROL – ⌥ OPTION – ⌘ COMMAND