link2247 link2248 link2249 link2250 link2251 link2252 link2253 link2254 link2255 link2256 link2257 link2258 link2259 link2260 link2261 link2262 link2263 link2264 link2265 link2266 link2267 link2268 link2269 link2270 link2271 link2272 link2273 link2274 link2275 link2276 link2277 link2278 link2279 link2280 link2281 link2282 link2283 link2284 link2285 link2286 link2287 link2288 link2289 link2290 link2291 link2292 link2293 link2294 link2295 link2296 link2297 link2298 link2299 link2300 link2301 link2302 link2303 link2304 link2305 link2306 link2307 link2308 link2309 link2310 link2311 link2312 link2313 link2314 link2315 link2316 link2317 link2318 link2319 link2320 link2321 link2322 link2323 link2324 link2325 link2326 link2327 link2328 link2329 link2330 link2331 link2332 link2333 link2334 link2335 link2336 link2337 link2338 link2339 link2340 link2341 link2342 link2343 link2344 link2345 link2346 link2347 link2348 link2349 link2350 link2351 link2352 link2353

Backup File(s) ⌃B — Logic Pro X keyboard command of the day

Logic Pro X keyboard command of the day. #LogicProX @StudioIntern1

  Backup File(s)    ⌃B

In the Audio File Editor. Audio files are large and not so easy to make into discrete chunks. Making a backup copy before altering the audio is a very good idea.

The typical “hard” change that I will make to an audio file is to reduce the gain when the maximum gain is 0.0. Logic does not work well with “normalized” audio tracks with regard to adjusting gain in a non-destructive manner (region gain).

This command is contained in a “local” menu, so some sort of editor or list window. It’s found in the

Project Audio Browser

Select an audio file at the “top” level. Choose “Backup File(s)”. A copy of the file is created in the same location as the original. A file named

 12-8 Acoustic Strum 01.caf

is duplicated as

 12-8 Acoustic Strum 01.caf dup

The duplicated files do not show up in the browser list. If your project is a “bundle” you have to hunt down the project and dive in via the Finder.

I’m not sure about this yet.

The same function, different command name (‘Create Backup’) exists in the Audio File Editor. A backup file gets created with the same trailing ‘dup’. There is a ‘Revert to Backup’ command that will (probably) replace the current audio file with the singular backup file. Apparently only one backup can be created in this manner.

I guess it’s probably a good idea to create a simple backup before doing any kind of processing on the file itself. It is destructive editing, so….

Perform manual backups — Logic Pro X

Although the Undo History and standard Undo functions are available, try to get in the habit of creating backups before processing or editing. This provides a safety copy of your audio recordings in case something unexpected happens, due to a processing error or other unforeseen event.

⇧ SHIFT – ⌃ CONTROL – ⌥ OPTION – ⌘ COMMAND
Show/Hide Marker Track ⇧⌘K — Logic Pro X keyboard command of the day

Logic Pro X keyboard command of the day. #LogicProX @StudioIntern1

  Show/Hide Marker Track    ⇧⌘K

Reveal the Marker track at the top of the Arrange window below the rulers. With the Marker track visible you can create markers — click with the Scissors or Pencil tools, and edit the text of markers using the Text tool.

I like to create markers using the option-single-quote keypress to mark places of interest in the music. With the Marker list open text can be added to the marker describing the area of interest. Significant amount of text can be added to the marker. Tested to in excess of 16,000 characters. The text is stored as RTF.

NB Project Notes and Track Notes can contain images which can be annotated using the markup tools. Very handy if you need to snap a picture of some external gear, or just for a fine picture of a studio 😉

⇧ SHIFT – ⌃ CONTROL – ⌥ OPTION – ⌘ COMMAND

Move Locators Forward by 1 Bar — Logic Pro X keyboard command of the day

Logic Pro X keyboard command of the day. #LogicProX @StudioIntern1

  Move Locators Forward by 1 Bar

Change the locator positions forward by one bar.

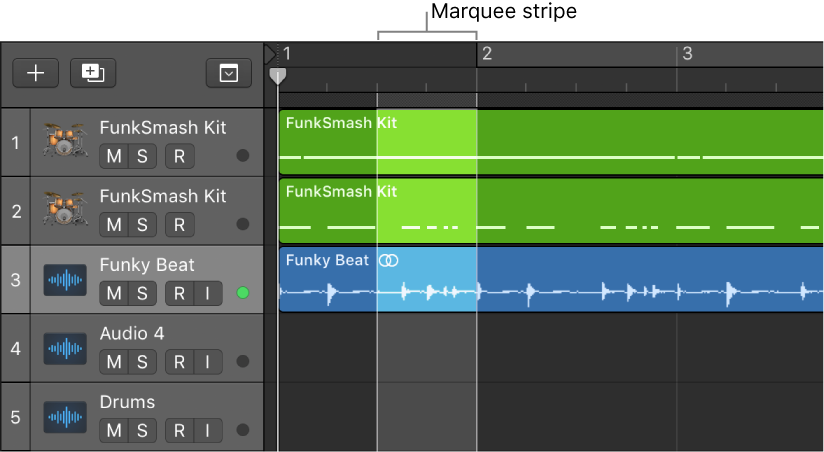
Setting the locators based on the Marquee selection makes a lot of sense for my workflow. I need to remember to keep the Marquee ruler visible. Many commands are available from the contextual menu (control-click) on the Marquee menu.

Use the cycle area — Logic Pro X

By Marquee Selection: The locators (and the cycle area) are set to the borders of the marquee selection in the marquee stripe.

Select parts of regions in the Tracks area — Logic Pro X

Control-click the marquee stripe, then choose Set Locators by Regions/Events/Marquee from the shortcut menu.

⇧ SHIFT – ⌃ CONTROL – ⌥ OPTION – ⌘ COMMAND

Convert Loops to Regions ⌃L — Logic Pro X keyboard command of the day

Logic Pro X keyboard command of the day. #LogicProX @StudioIntern1

  Convert Loops to Regions    ⌃L

When you convert loops to regions you can edit any of the occurrences of the loop to make changes. If you edit the loop without conversion every copy of the loop changes.

⇧ SHIFT – ⌃ CONTROL – ⌥ OPTION – ⌘ COMMAND

Forward by Transient ⌃. — Logic Pro X keyboard command of the day

Logic Pro X keyboard command of the day. #LogicProX @StudioIntern1

  Forward by Transient   ⌃.

Handy. Move the playhead forward to the next transient. Very useful when I am trying to align tracks made on different recording devices.

⇧ SHIFT – ⌃ CONTROL – ⌥ OPTION – ⌘ COMMAND