Show/Hide Type and Number Label — Logic Pro X keyboard command of the day

Logic Pro X keyboard command of the day. #LogicProX @StudioIntern1

  Show/Hide Type and Number Label

Display channel type and number in mixer windows. I don’t use this much at all. My typical track coloring and arrangement makes it clear what type of channel I am looking at. I do turn it on in the “Full Mixer” screenset for completeness.

I haven’t really found a use for knowing the actual number of a channel.

blah

⇧ SHIFT – ⌃ CONTROL – ⌥ OPTION – ⌘ COMMAND
Attach Symbol: Staccato — Logic Pro X keyboard command of the day

Logic Pro X keyboard command of the day. #LogicProX @StudioIntern1

  Attach Symbol: Staccato

Add a staccato marking to a note in the score. The behavior of the staccato marking is controlled in the Project Score Preferences — MIDI Meaning. You can set the length and velocity of the notes that are marked with the symbol.

Add notes and other symbols to multiple regions — Logic Pro X

You can add notes and other score symbols to multiple selected regions at the same time position. This makes it easy to double parts in unison, for example, or add the same dynamic marks to multiple instrument parts playing together. Adding symbols to multiple selected regions works for all score symbols represented by an event, including notes, dynamic marks, clefs, pedal markings, and even text.

⇧ SHIFT – ⌃ CONTROL – ⌥ OPTION – ⌘ COMMAND

Open Install — Logic Pro X keyboard command of the day

Logic Pro X keyboard command of the day. #LogicProX @StudioIntern1

  Open Install

Open the ‘Install’ panel for Control Surfaces. The menu command is local to the Control Surfaces ‘Setup…’ menu. Not really a candidate for automation.

⇧ SHIFT – ⌃ CONTROL – ⌥ OPTION – ⌘ COMMAND

Set Rounded Locators and Play — Logic Pro X keyboard command of the day

Logic Pro X keyboard command of the day. #LogicProX @StudioIntern1

  Set Rounded Locators and Play

I have claimed that this is a more useful command than ‘Set Locators and Play’. Rounds the locators to the nearest barlines and starts playback.

Use the Marquee tool to highlight part of a region, press ⇧⌃⌥⌘UC and off we go. I have programmed the keypress, add the ‘C’ and Cycle is turned on.

Use the cycle area — Logic Pro X

Set Rounded Locators and Play and Set Rounded Locators and Record: Rounds the position of the locators to the barline that is nearest to the beginning and end points of the selected regions or events, and starts playback or recording.

⇧ SHIFT – ⌃ CONTROL – ⌥ OPTION – ⌘ COMMAND

Create 2 Track Automation Points at Region Borders ⌃⇧⌘2 — Logic Pro X keyboard command of the day

Logic Pro X keyboard command of the day. #LogicProX @StudioIntern1

  Create 2 Track Automation Points at Region Borders    ⌃⇧⌘2

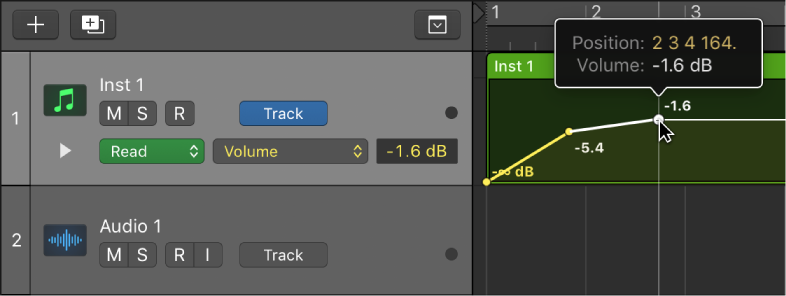
This creates automation points that effectively give you an automation ‘curve’ for the region selected, and an automation ‘curve’ for the before-region and the after-region. Basically you can simply adjust the automation ‘inside’ the region.

The ‘Automate mix and effect settings’ section of the manual is a very good read.

Add and adjust automation points — Logic Pro X

To add two automation points at each region border: Select the region, then choose Mix > Create Track Automation > Create 2 Automation Points at Region Borders.

This pointer to a video from Eli Krantzberg is very enlightening about automation points.

Logic Pro Expert | Learn The Secret Handshake and Become a Member of Logic’s Hidden Automation Key Combination Elite — learning at the elbow of the internet

⇧ SHIFT – ⌃ CONTROL – ⌥ OPTION – ⌘ COMMAND