Select Next Take or Comp ⌥⇧↓ — Logic Pro X keyboard command of the day

Logic Pro X keyboard command of the day. #LogicProX @StudioIntern1

  Select Next Take or Comp   ⌥⇧↓

Unheard of in my days of making music. Now, choose the best parts and put them to good use. The differences between performances and productions…

Comping overview — Logic Pro X

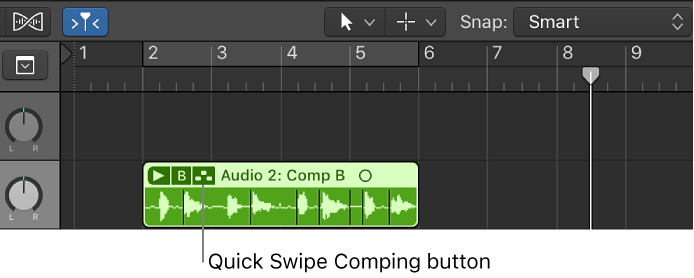
Imagine a scenario in which you have recorded multiple performances of a vocal solo over the same section of a project. You can select the best parts from the different performances and piece them together into a single master take. This is the process of “making a composite take”—commonly referred to as comping—and is achieved by using the Quick Swipe Comping feature. You can also drag or cut the contents of take folders.

⇧ SHIFT – ⌃ CONTROL – ⌥ OPTION – ⌘ COMMAND

Toggle Current Track Automation Write/Read — Logic Pro X keyboard command of the day

Logic Pro X keyboard command of the day. #LogicProX @StudioIntern1

  Toggle Current Track Automation Write/Read

Switch between Read automation and Write automation.

Read automation performs automation moves. Turning automation off is like muting the actions.’

Write automation writes over (replaces) any automation currently on the track. This is not a typical command.

When switching to Write automation Logic issues the warning

“Write” mode erases multiple parameters in one go without touching anything!
In most cases it is better to use “Latch” or “Touch”.

and waits for you to confirm what you are doing. The warning is only issued once (per session apparently.) The warning is issued if you create a key command to perform the operation.

Choose automation modes — Logic Pro X

Write: Erases existing automation on the track as the playhead passes over it. Records the new control movement or deletes the existing data if you do nothing.

⇧ SHIFT – ⌃ CONTROL – ⌥ OPTION – ⌘ COMMAND

Next Plug-in Setting — Logic Pro X keyboard command of the day

Logic Pro X keyboard command of the day. #LogicProX @StudioIntern1

  Next Plug-in Setting

Select the next plug-in setting. Lets you easily switch between various settings.

When plug-ins are opened there is a standard “container” with On/Off button, menu of settings, previous/next controls, compare button, and plug-in window controls.

The controls can be hidden by clicking on the horizontal button in the top right corner of the window.

Work in the plug-in window — Logic Pro X

The header area at the top of a plug-in window is common to all plug-ins. You can use it to adjust the size of the window, link plug-in windows when more than one is open, switch the plug-in parameter view, and route side chain signals.

Work with plug-in settings — Logic Pro X

Plug-in settings are stored with the project file and are automatically recalled the next time the project is opened. In the plug-in window, you can load, copy and paste, compare, save, create default, and delete plug-in settings. You can also load, save, and delete plug-in settings in the Library.

⇧ SHIFT – ⌃ CONTROL – ⌥ OPTION – ⌘ COMMAND

Apply Transform User Preset 21 to selected Events — Logic Pro X keyboard command of the day

Logic Pro X keyboard command of the day. #LogicProX @StudioIntern1

  Apply Transform User Preset 21 to selected Events

The MIDI Transform window can be opened from the Window menu, or by entering ‘⌘9’. There are 30 ‘Apply Transform User Preset … to selected Events’.

Use transform sets — Logic Pro X:

1. Choose Create New Transform Set from the Presets pop-up menu.

2. Set conditions and operations.

3. Select the “Hide unused parameters” checkbox. This helps to avoid changes to conditions and operations that aren’t required for (or may disturb) your transform set.

4. Choose New Parameter Set (Number) from the Presets pop-up menu. Enter a new name for your transform set.

This transform set now appears at the bottom of the Presets list in all MIDI Transform windows for this project. You should consider saving your user transform sets in one or more template projects. This way, they are always available to you in all future projects.

Tip: Renaming an existing transform set creates a new transform set that is identical to the original. The existing (source) transform set is retained.

⇧ SHIFT – ⌃ CONTROL – ⌥ OPTION – ⌘ COMMAND