Move Selected Regions to Focused Track ⌃⇧T — Logic Pro X keyboard command of the day

Logic Pro X keyboard command of the day. #LogicProX @StudioIntern1

  Move Selected Regions to Focused Track    ⌃⇧T

Moves regions to the selected track. The term “focused” track is far more accurate than “selected” since it is possible to have multiple tracks (or channel strips for that matter) selected. The visual indicator in the track numbers (the focused track is highlighted) is very useful. I need to pay attention to these kinds of details.

The focus for a command is outlined in blue — required knowledge when viewing an Arrange window with tracks, mixer, and lists all visible. Use the TAB key to change focus between the areas on the screen.

Some definitions are good to have

focused – Select tracks — Logic Pro X

You can select multiple tracks. When multiple tracks are selected, the first selected track is the focused track. Some operations, such as choosing a patch in the Library, only affect the focused track when multiple tracks are selected.

⇧ SHIFT – ⌃ CONTROL – ⌥ OPTION – ⌘ COMMAND
Show/Hide Environment ⌃⌘0 — Logic Pro X keyboard command of the day

Logic Pro X keyboard command of the day. #LogicProX @StudioIntern1

  Show/Hide Environment  ⌃⌘0

Toggles the open Environment window. As expected, it behaves in odd ways when multiple Environment windows are open. In my case it closed one window, then the next, and wouldn’t show either window again.

The multiple windows of the same “name” is problematic since it sort of violates the entire windowing scheme of most Mac applications.

⇧ SHIFT – ⌃ CONTROL – ⌥ OPTION – ⌘ COMMAND
Go to Left Locator  — Logic Pro X keyboard command of the day

Logic Pro X keyboard command of the day. #LogicProX @StudioIntern1

  Go to Left Locator    

Move the playhead to the left locator position. I recently wrote about ‘Go to Right Locator’ and enthusiastically assigned the left and right motions to the keys F7 and F9 (rewind and fast forward symbols) on my keyboard.

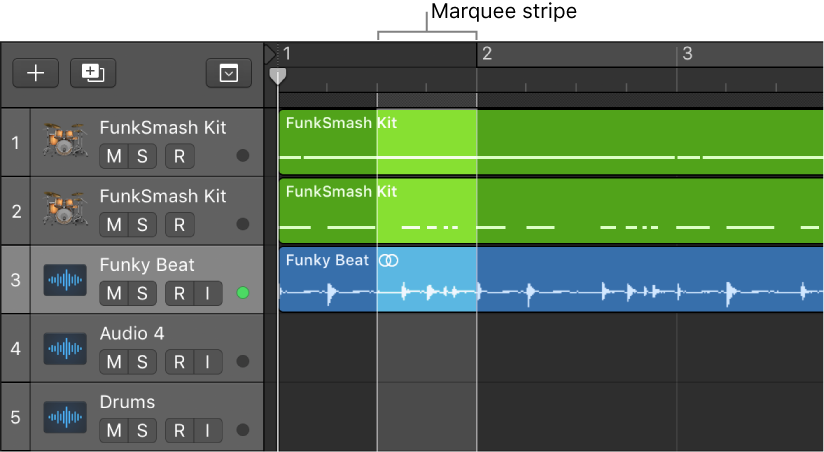
I now have a very nice workflow for zooming in on a section of a track. Use the Marquee tool to select an area (Auto Set Locators enabled), press F7 to move the playhead to the left locator, and press Z to zoom the selection into view. Very handy…

The order of Zoom and Move Playhead can be reversed. The Z(oom) command will zoom the Marquee selection to fill the Arrange window.

It’s kind of fun when my commands of the day randomly fall into place and give me a new perspective on the work.

Auto Set Locators

Go to Right Locator

The Marquee Tool

Select parts of regions in the Tracks area — Logic Pro X

You can select and edit parts of one or more regions, using the Marquee tool or the marquee stripe:

⇧ SHIFT – ⌃ CONTROL – ⌥ OPTION – ⌘ COMMAND

Duplicate Event and Numerical Edit ⌘D — Logic Pro X keyboard command of the day

Logic Pro X keyboard command of the day. #LogicProX @StudioIntern1

  Duplicate Event and Numerical Edit    ⌘D

This command doesn’t appear in any menu. It is listed under the heading “Event Editor” which doesn’t exist in the documentation or any menu. We can find the “Event List” which appears to have all of the commands associated with the “Event Editor”.

Duplicates the selected event(s). Apparently the same as a Copy followed by a Paste.

⇧ SHIFT – ⌃ CONTROL – ⌥ OPTION – ⌘ COMMAND

Apply Control Bar and Display Defaults — Logic Pro X keyboard command of the day

Logic Pro X keyboard command of the day. #LogicProX @StudioIntern1

  Apply Control Bar and Display Defaults

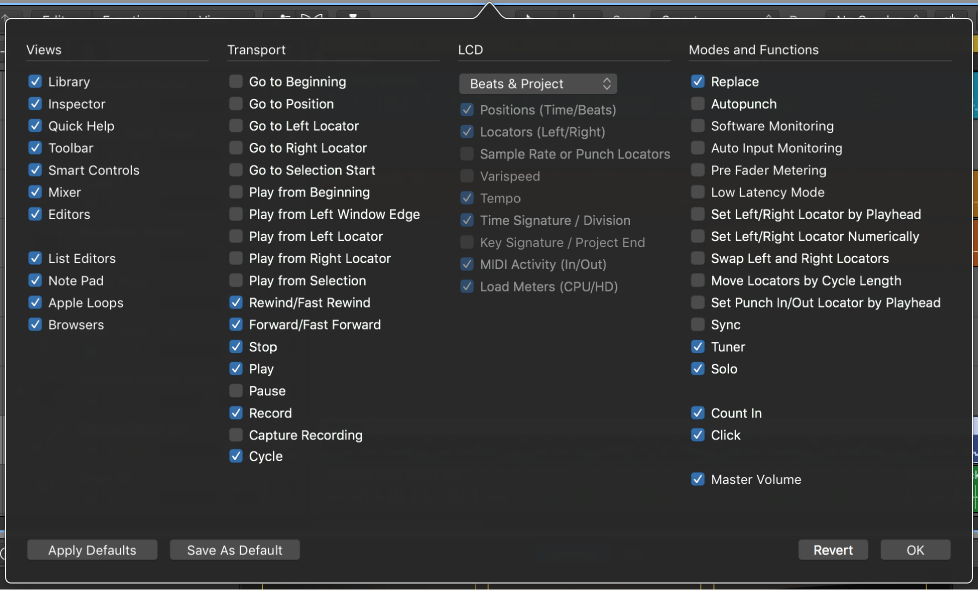
The official name for the area at the top of the main window, and that which is contained in the “Transport Float” window. This does the same thing that clicking on the “Apply Defaults” button at the bottom left of the control bar customization window.

⇧ SHIFT – ⌃ CONTROL – ⌥ OPTION – ⌘ COMMAND