Logic Pro X keyboard command of the day. #LogicProX @StudioIntern1
Add to Tracks… ⌘;
An excellent follow-on to yesterday’s ”Add Audio File’.
Add the selected audio region to the tracks.
⇧ SHIFT – ⌃ CONTROL – ⌥ OPTION – ⌘ COMMAND
text is a tough way to do audio — ⇧ SHIFT — ⌃ CONTROL — ⌥ OPTION — ⌘ COMMAND
Logic Pro X keyboard command of the day. #LogicProX @StudioIntern1
Add to Tracks… ⌘;
An excellent follow-on to yesterday’s ”Add Audio File’.
Add the selected audio region to the tracks.
⇧ SHIFT – ⌃ CONTROL – ⌥ OPTION – ⌘ COMMAND
Logic Pro X keyboard command of the day. #LogicProX @StudioIntern1
Region Automation: Control Change 32
Set the region automation to CC32. With automation being displayed (press ‘A’ on the keyboard) you will typically see “Track” automation. Click on the “Track” button to change to region. There is also an on/off control button as well.
I am not sure of what “Region Automation” is all about. Ahh. Now it makes sense. Sound in space over time. A remarkably complex programming space. I simply need to re-think my programming methods. Parallel programs with function calls tied to time points as opposed to simply being interrupt driven. I need to meditate.
Show automation curves — Logic Pro X:
Before you can add automation points to a track’s automation curves, you need to show the automation curves. Automation curves are displayed as colored curves and points on top of audio and MIDI regions across the track, running the length of the project. You can choose whether to view and edit automation across the track (track-based automation) or only within the track’s regions (region-based automation).
⇧ SHIFT – ⌃ CONTROL – ⌥ OPTION – ⌘ COMMAND

Logic Pro X keyboard command of the day. #LogicProX @StudioIntern1
Add Audio File… ⌃F
Add an audio file to your project. Only active when the Project Browser is visible. A much better path to adding audio files than I usually use. I had been using the Media Browser. The “Finder” interface that we get with “Add Audio File…” is much more familiar and usable.
Add and delete audio files — Logic Pro X
When you add an audio file to your project, Logic Pro automatically creates a region that encompasses the entire file length. You can create as many regions as you like from the same audio file. There are no length limitations to regions, as long as they don’t exceed the length of the source audio file. Creating multiple regions from the same audio file is beneficial for many tasks—using different portions of a vocal take that spans the length of the project, for example.
⇧ SHIFT – ⌃ CONTROL – ⌥ OPTION – ⌘ COMMAND
Overloaded keys…
- Main Window Tracks and Various Editors


Flex/Follow Tempo On/Off ⌃F


- Score Editor


Explode Folders ⌃F


- Project Audio


Add Audio File… ⌃F


- EXS24 Instrument Editor


Load Audio Sample… ⌃F
Logic Pro X keyboard command of the day. #LogicProX @StudioIntern1
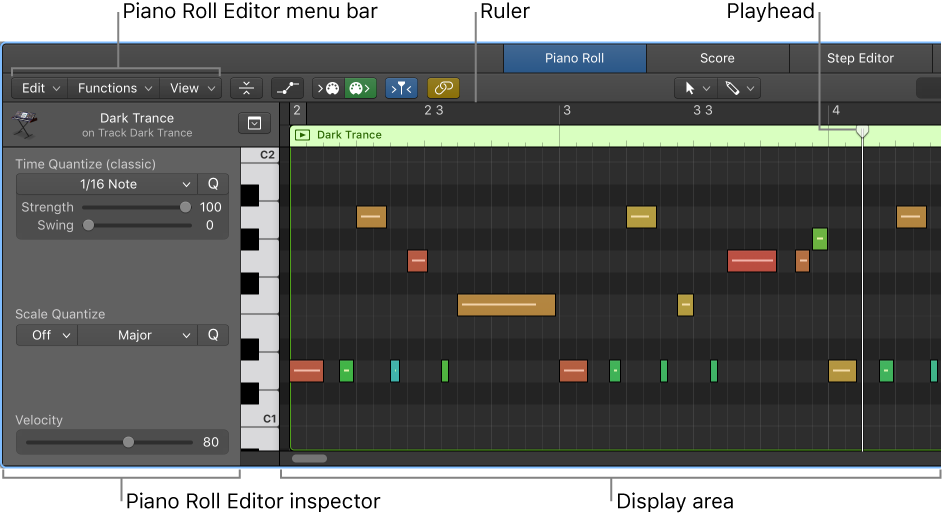
View Mode: One Track
In the Piano Roll editor.
When you have multiple regions selected you can view all of the MIDI notes for all of the regions at the same time. To look at one track choose this view mode. ‘Selected Regions’ will show all the values.
It is particularly handy to choose ‘Collapse Mode’ to show only the MIDI notes that are actually in use. The ‘Collapse Mode’ button is directly to the right of the ‘View’ drop-down menu at the top of the editor.
⇧ SHIFT – ⌃ CONTROL – ⌥ OPTION – ⌘ COMMAND
With more and more people using different DAWs, the need to be able to transfer a project from one DAW to another has grown. In this article we are going to show you how to move projects from one DAW, like Pro Tools, Studio and Logic Pro, to another DAW. In this article we will also cover the pitfalls in the export and import processes and how to overcome them.
Moving projects about. Very important to know how to do this.