I am deep in “historical preservation” mode.
I use Logic. Started with version 10 — I missed a lot of stuff
many amazing things hiding under the covers, but nowhere to be found. No books, no classes, unspoken.
My current path is to visit all of the Sound on Sound magazine Logic articles for version 10 (about 2013 onward). Part of what I hope to discover is how things changed from 9 to 10 (besides the amazing price drop). Once more familiar with what was, go back and peruse Logic 9 techniques, see what’s relevant. Then 8, then 7. Any further back is meh.
I am almost able to tie the Logic/Notator world to the Opcode Vision world in terms of what is actually happening, and what might be possible.
I think the key for me is to think of all of the automation stuff as simply a very capable sequencer that can effect change on audio and MIDI sources over time. That simple. That reproducible.
and to remember that just about everything that Logic can possibly do can be automated. Everything. Instruments, plugins, modify MIDI input, bend MIDI output
to me mixing is like creating a control program to work with “fixed” sources, be they audio files or MIDI sequences.
Mostly the control is a matter of small adjustment made once, un-changing over time. When I grok the change-over-time function then my programmer kicks in. I know how to do that stuff…10,000 hours 8 times over
just need to learn some language specifics
Region Automation: Control Change 20 — Logic Pro X keyboard command of the day
Logic Pro X keyboard command of the day. #LogicProX @StudioIntern1
Region Automation: Control Change 20
Select CC20 for Region Automation. There a *lots* of things that can be automated. When you “Display Automation” for a track (happens if you use this command) you can see the enormous set of parameters that can be manipulated. You can even automate a change of MIDI channel!
Automation is the “program” that is applied to the tracks in the project. The sounds that are made come from the MIDI instruments or audio files that “sound” at a point in time. What happens to the sound is modified by plugins. All of the things that can occur over time — changes to plugins, volume, pan, all of it — the automation — is the program that gets written to create the finished product.
It appears that almost every single bit of what Logic can do is available as an “automation” parameter. We program the environment through automation, and allow real-time control to be applied — and recorded!
From the past — “MIDI Draw” — need to check old manuals to learn more about this. This leads me back to the days of Opcode Vision and the entire MIDI orchestra world.
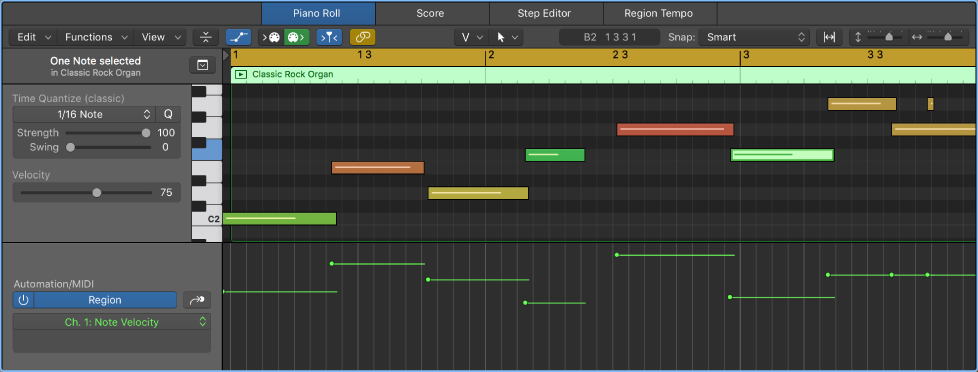
Use the Automation/MIDI area in the Piano Roll Editor — Logic Pro X:
When track-based automation is displayed in the Automation/MIDI area, the displayed automation curve is identical to the automation curve displayed in the automation lane in the Tracks area. Any adjustments to the automation curve made in either location is reflected immediately in the other. However, with region-based automation, you can choose to display either the automation curve associated with the region in the Tracks area automation lane or the MIDI data associated with individual notes. Therefore, with region-based automation it is possible to have the automation lane in the Tracks area showing the automation curve associated with the region and the Automation/MIDI area displaying MIDI data associated with each note (or vice versa).
⇧ SHIFT – ⌃ CONTROL – ⌥ OPTION – ⌘ COMMAND
- Views showing Time Ruler


Automation: Toggle Track/Region


Automation: Cycle Through Used Parameters ⌘Y


Automation: Display Off ⇧⌘Y


Region Automation: Volume


Region Automation: Panorama


Region Automation: Balance


Region Automation: Modulation


Region Automation: Breath


Region Automation: Foot Control


Region Automation: Portamento Time


Region Automation: Expression


Region Automation: Sustain Pedal


Region Automation: Control Change 20 ⌃⌥⇧⌘⌦


Region Automation: Control Change 21


Region Automation: Control Change 22


Region Automation: Control Change 23


Region Automation: Control Change 24


Region Automation: Control Change 25


Region Automation: Control Change 26


Region Automation: Control Change 27


Region Automation: Control Change 28


Region Automation: Control Change 29


Region Automation: Control Change 30


Region Automation: Control Change 31


Region Automation: Control Change 32


Region Automation: Surround Angle


Region Automation: Surround Diversity


Region Automation: Surround LFE


Region Automation: Channel Pressure


Region Automation: Pitch Bend


Region Automation: Program Change


Region Automation: Note Velocity
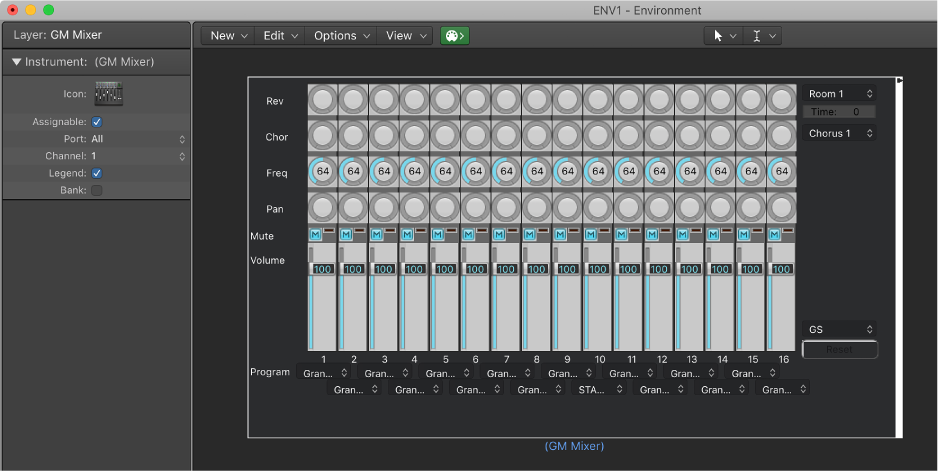
Send All MIDI Mixer Data — Logic Pro X keyboard command of the day
Logic Pro X keyboard command of the day. #LogicProX @StudioIntern1
Send All MIDI Mixer Data
Found in the Options menu of the Mixer window(s). Program Change, Volume, Pan, Transposition, etc. If you want to reset a MIDI instrument (external) to the known condition defined in the track data.
This is a lot like an archeological dig. Vast amounts of fine-control mechanisms live inside Logic, all of them hidden further away as time moved forward. I get glimmers of understanding by reading Logic 7 manuals. Hmmm.
The only MIDI device that I currently use or control is my Casio PX-330. Full piano and functions as a GM MIDI device, so I can do all the things I used to do with a SoundCanvas and friends. Lots to explore.
⇧ SHIFT – ⌃ CONTROL – ⌥ OPTION – ⌘ COMMAND
Select Highest Notes ⇧↑ — Logic Pro X keyboard command of the day
Logic Pro X keyboard command of the day. #LogicProX @StudioIntern1
Select Highest Notes ⇧↑
As the command is named. Select the highest note in chords in the region. “Select Lowest Notes” is also available. Probably useful if you are trying to create separate tracks for “instruments” from a chord. I currently don’t see me using this command much.
You can watch the command in action in the Score Editor, or with the Event List open.
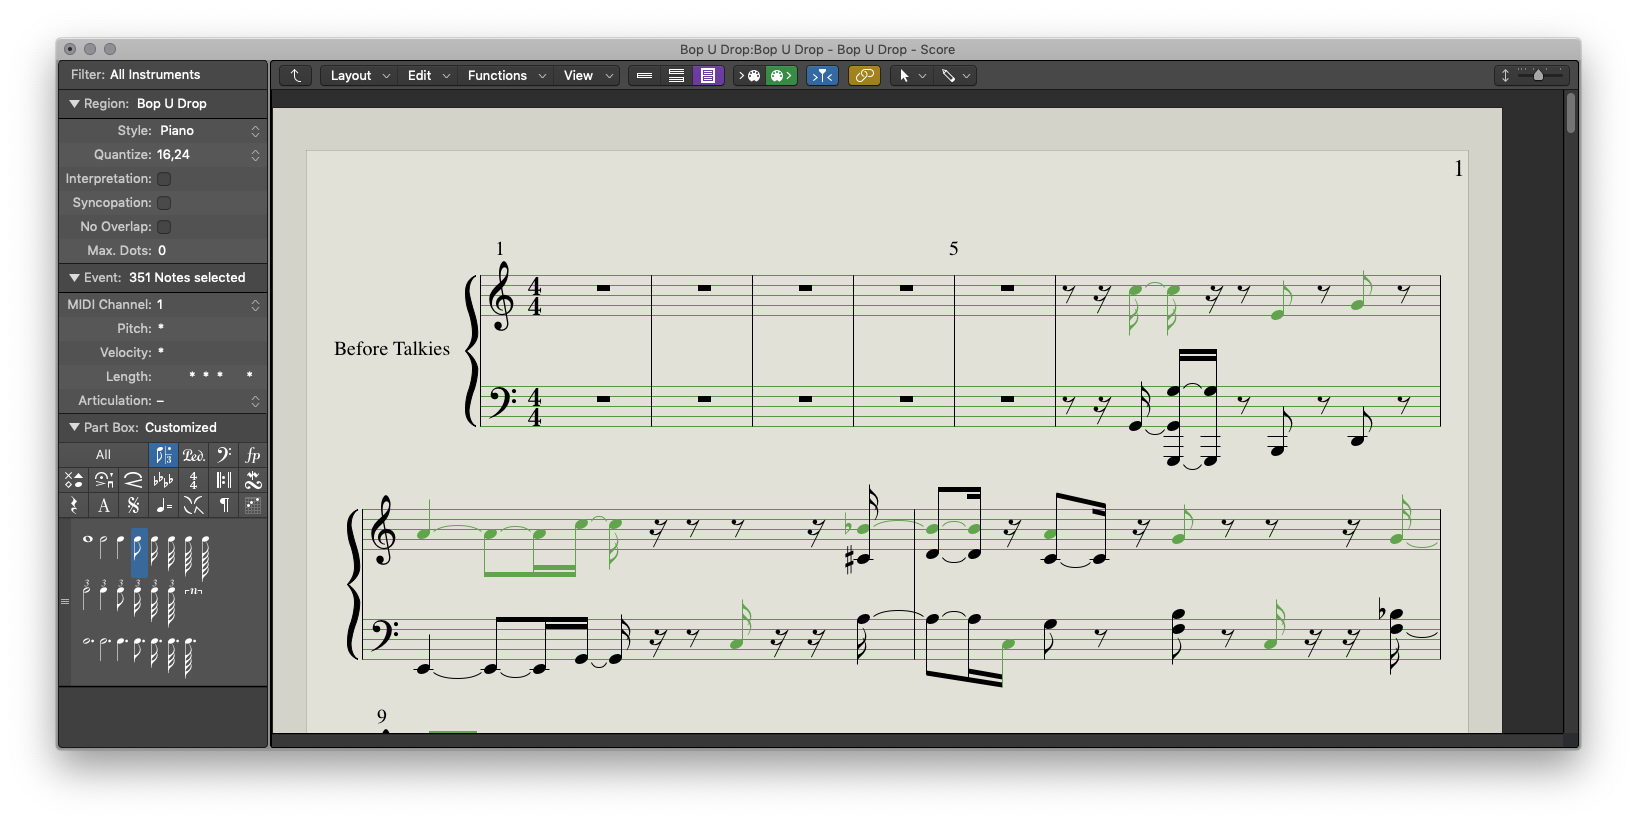
Split chords in the Piano Roll Editor — Logic Pro X:
These commands can be used with regions containing chords to separate the top note of each chord (often the melody), or to separate the bottom note of each chord for a bass line. Once selected, the notes can be cut or copied, and pasted into a region on a different track.
⇧ SHIFT – ⌃ CONTROL – ⌥ OPTION – ⌘ COMMAND
Move Region to Beat — Logic Pro X keyboard command of the day
Logic Pro X keyboard command of the day. #LogicProX @StudioIntern1
Move Region to Beat
This appears to move the region boundary (left in my case) to a position that might line up with the beat of the first note/transient.
My observation of an audio file is that the region “shifts” to position the first transient on a beat. I have to do more reading about placing audio in “recorded” position. I have some recordings that say their “recorded time” is 13 hours from the start. Pretty interesting.
This may be the ticket for lining up multiple recorded tracks to have a consistent starting point, as well as aligning DI and amp recordings.
⇧ SHIFT – ⌃ CONTROL – ⌥ OPTION – ⌘ COMMAND