Snap Mode: Off — Logic Pro X keyboard command of the day

Logic Pro X keyboard command of the day. #LogicProX @StudioIntern1

  Snap Mode: Off

Turns off all automatic snap of items to boundaries. I haven’t used this. I am not sure when I would.

Snap items to the grid — Logic Pro X

The Tracks area includes a grid that helps you align regions, automation points, and other items with the time divisions in the ruler. When you perform any of the following actions, the items move according to the current Snap value:

⇧ SHIFT – ⌃ CONTROL – ⌥ OPTION – ⌘ COMMAND

Toggle Current Track Automation Touch/Read ⌃2⃣ — Logic Pro X keyboard command of the day

Logic Pro X keyboard command of the day. #LogicProX @StudioIntern1

  Toggle Current Track Automation Touch/Read        ⌃2⃣

Control-Touch Bar 2

Arm/disarm tracks for Touch Automation.

I am going to try mapping Touch Bar commands to keypad commands.

There are dedicated buttons on the MCU for Automation which accomplish setting the Automation modes.

The GROUP button caught my eye — it is NOT an Automation function. It does let you control group settings and add/remove tracks from groups. The cursor pad controls which group and lets you scroll through the parameters.

Choose automation modes — Logic Pro X

Automation modes determine how automation tracks are treated. Automation is either being read or being written. You can independently set the automation mode for each track. You can also trim automation values and record relative automation data.

Touch: Plays back automation in the same way as Read mode. You can modify the value of the chosen automation parameter by moving controls in Touch mode. After the fader or knob is released, the parameter follows existing automation on the track.

⇧ SHIFT – ⌃ CONTROL – ⌥ OPTION – ⌘ COMMAND

Command    Key Touch Bar
- Global Commands
Toggle Current Track Automation Off/Read ⌃⌘O ⌃3⃣
Toggle Current Track Automation Touch/Read ⌃2⃣
Toggle Current Track Automation Latch/Read ⌃⌘A
Toggle Current Track Automation Write/Read
Toggle Current Track Automation Trim Mode
Toggle Current Track Automation Write Relative Mode

Transpose Region/Event +12 Semitones or Nudge Automation up 10 Steps ⌥⇧↑ — Logic Pro X keyboard command of the day

Logic Pro X keyboard command of the day. #LogicProX @StudioIntern1

  Transpose Region/Event +12 Semitones or Nudge Automation up 10 Steps    ⌥⇧↑

This is a variation of a typical up/down command that is altered by the use of the ⇧ key. Typically the changes will be an order of magnitude (octaves when dealing with pitch) greater or smaller. I am bit surprised by the automation change being 10 since the MIDI background of Logic would be more in keeping with 8 or 16. I guess the programmers held sway.

I have been unsuccessful at transposing an audio region using this command, so my assumption that it is useful for MIDI only remains intact.

Change the pitch, duration, and velocity of notes — Logic Pro X

Use Option-Up Arrow and Option-Down Arrow to raise or lower the pitch in semitones.

⇧ SHIFT – ⌃ CONTROL – ⌥ OPTION – ⌘ COMMAND

Command    Key Touch Bar
- Main Window Tracks and Various Editors
Transpose Region/Event +1 Semitone or Nudge Automation up 1 Step ⌥↑
Transpose Region/Event -1 Semitone or Nudge Automation down 1 Step ⌥↓
Transpose Region/Event +12 Semitones or Nudge Automation up 10 Steps ⌥⇧↑
Transpose Region/Event -12 Semitones or Nudge Automation down 10 Steps ⌥⇧↓

Show Event Position and Length as Time or Bars/Beats ⌃⌥R — Logic Pro X keyboard command of the day

Logic Pro X keyboard command of the day. #LogicProX @StudioIntern1

  Show Event Position and Length as Time or Bars/Beats    ⌃⌥R

There are three event/region lists or windows that I know of. The Event list in the List Editors panel, Event list windows (you can have lots of them), and the Event Float window. I like to have the Event Float open in my mixing screenset to see which channel (track) is selected.

The setting of time or bars/beats affects only the window that has focus. In the Event Float window you have to use the contextual menu to change the setting — there is no keyboard focus for the window so the command key won’t work.

On a Mackie Control you can press the SMPTE/BEATS button to toggle the display between time and beats. The X-Touch has a bit of a wrinkle if it is being used in XCTL/MCU mode (XCTL over network, MCU over MIDI) since the SMPTE/BEATS button controls which mode the control surface is in. The display can be changed in the Control Surfaces>Setup menu — choose SMPTE/Beats in the Clock Display.

Change the position and length of events — Logic Pro X

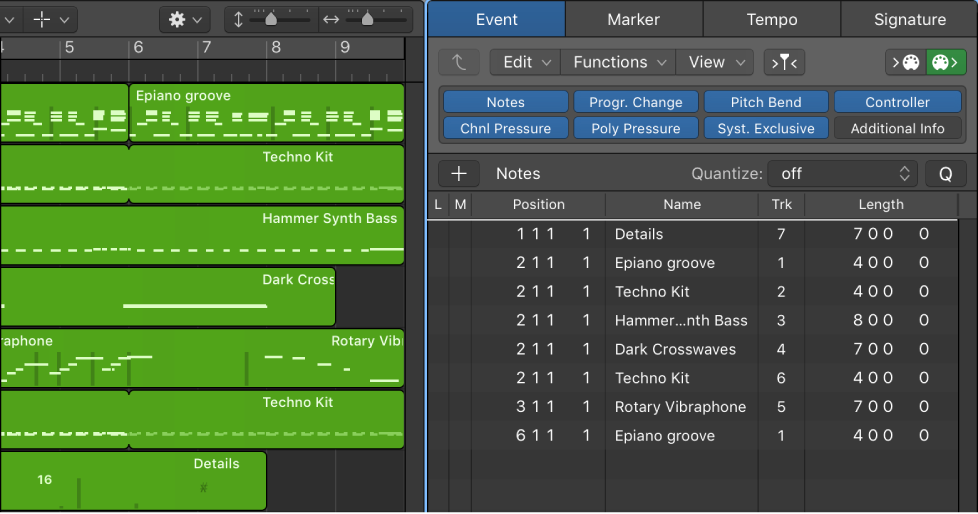
The units shown in the Event List Position and Length/Info columns represent bars, beats, divisions, and ticks (or SMPTE time, when View > Show Event Position and Length as Time is active). Counting begins at 1 for each unit (first bar, first beat, first division, first tick: 1 1 1 1), and continues until it is carried over to the next largest unit.

Numerical input starts from the left (which means you can enter the bar number only, and press Return, if you want to move an event to the beginning of a specific bar, when entering a value). The units can be separated by either spaces, dots, or commas, allowing you to type 3.2.2.2 or 3, 2, 2, 2 or 3 space 2 space 2 space 2.

⇧ SHIFT – ⌃ CONTROL – ⌥ OPTION – ⌘ COMMAND