Create 2 Track Automation Points for Visible Parameter — Logic Pro X keyboard command of the day

Logic Pro X keyboard command of the day. #LogicProX @StudioIntern1

  Create 2 Track Automation Points for Visible Parameter

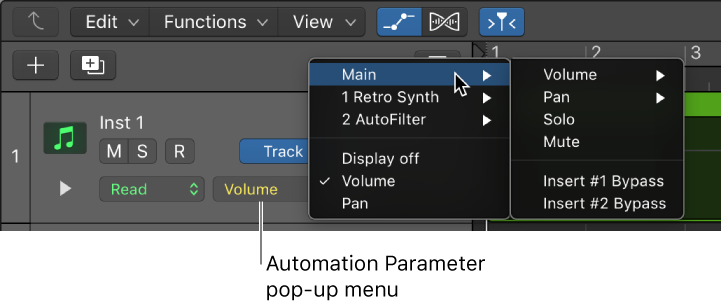
There are commands for creating automation points for things like Volume, Pan, and Sends. This command will create two automation points for the parameter that is currently showing in Automation. This is the simple way to add automation points to control a Smart Control, an EQ parameter, just about anything.

Region-based vs. track-based automation — Logic Pro X

Logic Pro offers two types of automation: track-based automation, and region-based automation. Track-based automation can be applied to the entire track, from the beginning to the end of your project. Region-based automation only applies to the specific region the automation parameters are connected to. With track-based automation, if you re-record, move or copy regions (either to another point on the same track, or to another track) the automation data remains tied to the initial point on the track in which it was created. With region-based automation, if you re-record the region, the automation is lost; if you move or copy the region (either to another point on the same track, or to another track) the automation remains with the region. Region-based automation is particularly useful when you are automating instrument parameters.

⇧ SHIFT – ⌃ CONTROL – ⌥ OPTION – ⌘ COMMAND
Go to Marker Number 17 — Logic Pro X keyboard command of the day

Logic Pro X keyboard command of the day. #LogicProX @StudioIntern1

  Go to Marker Number 17

Another of the numbered marker commands. Not happening for me. I name my markers or use the forward/backward marker commands and buttons on the X-Touch.

Markers overview — Logic Pro X

There are several ways to create and edit markers in Logic Pro. You can view and edit markers in the following work areas:

Navigate using markers — Logic Pro X

You can navigate through your project using markers. This is useful when you want to quickly jump to, and edit, regions or events at a specific position in your project, for example.

⇧ SHIFT – ⌃ CONTROL – ⌥ OPTION – ⌘ COMMAND
Go to Selection End ⌃↘ — Logic Pro X keyboard command of the day

Logic Pro X keyboard command of the day. #LogicProX @StudioIntern1

  Go to Selection End    ⌃↘

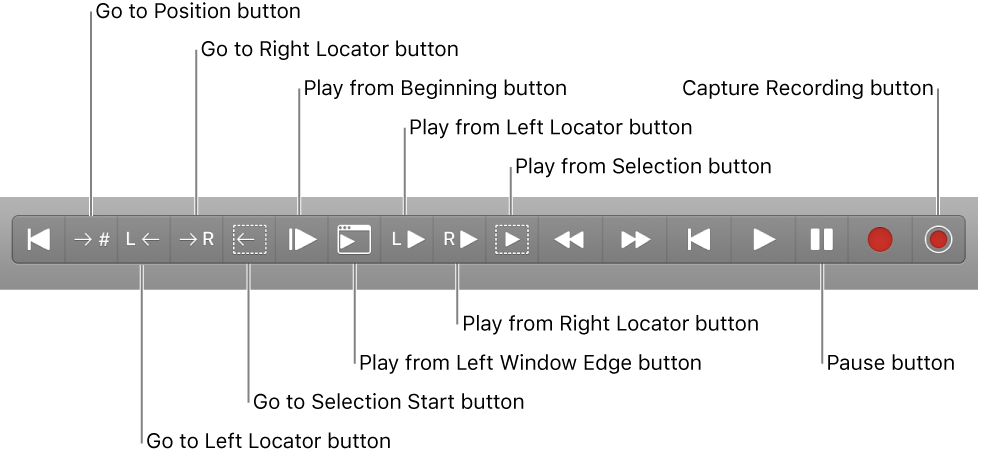
Move the playhead to the end of the current selection. I can really use this as I try to use the Marquee tool to focus on an area of a region. Select a part of a region and press the ‘Go to Selection Start’ (control-home) and ‘Play from Selection’ (shift-space). I don’t really need to move the playhead to do this, but I seem to get a better idea of where things are by having the playhead touch the end of the selection. Just me.

Control playback with the transport buttons — Logic Pro X

You can use the transport buttons in the control bar to control playback, or to set the playhead position. You can click the buttons to activate or deactivate functions, or use the corresponding key commands to speed up your workflow.

⇧ SHIFT  –  ⌃ CONTROL  –  ⌥ OPTION  –  ⌘ COMMAND
“K” is for Klopfgeist | Logic Pro

“K” is for Klopfgeist | Logic Pro

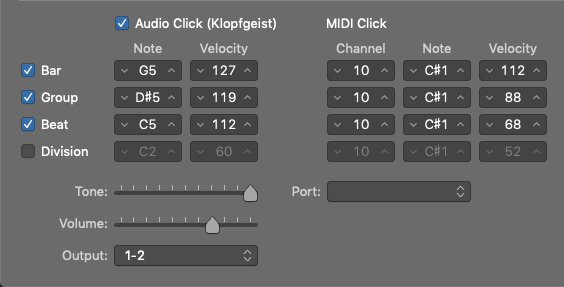
Klopfgeist is the software instrument that powers Logic’s Metronome function. For many of us, there’s not much more to think about with the Klopfgeist other than enabling the Metronome and hitting “record.” But there’s plenty to dig into with our trusty and unwavering click. Whether it be for utility or creativity.

Toggle MIDI Remote for Articulation Switches — Logic Pro X keyboard command of the day

Logic Pro X keyboard command of the day. #LogicProX @StudioIntern1

  Toggle MIDI Remote for Articulation Switches

When MIDI Remote is “on” MIDI events can be used to change the articulation. The standard MIDI messages are found starting with the C0 Note On. It would be nice if I could program the A-1 key on the piano to toggle MIDI Remote without sending the Note On back to the piano. I guess I should just turn down the piano speakers when I am using it as a controller.

Manage articulations for software instruments — Logic Pro X

If an Articulation Set is loaded, you can select between articulations using the Articulations pop-up menu in the plug-in window header. Some software instruments let you view the most recently played articulation in the plug-in interface as well.


Use the Articulation Set Editor in Logic Pro — Apple Support

The Articulation Set Editor can be used to create sophisticated key switch and controller switch definitions, and define output transformations, which enables compatibility with third party sample libraries. You can also use the Articulation Set Editor to create Articulation Sets for instruments that have assigned Articulation IDs to sample groups, but do not have pre-configured articulations. For example, some Sampler instruments come pre-configured with specific sample groups identified by an Articulation ID but do not have pre-configured Articulation Sets. For more information on how Sampler uses Articulation IDs, see Logic Pro Sampler articulation handling.


⇧ SHIFT  –  ⌃ CONTROL  –  ⌥ OPTION  –  ⌘ COMMAND