1/32 Note 6 — Logic Pro X keyboard command of the day

Logic Pro X keyboard command of the day. #LogicProX @StudioIntern1

  1/32 Note  6

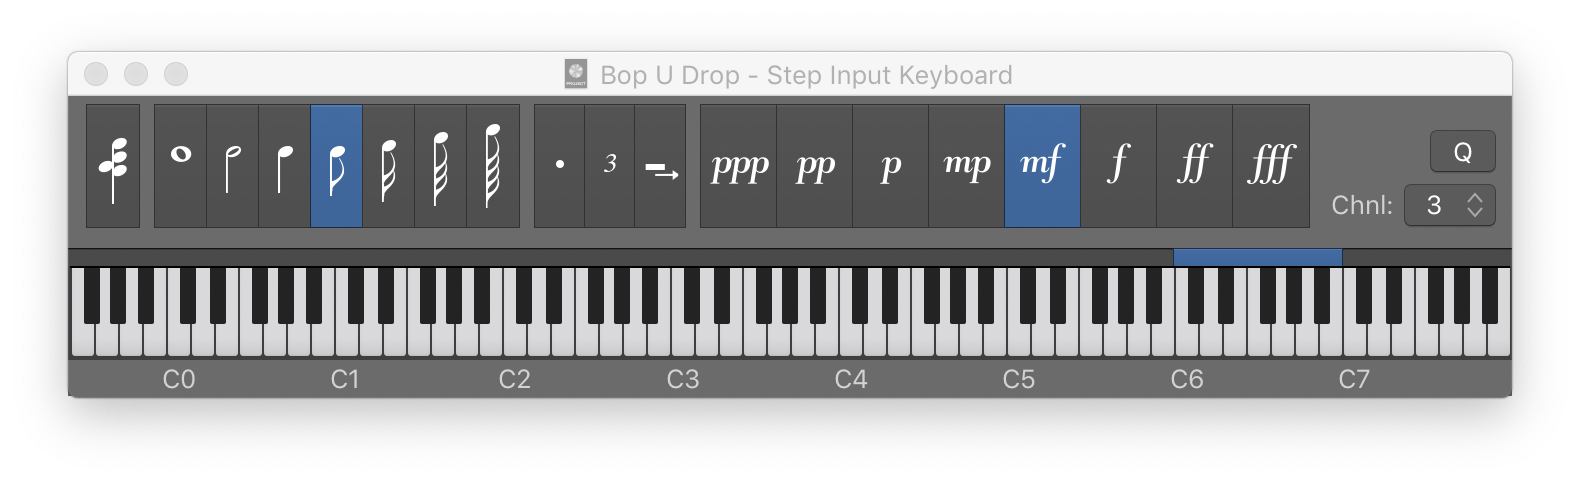
The Step Input Keyboard can be used to easily insert notes and rests into a MIDI region. The “dot”, “triplet”, and “sustain” buttons have an odd keyboard assignment.

The “Sustain Inserted Notes” command is defined as a Global command, not in the Step Editor — doesn’t seem to work to change the key definition — can’t get it to work. It appears that clicking the “Sustain Inserted Notes” button doubles the length of the most recently inserted note.

There is a 1/128th note command that doesn’t have a button on the keyboard. Unlikely to be necessary.

The definitions of the buttons appear if you hover the mouse over one of them for “a while”.

Use step input recording techniques — Logic Pro X

Insert notes using the Step Input keyboard

⇧ SHIFT – ⌃ CONTROL – ⌥ OPTION – ⌘ COMMAND

- Step Input Keyboard
Note “C” A
Note “C#” W
Note “D” S
Note “D#” E
Note “E” D
Note “F” F
Note “F#” T
Note “G” G
Note “G#” Y
Note “A” H
Note “A#” U
Note “B” J
Rest ˽
Next note will be sharp ⇧3
Next note will be flat ⇧B
Chord Mode `
Delete ⌃⌫
Step Backwards ←
Step Forward →
Octave 0
Octave 1
Octave 2
Octave 3
Octave 4
Octave 5
Octave 6
Octave - 2 ⇧Z
Octave - 1 Z
Octave + 1 X
Octave + 2 ⇧X
1/1 Note 1
1/2 Note 2
1/4 Note 3
1/8 Note 4
1/16 Note 5
1/32 Note 6
1/64 Note 7
1/128 Note 8
Triplets on/off 0
Dotted note values on/off 9
Velocity 16 (ppp) C
Velocity 32 (pp) V
Velocity 48 (p) B
Velocity 64 (mp) N
Velocity 80 (mf) M
Velocity 96 (f) ,
Velocity 112 (ff) .
Velocity 127 (fff) /
Quantize note starts On/Off Q

Multiband Compressors vs. Dynamic EQs: Differences and Uses

Multiband Compressors vs. Dynamic EQs: Differences and Uses

Multiband compressors and dynamic EQs are some of the most useful tools available to audio engineers. They allow for dynamic control of defined frequency ranges, providing some of the functionality and benefits of both EQs and compressors. Their ability to correct “problem” frequencies in a detailed and generally transparent way makes them extremely helpful for balancing a single sound or a full mix.

Useful comparison from iZotope to help us choose between these somewhat similarly behaving tools.

Plug-in Redo — Logic Pro X keyboard command of the day

Logic Pro X keyboard command of the day. #LogicProX @StudioIntern1

  Plug-in Redo

Plug-in windows have Undo and Redo buttons. They can be used to adjust changes. Plug-in changes are remembered, so you can make a number of changes and undo/redo for comparisons. It’s easy to assign key commands to plug-in undo and redo.

In newer versions of Logic mixer and plug-in changes can be kept in the undo list, so the normally available Undo (⌘Z) and Redo (⇧⌘Z) can be used if desired.

It might be interesting to provide separate plug-in and mixer undo/redo commands. Don’t know if it would really change the workflow in a significant way.

Currently have number of undo steps set to 150. That’s probably enough 😉

Undo and redo Mixer and plug-in adjustments — Logic Pro X

Using the Mixer Undo and Redo commands and the Undo History, you can undo and redo adjustments that you make to channel strips and plug-ins in the Mixer. Undoing or Redoing Mixer and plug-in adjustments is exactly like undoing adjustments in other areas of Logic Pro. The main difference is in the Undo History, where you can choose to include or remove changes from the Mixer and plug-ins from the Undo History action list. If you want to undo changes you make in the Mixer and to plug-ins, make sure that you have the buttons for Include Parameter Changes From for both Mixer and Plug-in turned on.

⇧ SHIFT – ⌃ CONTROL – ⌥ OPTION – ⌘ COMMAND

Cycle Through Window Views ⇥ — Logic Pro X keyboard command of the day

Logic Pro X keyboard command of the day. #LogicProX @StudioIntern1

  Cycle Through Window Views    ⇥

Only in the main window. The TAB key. Changes the focus between the various areas in a window. Movement is clockwise. In the main window you get Tracks, Lists, Mixer, and back to Tracks. Shift-TAB reverses the order, counter-clockwise.

Logic Pro 9 User Manual: Understanding the Window Types

The Arrange window can incorporate several other windows in different areas. These can be given key focus by clicking the background or title bar of the window (the area of the Arrange window you want to use), or by using a tool in the window.

Tip: You can also use Tab or Shift-Tab to cycle through the Arrange window areas: Tab cycles forward, Shift-Tab cycles backward.

The main characteristic of the key focus window (or area of the Arrange window) is that key commands only affect this window, and not any of the others.

Open and close windows — Logic Pro X

Only one window can have key focus at a given time, this is called the active window. When several normal windows overlap, the active window is the window in the foreground. The title of the window with key focus is black (the titles of other open windows are gray). Inside a window, the area with key focus (for example, the Tracks area) is bordered by a blue frame.

⇧ SHIFT – ⌃ CONTROL – ⌥ OPTION – ⌘ COMMAND

Region Automation: Control Change 23 — Logic Pro X keyboard command of the day

Logic Pro X keyboard command of the day. #LogicProX @StudioIntern1

  Region Automation: Control Change 23

Program MIDI Control Change 23 for the selected region.

Drawing in MIDI CC messages using Region Automation can be far simpler than trying to insert events in the event list or adding them in the Step Editor.

Music Programming 301.

MIDI CC23 — called Control Change in Logic — is an undefined Continuous Controller. CC23 contains the MSB (most significant bits) of the control value. MIDI CC55 contains the LSB (least significant bits) or “fine control” values.

Control Change Messages (Data Bytes)

The following table lists all currently defined Control Change messages and Channel Mode messages, in control number order (adapted from “MIDI by the Numbers” by D. Valenti-Electronic Musician 2/88, and updated by the MIDI Manufacturers Association.) This table is intended as an overview of MIDI, and is by no means complete.

Show automation curves — Logic Pro X

Before you can add automation points to a track’s automation curves, you need to show the automation curves. Automation curves are displayed as colored curves and points on top of audio and MIDI regions across the track, running the length of the project. You can choose whether to view and edit automation across the track (track-based automation) or only within the track’s regions (region-based automation).

⇧ SHIFT – ⌃ CONTROL – ⌥ OPTION – ⌘ COMMAND