Articulation ⌃⇧D — Logic Pro X keyboard command of the day

Logic Pro X keyboard command of the day. #LogicProX @StudioIntern1

  Articulation    ⌃⇧D

Toggle Articulation view in the Event Editor. Only available in the “View” menu when region data is present. If the Event Editor is at the “track” level the options does not show up. You have to open a MIDI region to view the Articulation data.

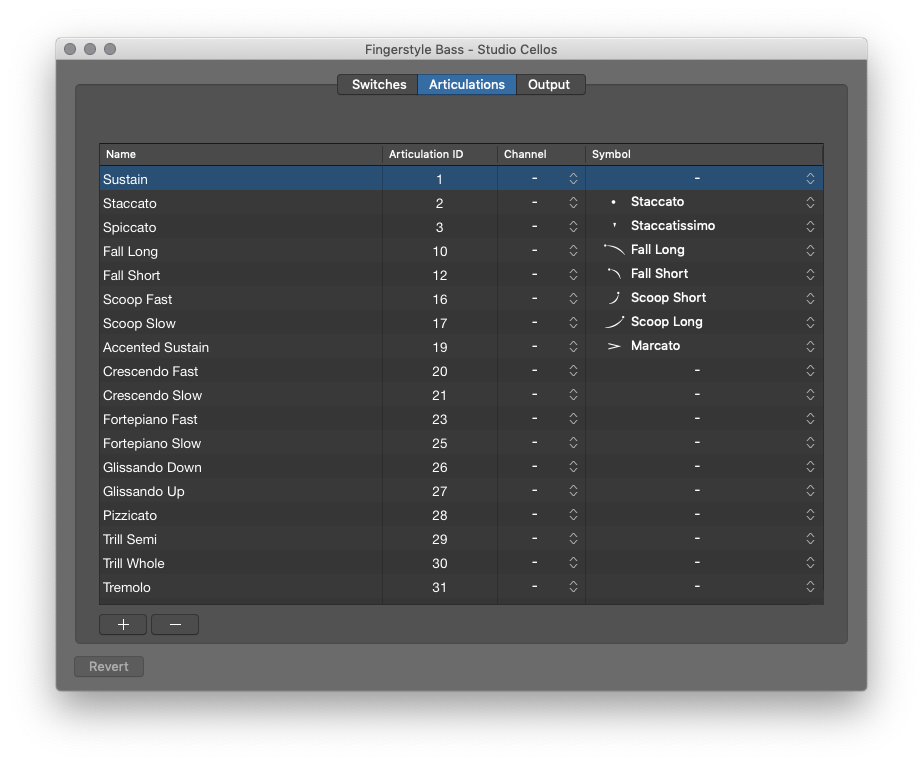
Articulation “sets” allow you to alter the sound of an instrument (e.g. orchestral violin) by using a “mark” to denote style. Think about staccato or marcato, or tenuto. It is the language of the orchestral score. Jazz players have a different set of articulations, but it is similar. Think doit, fall, or scoop.

The mechanics of the articulation mark are a MIDI event, often ‘Note On’, of a particular value which is not in the range that the instrument can play. Logic allows you to create sets of articulations, each set up to 254 IDs with control over MIDI channel, and a symbol that can be used in the Score Editor to indicate a different articulation.

Each articulation can be associated with a switch, and output(s) that can be used to control MIDI devices.

As I think about this I wonder if I could create a MIDI region consisting of Articulations alone that can be used as “macros” to control devices.

Meanwhile, I should practice using articulations to control my orchestral instruments (Miroslav Philharmonik) and practice with Logic’s “Studio Horns” and “Studio Strings”.

Extra credit if I build a functional articulation set for my orchestra and share it with the world.

Manage articulations with the Articulation Set Editor — Logic Pro X:

The Articulation Set Editor can be used to create sophisticated key switch and controller switch definitions, and define output transformations, which enables compatibility with third party sample libraries. You can also use the Articulation Set Editor to create Articulation Sets for instruments that have assigned Articulation IDs to sample groups, but do not have pre-configured articulations. For example, some EXS instruments come pre-configured with specific sample groups identified by an Articulation ID but do not have pre-configured Articulation Sets. For more information on how the EXS uses Articulation IDs, see Articulation ID handling.

Manage articulations for software instruments — Logic Pro X:

If an Articulation Set is loaded, you can select between articulations using the Articulations pop-up menu in the plug-in window header. Some software instruments let you view the most recently played articulation in the plug-in interface as well.

⇧ SHIFT – ⌃ CONTROL – ⌥ OPTION – ⌘ COMMAND

Consolidate Project… — Logic Pro X keyboard command of the day

Logic Pro X keyboard command of the day. #LogicProX @StudioIntern1

  Consolidate Project…

Gather all resources together and make sure they are stored in the project (folder or package).

Essential to keeping projects that can be shared with others. I copy all Apple sound files, sampler (Alchemy) files and others.

I think about what would happen if plugins could be copied as well? Bigger projects. Lots of issues.

Harrison ‘MixBus’ includes “play-only” plugins in saved projects. If I share a ‘MixBus’ project with someone they get the sound as modified by plugins. They can’t change the plugins, but they don’t simply vanish.

Consolidate assets in a project — Logic Pro X:

Using the Consolidate command, you can create a “consolidated” copy of a project, and select which types of assets are copied into the consolidated project.

⇧ SHIFT – ⌃ CONTROL – ⌥ OPTION – ⌘ COMMAND

Copy Lane ⌃C — Logic Pro X keyboard command of the day

Logic Pro X keyboard command of the day. #LogicProX @StudioIntern1

  Copy Lane  ⌃C

In the Step Editor.

Step Editor overview — Logic Pro X:

The Step Editor is a graphical editor that can be used to create or edit MIDI note and controller data. You can use the Step Editor to view and edit different MIDI event types, shown as vertical beams—or steps—along a timeline within a region.

⇧ SHIFT – ⌃ CONTROL – ⌥ OPTION – ⌘ COMMAND

Apply Transform User Preset 28 to selected Events — Logic Pro X keyboard command of the day

Logic Pro X keyboard command of the day. #LogicProX @StudioIntern1

  Apply Transform User Preset  28 to selected Events

The MIDI Transform window can be opened from the Window menu, or by entering ‘⌘9’. There are 30 ‘Apply Transform User Preset … to selected Events’.

Use transform sets — Logic Pro X:

1. Choose Create New Transform Set from the Presets pop-up menu.

2. Set conditions and operations.

3. Select the “Hide unused parameters” checkbox. This helps to avoid changes to conditions and operations that aren’t required for (or may disturb) your transform set.

4. Choose New Parameter Set (Number) from the Presets pop-up menu. Enter a new name for your transform set.

This transform set now appears at the bottom of the Presets list in all MIDI Transform windows for this project. You should consider saving your user transform sets in one or more template projects. This way, they are always available to you in all future projects.

Tip: Renaming an existing transform set creates a new transform set that is identical to the original. The existing (source) transform set is retained.

⇧ SHIFT – ⌃ CONTROL – ⌥ OPTION – ⌘ COMMAND

Region Automation: Note Velocity — Logic Pro X keyboard command of the day

Logic Pro X keyboard command of the day. #LogicProX @StudioIntern1

  Region Automation: Note Velocity

Almost everything can be automated in Logic. Automation is an interesting programming language.

To show automation use the ‘Show Automation — A’ command. Initially Track automation will be displayed. Click on the ‘Track’ button in the track header to switch to Region automation. Click and hold the track/region button to select the automation that you want displayed.

I don’t expect to automate Note Velocity very often, but those Control Change lanes could be interesting.

Show automation curves — Logic Pro X:

Before you can add automation points to a track’s automation curves, you need to show the automation curves. Automation curves are displayed as colored curves and points on top of audio and MIDI regions across the track, running the length of the project. You can choose whether to view and edit automation across the track (track-based automation) or only within the track’s regions (region-based automation).

⇧ SHIFT – ⌃ CONTROL – ⌥ OPTION – ⌘ COMMAND

Command    Key Touch Bar
- Views showing Time Ruler
Automation: Toggle Track/Region
Region Automation: Volume
Region Automation: Panorama
Region Automation: Balance
Region Automation: Modulation
Region Automation: Breath
Region Automation: Foot Control
Region Automation: Portamento Time
Region Automation: Expression
Region Automation: Sustain Pedal
Region Automation: Control Change 20
Region Automation: Control Change 21
Region Automation: Control Change 22
Region Automation: Control Change 23
Region Automation: Control Change 24
Region Automation: Control Change 25
Region Automation: Control Change 26
Region Automation: Control Change 27
Region Automation: Control Change 28
Region Automation: Control Change 29
Region Automation: Control Change 30
Region Automation: Control Change 31
Region Automation: Control Change 32
Region Automation: Surround Angle
Region Automation: Surround Diversity
Region Automation: Surround LFE
Region Automation: Channel Pressure
Region Automation: Pitch Bend
Region Automation: Program Change
Region Automation: Note Velocity ⌃⌥⇧⌘⌦