Set Punch In Locator by Rounded Playhead — Logic Pro X keyboard command of the day

Logic Pro X keyboard command of the day. #LogicProX @StudioIntern1

  Set Punch In Locator by Rounded Playhead

Sets the punch in point at the nearest bar. I cannot really tell where the rounded playhead will be when using the SMPTE ruler.

Punch In/Out is such a wonderful thing to have. Take that! magnetic tape 😉

⇧ SHIFT – ⌃ CONTROL – ⌥ OPTION – ⌘ COMMAND

Shift selected Zone(s)/Group(s) Left (Zones incl. Root Key) ⌥⇧← — Logic Pro X keyboard command of the day

Logic Pro X keyboard command of the day. #LogicProX @StudioIntern1

  Shift selected Zone(s)/Group(s) Left (Zones incl. Root Key)    ⌥⇧←

I haven’t used a sampler other than to play back the samples. At some point I might delve into sampling. Certainly having a 24-bit sampler with virtually infinite storage changes the game from the samplers from the 1980s and 1990s.

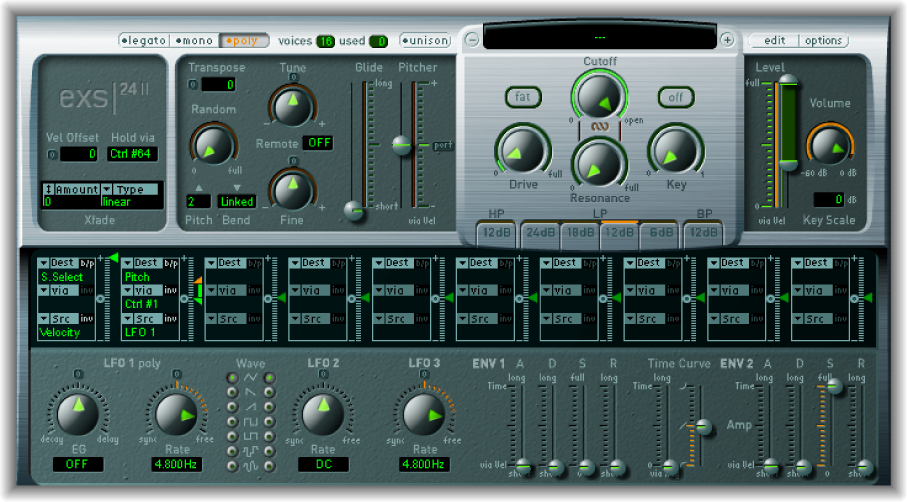
EXS24 mkII overview — Logic Pro X

EXS24 mkII is a software sampler. It plays back audio files, called samples, that you load into it. These samples are combined into tuned, organized collections called sampler instruments. Because sampler instruments are based on audio recordings, they are ideally suited to emulating real instruments such as guitars, pianos, and drums.

Graphically edit EXS24 mkII zones and groups — Logic Pro X

You are not limited to editing zones and groups in the Parameters area. You can also graphically edit a number of zone and group parameters in the Zones/Groups Display area above the keyboard. If you want to edit the audio file of a zone, see Edit samples in the Logic Pro X Audio File Editor.

⇧ SHIFT – ⌃ CONTROL – ⌥ OPTION – ⌘ COMMAND

- EXS24 Instrument Editor
Shift selected Zone(s)/Group(s) Left ⌥←
Shift selected Zone(s)/Group(s) Right ⌥→
Shift selected Zone(s)/Group(s) Left (Zones incl. Root Key) ⌥⇧←
Shift selected Zone(s)/Group(s) Right (Zones incl. Root Key) ⌥⇧→

Select Project 15 — Logic Pro X keyboard command of the day

Logic Pro X keyboard command of the day. #LogicProX @StudioIntern1

  Select Project 15

I’m not sure this command actually makes sense in any rational environment. Having multiple projects open at the same time could be useful for copy information, but 6? Not only that — what is Project 15? The sixth project you opened? No. As best as I can tell open projects are listed in the “Window” menu in alphabetical order. Project 15 is the sixth window in the menu.

All the open projects are listed. Projects with windows that are actually visible on the screen have a bullet before the name.

Apparently these commands are holdovers from Logic 8 at which time projects maintained the order in which they were opened. This was how I assumed the commands would work. Not any more.

When the other 19 “Select Project nn” commands show up I will not be documenting them. But I will add this page to the blog.

⇧ SHIFT – ⌃ CONTROL – ⌥ OPTION – ⌘ COMMAND

Convert Auto Slur — Logic Pro X keyboard command of the day

Logic Pro X keyboard command of the day. #LogicProX @StudioIntern1

  Convert Auto Slur

Change an Automatic Slur to a manual slur. Brings up a question about slurs and piano, guitar, and possibly other instruments. I know how to play a slur on a brass or reed instrument.

Add dynamic marks, slurs, and crescendi — Logic Pro X

To convert an automatic slur to a manual slur: Use the Convert Auto Slur key command.

Note: A manual slur cannot be converted to an automatic slur.

found this explanation while pondering the question…

notation — Understanding and distinguishing piano slurs and phrases — Music: Practice & Theory Stack Exchange

Slurs have different meanings for different instruments, and for singers. For example, for string instruments (violin, cello, etc) all the notes under a slur are played with one movement of the bow, but in some situations there can still be intentional gaps between the notes! In vocal music, slurs merely indicate that one syllable of the lyrics is sung to more than one note, and nothing more than that.

⇧ SHIFT – ⌃ CONTROL – ⌥ OPTION – ⌘ COMMAND

Here Is An Easy And Elegant Way To Emulate A Commonly Used Pro Tools Workflow in Logic | Logic Pro Expert

Here Is An Easy And Elegant Way To Emulate A Commonly Used Pro Tools Workflow in Logic | Logic Pro

An extremely common workflow when editing in Pro Tools is to tap the Tab key to move the insertion point to the end of the region, and then again to the beginning of the next region (And Option Tab to move backwards.) So, with two taps of the tab key, the user can then hit the space bar to start playback from each successive region on a track. This routine uses three keystrokes in all (two using the same key.) Moving from region start to region start is a handy way to navigate the timeline, when not working with strict bars and beats, or memory locations (markers for us Logic users). Tab — Tab — Spacebar. Tab -Tab Spacebar, etc.