Fade Zones no more

I have had “Fade Zones” and “Marquee Zones” turned on for some time. I keep forgetting to make the “right tool” be something other than the Marquee tool — that’s a simple cursor position in the bottom half of the region.

I don’t fade regions often, so taking the entire top half of a region for a particular tool seems like a waste.

The Fade tool can be invoked by simply holding down control and shift (⌃⇧) and dragging the pointer tool across the start/end of a region — or across a region split, the typical place I would need the tool frequently.

Send Used Instruments MIDI Settings — Logic Pro X keyboard command of the day

Logic Pro X keyboard command of the day. #LogicProX @StudioIntern1

  Send Used Instruments MIDI Settings

Logic will “reset” MIDI settings for instruments that are “used”, as the documentation says, “intelligently”. We can force the transmission of MIDI settings by using this command. Program change, volume, and pan. I sure could have used this kind of command back when I was working with the Orchestra Nova — 8 performers, 8 keyboards, many ROMplers. It was always a challenge to get each device set properly during performances.

Reset Messages preferences — Logic Pro X

These preferences are included for compatibility with older MIDI hardware. For selected controller types, a reset message is sent to all MIDI outputs. This reset message is sent on cycle jumps and when playback begins. However, Logic Pro handles MIDI reset messages automatically and intelligently, so you should generally make sure that all of these options are unselected—which they are, by default.

⇧ SHIFT – ⌃ CONTROL – ⌥ OPTION – ⌘ COMMAND
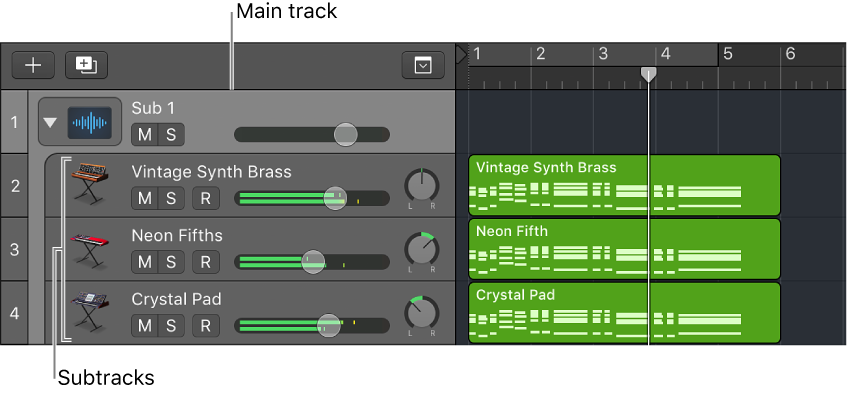
Create Folder Stack ⇧⌘H — Logic Pro X keyboard command of the day

Logic Pro X keyboard command of the day. #LogicProX @StudioIntern1

  Create Folder Stack    ⇧⌘H

The naming of the folder stack (default) is somewhat misleading, I guess. When I see “Sub 1” I think of a sub-mix more than a VCA. A folder stack looks like a VCA, and appears in the mixer just like a VCA except that it is located in position in the Arrange window.

Using folder stacks makes it much easier to gain control of VCAs from my control surface. Normally VCAs are located at the far right of the mixer. With the VCA “in-line” I don’t have to bounce around the control surface as much, or switch the surface to “output” channels.

As I investigated just how many VCAs I could have (more than 32) I decided to look at the Environment to see what VCAs “look like”. A VCA is a sub-channel of the master channel named “Sub 1”, “Sub 2”, etc.

Not sure what I would do with more than 32 VCAs, but there could be situations where it might be plausible — a performance with hundreds of channels.

Track Stacks overview — Logic Pro X

Folder stacks let you combine multiple tracks and control them as one unit, without changing the audio routing of the individual subtracks. When you create a folder stack, the channel strip assigned to the main track is called the stack master. Using the main track or the stack master channel strip, you can mute, solo, and adjust the volume level for the folder stack. This is similar to the way a VCA master fader functions on a hardware mixing console.

⇧ SHIFT – ⌃ CONTROL – ⌥ OPTION – ⌘ COMMAND