Open Transport Float… — Logic Pro X keyboard command of the day

Logic Pro X keyboard command of the day. #LogicProX @StudioIntern1

  Open Transport Float…

Opens the floating Transport window. I use the floating Transport (and should use floating event) on my Mixer screenset (3) which only has the Mixer window open.

I should spend more time making different arrangements of windows in screensets.

⇧ SHIFT – ⌃ CONTROL – ⌥ OPTION – ⌘ COMMAND

Show/Hide Background Grid Lines — Logic Pro X keyboard command of the day

Logic Pro X keyboard command of the day. #LogicProX @StudioIntern1

  Show/Hide Background Grid Lines

Toggle the visibility of the grid lines in the Tracks area of the main window. Sometimes things are easier to navigate with a visible grid. Sometimes it isn’t necessary.

Width of the grid lines is controlled in Preferences>Display>Tracks

⇧ SHIFT – ⌃ CONTROL – ⌥ OPTION – ⌘ COMMAND

Open Group Settings… — Logic Pro X keyboard command of the day

Logic Pro X keyboard command of the day. #LogicProX @StudioIntern1

  Open Group Settings…

Opens the Group Inspector in a separate window and expose the settings (disclosure triangle).

You can drag the Group Inspector out of the inspectors area in the main window. The state of the Settings disclosure remains unchanged.

Very useful if you have a screenset without the main window open and want to get to the group settings.

The Key Commands entry indicates that this is only available as a Key Command, but I have found that clicking on the Groups channel strip component brings up a menu with this command in it.

Groups inspector — Logic Pro X

You use the Groups inspector to define the behavior of each Mixer group. The Groups inspector appears in the Track inspector when one or more groups have been created, and it can be opened as a floating window as well. It contains the following settings:

⇧ SHIFT – ⌃ CONTROL – ⌥ OPTION – ⌘ COMMAND

Region Automation: Breath — Logic Pro X keyboard command of the day

Logic Pro X keyboard command of the day. #LogicProX @StudioIntern1

  Region Automation: Breath

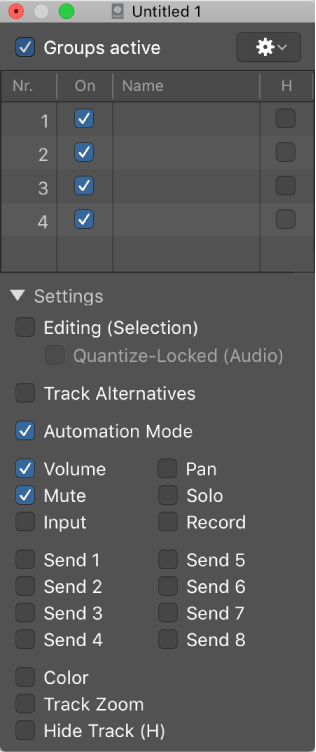
Automation is the “program” that is applied to the tracks in the project. The sounds that are made come from the MIDI instruments or audio files that “sound” at a point in time. What happens to the sound is modified by plugins. All of the things that can occur over time — changes to plugins, volume, pan, all of it — the automation — is the program that gets written to create the finished product.

It appears that almost every single bit of what Logic can do is available as an “automation” parameter. We program the environment through automation, and allow real-time control to be applied — and recorded!

The available commands are a subset of what can actually be automated by selecting from the drop-down menu. I’m not sure that I am ready to learn how to progam using faders 😉

Region-based vs. track-based automation — Logic Pro X

Logic Pro offers two types of automation: track-based automation, and region-based automation. Track-based automation can be applied to the entire track, from the beginning to the end of your project. Region-based automation only applies to the specific region the automation parameters are connected to. With track-based automation, if you re-record, move or copy regions (either to another point on the same track, or to another track) the automation data remains tied to the initial point on the track in which it was created. With region-based automation, if you re-record the region, the automation is lost; if you move or copy the region (either to another point on the same track, or to another track) the automation remains with the region. Region-based automation is particularly useful when you are automating instrument parameters.

⇧ SHIFT – ⌃ CONTROL – ⌥ OPTION – ⌘ COMMAND

Command    Key Touch Bar
- Views Showing Time Ruler
Region Automation: Volume
Region Automation: Panorama
Region Automation: Balance
Region Automation: Modulation
Region Automation: Breath
Region Automation: Foot Control
Region Automation: Portamento Time
Region Automation: Expression
Region Automation: Sustain Pedal
Region Automation: Control Change 20
Region Automation: Control Change 21
Region Automation: Control Change 22
Region Automation: Control Change 23
Region Automation: Control Change 24
Region Automation: Control Change 25
Region Automation: Control Change 26
Region Automation: Control Change 27
Region Automation: Control Change 28
Region Automation: Control Change 29
Region Automation: Control Change 30
Region Automation: Control Change 31
Region Automation: Control Change 32
Region Automation: Surround Angle
Region Automation: Surround Diversity
Region Automation: Surround LFE
Region Automation: Channel Pressure
Region Automation: Pitch Bend
Region Automation: Program Change
Region Automation: Note Velocity

Toggle Channel Strip Format (mono/stereo) ⌃⇧S — Logic Pro X keyboard command of the day

Logic Pro X keyboard command of the day. #LogicProX @StudioIntern1

  Toggle Channel Strip Format (mono/stereo)    ⌃⇧S

Change the selected channel strip(s) between mono and stereo. This can be changed using the pop-up menu to the left of the input selector. There is visual feedback in the meter strip which will show one or two meters depending on the channel strip format, and the input indicator changes between a single ring and the linked stereo rings.

It is possible to cause a channel strip to “become” mono or stereo by inserting a mono or stereo plugin. Normally you can only insert plugins of the proper type for mono and stereo (dual mono). Holding down the option key while choosing a plugin allows you to insert a mono plugin on a stereo channel. The input indicator does not change. The meters switch from two to one.

The format of any audio region on the track does not change. If you Bounce in Place the track the new audio will be in the format of the channel strip, so you can switch a stereo track to mono, then bounce in place to get a mono track. Interesting.

Set channel strip input formats — Logic Pro X

The channel input format determines the mono, stereo, or surround state of the channel strip. The symbol on the button indicates the current state as follows:

Set the channel strip output format — Logic Pro X

Logic Pro can automatically determine the output format of specific channel strip types. You can override the automatic choices by manually setting the output; otherwise, the channel strip output formats follow these rules:

⇧ SHIFT – ⌃ CONTROL – ⌥ OPTION – ⌘ COMMAND