Go to Previous Marker — Logic Pro X keyboard command of the day

Logic Pro X keyboard command of the day. #LogicProX @StudioIntern1

  Go to Previous Marker

Markers are handy things. I try to make it a point to create a marker track for a mix, and to place markers at points that stand out to me. During an initial listening pass I simply create a marker so I can return later. It is almost easy to create a marker and enter a bit of text to describe what is of interest, but attempting to type notes during the first listen can make me miss an important point.

Lots of ways to move around using markers. We can have different marker sets as well. I can make notes about a recording, mix it, and add a new marker set at each phase of the mix. A handy way to incorporate feedback in the project with a useful tool — a location in the project.

Navigating between markers is very easy on the X-Touch — press the MARKER button and use the FAST FWD or REWIND buttons.

Mackie Control Marker button overview — Control Surfaces Help:

Press the MARKER button to activate one of three marker modes: Small Marker mode, Large Marker mode, and Temporary Marker mode. You can use these modes to create or delete markers and jump to markers in your project.

I will be using markers to make notes as I work through “training” videos.

⇧ SHIFT – ⌃ CONTROL – ⌥ OPTION – ⌘ COMMAND

- Global Commands
Create Marker ⌥'
Create Marker without rounding ⌃⌥'
Create Marker for Selected Regions ⌥⇧'
Delete Marker ⌥⌫
Open Marker List ⌃⌥⇧8⃣
Open Marker Text
Set Locators by Marker and Enable Cycle ⌃⌥C
Set Locators by Previous Marker and Enable Cycle ⌃⌥,
Set Locators by Next Marker and Enable Cycle ⌃⌥.
Go to Previous Marker
Go to Next Marker
Go to Previous Marker And Set Locators ⌥,
Go to Next Marker And Set Locators ⌥.
Go to Marker Number… ⌥/
Rename Marker ⇧'
Go to Marker Number 1

Go to Marker Number 20
Create Arrangement Marker
Show/Hide Marker List
Create Scene Markers (Auto Range)
Remove Scene Markers (Auto Range)

- Views showing Time Ruler
Show/Hide Marker Track ⇧⌘K
Show/Hide Marker Track Only '

Remove Overlaps \ — Logic Pro X keyboard command of the day

Logic Pro X keyboard command of the day. #LogicProX @StudioIntern1

  Remove Overlaps    \

Removing overlaps is essentially the same as the “Trim Region” commands. If there are no overlapping regions the command changes nothing.

Resize regions in the Tracks area — Logic Pro X:

Remove overlaps between regions

Select the overlapping regions, or select all regions on the track by clicking the track header.

Choose Edit > Trim > Remove Overlaps (or press \).

Where the selected regions overlap, the length of the left (earlier) region is reduced to remove the overlap.

⇧ SHIFT – ⌃ CONTROL – ⌥ OPTION – ⌘ COMMAND

- Main Window Tracks
Trim Region End to Next Region ⇧\
Trim Region Start to Previous Region
Trim Regions to Fill within Locators ⌥\
Trim Region Start to Previous Transient ⌃⇧[
Trim Region Start to Next Transient ⌃⇧]
Trim Region End to Previous Transient ⌃[
Trim Region End to Next Transient ⌃]

Default Syncopation — Logic Pro X keyboard command of the day

Logic Pro X keyboard command of the day. #LogicProX @StudioIntern1

  Default Syncopation

Alters notation to minimize ties between notes and odd combinations of smaller notes. Reminiscent of “swinging” eighth notes — two eighth notes are played as a dotted eighth and a sixteenth.

Syncopation — Logic Pro X:

Syncopation involves rhythmic patterns that go against the normal rhythm as defined by the time signature. The Syncopation setting helps you produce a cleaner-looking score by displaying syncopated notes with fewer ties or subdivisions.

Change the syncopation or interpretation of notes — Logic Pro X:

By default, note syncopation and interpretation match the settings chosen in the Region inspector. You can change interpretation settings for individual notes to improve readability.

⇧ SHIFT – ⌃ CONTROL – ⌥ OPTION – ⌘ COMMAND

Select Equal Colored Regions/Events ⇧C — Logic Pro X keyboard command of the day

Logic Pro X keyboard command of the day. #LogicProX @StudioIntern1

  Select Equal Colored Regions/Events    ⇧C

If everything is set to the default colors you can use this to select all audio, all MIDI, etc. Once you start arranging things to group by color this provides an easy way to focus on a group. I usually group things with a summing stack with selected busses.

I will experiment with coloring as I start working on larger mixing projects.

⇧ SHIFT – ⌃ CONTROL – ⌥ OPTION – ⌘ COMMAND

Region Automation: Control Change 20 — Logic Pro X keyboard command of the day

Logic Pro X keyboard command of the day. #LogicProX @StudioIntern1

  Region Automation: Control Change 20

Select CC20 for Region Automation. There a *lots* of things that can be automated. When you “Display Automation” for a track (happens if you use this command) you can see the enormous set of parameters that can be manipulated. You can even automate a change of MIDI channel!

Automation is the “program” that is applied to the tracks in the project. The sounds that are made come from the MIDI instruments or audio files that “sound” at a point in time. What happens to the sound is modified by plugins. All of the things that can occur over time — changes to plugins, volume, pan, all of it — the automation — is the program that gets written to create the finished product.

It appears that almost every single bit of what Logic can do is available as an “automation” parameter. We program the environment through automation, and allow real-time control to be applied — and recorded!

From the past — “MIDI Draw” — need to check old manuals to learn more about this. This leads me back to the days of Opcode Vision and the entire MIDI orchestra world.

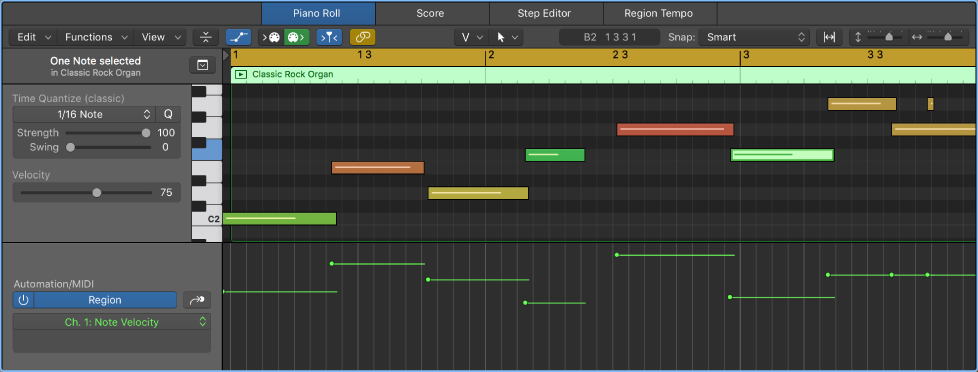
Use the Automation/MIDI area in the Piano Roll Editor — Logic Pro X:

When track-based automation is displayed in the Automation/MIDI area, the displayed automation curve is identical to the automation curve displayed in the automation lane in the Tracks area. Any adjustments to the automation curve made in either location is reflected immediately in the other. However, with region-based automation, you can choose to display either the automation curve associated with the region in the Tracks area automation lane or the MIDI data associated with individual notes. Therefore, with region-based automation it is possible to have the automation lane in the Tracks area showing the automation curve associated with the region and the Automation/MIDI area displaying MIDI data associated with each note (or vice versa).

⇧ SHIFT – ⌃ CONTROL – ⌥ OPTION – ⌘ COMMAND

- Views showing Time Ruler
Automation: Toggle Track/Region
Automation: Cycle Through Used Parameters ⌘Y
Automation: Display Off ⇧⌘Y
Region Automation: Volume
Region Automation: Panorama
Region Automation: Balance
Region Automation: Modulation
Region Automation: Breath
Region Automation: Foot Control
Region Automation: Portamento Time
Region Automation: Expression
Region Automation: Sustain Pedal
Region Automation: Control Change 20 ⌃⌥⇧⌘⌦
Region Automation: Control Change 21
Region Automation: Control Change 22
Region Automation: Control Change 23
Region Automation: Control Change 24
Region Automation: Control Change 25
Region Automation: Control Change 26
Region Automation: Control Change 27
Region Automation: Control Change 28
Region Automation: Control Change 29
Region Automation: Control Change 30
Region Automation: Control Change 31
Region Automation: Control Change 32
Region Automation: Surround Angle
Region Automation: Surround Diversity
Region Automation: Surround LFE
Region Automation: Channel Pressure
Region Automation: Pitch Bend
Region Automation: Program Change
Region Automation: Note Velocity