Default Interpretation — Logic Pro X keyboard command of the day

Logic Pro X keyboard command of the day. #LogicProX @StudioIntern1

  Default Interpretation

Change the interpretation of scored notes.

Interpretation — Logic Pro X

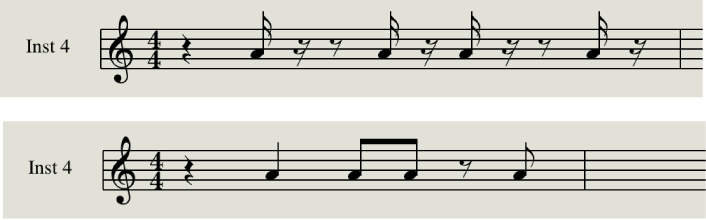
Music notation is meant as a guide to performance, and rhythmic values are often not notated with metronomic precision. The Interpretation setting helps you produce a more readable score from real-time recordings. You should usually turn it off when adding notes via step input or with the pointer.

Note attributes overview — Logic Pro X

You can control the appearance of individual notes in the Score Editor using note attributes. Note attributes include note size and position, accidentals, stems, beaming, and interpretation. Using note attributes, you can enhance the readability of the score and add performance information.

Change the syncopation or interpretation of notes — Logic Pro X

By default, note syncopation and interpretation match the settings chosen in the Region inspector. You can change interpretation settings for individual notes to improve readability.

⇧ SHIFT – ⌃ CONTROL – ⌥ OPTION – ⌘ COMMAND

Toggle Next Region/Event or Move Marquee Start (or Extend Marquee Selection) to Next Transient ⇧→ — Logic Pro X keyboard command of the day

Logic Pro X keyboard command of the day. #LogicProX @StudioIntern1

  Toggle Next Region/Event or Move Marquee Start (or Extend Marquee Selection) to Next Transient ⇧→

I haven’t figured out the “toggle” part of the command, but the extend selection makes sense.

With a note (event) selected in a MIDI region ‘⇧→’ will extend the selection to include the next event. Easy to grab a note and the next few to make adjustments.

Using ‘⇧←’ (previous) extends the selection backwards in time.

With a marquee selection the commands behave as described, moving the start of the Marquee selection or extending it.

This is very handy fine-grained control of selections. I need to remember to make sure that the Marquee Ruler is visible.

Select parts of regions in the Tracks area — Logic Pro X

Do one of the following:

Using the Marquee tool:

Press and hold Shift, then click in the Tracks area to change the selection in any direction.

Shift-click inside a selection to move the selection end closest to the pointer.

Option-Shift-click inside a selection to move the selection end farther from the pointer.

Using any marquee selection:

Press and hold Shift while using the Left Arrow key or Right Arrow key to move the marquee start point.

You can also use the Toggle Previous (or Next) Region/Event, or set Marquee Start to Previous (or Next) Transient key commands.

Use the Left Arrow key or Right Arrow key to change the selection end points.

You can also use the Select Previous (or Next) Region/Event, or set Marquee End to Previous (or Next) Transient key commands, depending on the type of region selected.

⇧ SHIFT – ⌃ CONTROL – ⌥ OPTION – ⌘ COMMAND

Apogee Control Panel — Logic Pro X keyboard command of the day

Logic Pro X keyboard command of the day. #LogicProX @StudioIntern1

  Apogee Control Panel

OK. If I ever “go Apogee”.

Configure Apogee and Euphonix audio devices — Logic Pro X

You can configure Apogee Digital or Euphonix audio hardware in the utilities provided by these manufacturers. The configuration utilities for connected devices can be opened directly from Logic Pro. Consult the documentation provided with the device for specific configuration instructions.

⇧ SHIFT – ⌃ CONTROL – ⌥ OPTION – ⌘ COMMAND

Join Regions/Notes ⌘J ⌘:four: — Logic Pro X keyboard command of the day

Logic Pro X keyboard command of the day. #LogicProX @StudioIntern1

  Join Regions/Notes    ⌘J    ⌘:four:

Combine separate regions/notes into a single region. With audio regions, if the joined region is “contiguous” in the original audio the region is simply extended to include those selected. If there are gaps (or regions from different audio files are selected) a new audio file will be created for the joined region.

MIDI notes that are joined simply create a single note that has a duration of the sum of the durations of the joined notestime from the start of the first note to the end of the furthest away note.

Join regions in the Tracks area — Logic Pro X

You can join untransposed audio regions, and join MIDI regions. Regions from audio Apple Loops, and audio regions that have been transposed, can’t be joined.

⇧ SHIFT – ⌃ CONTROL – ⌥ OPTION – ⌘ COMMAND

Select Previous Section for Realtime Comping — Logic Pro X keyboard command of the day

Logic Pro X keyboard command of the day. #LogicProX @StudioIntern1

  Select Previous Section for Realtime Comping

Comping is a mystery to me. It sets apart what can be done in the studio as opposed to recording live performance. Multiple takes I understand, you perform until it’s right. Punch in I understand, fix the spot where it is necessary.

Chopping parts of multiple takes and combining them is just counter to how I perceive music and its creation. Much work needs to be done to figure out the details.

Comping overview — Logic Pro X

Imagine a scenario in which you have recorded multiple performances of a vocal solo over the same section of a project. You can select the best parts from the different performances and piece them together into a single master take. This is the process of “making a composite take”—commonly referred to as comping—and is achieved by using the Quick Swipe Comping feature. You can also drag or cut the contents of take folders.

Punch in and out of audio recordings — Logic Pro X

Punch recording is a technique you can use to overwrite a portion of a previously recorded track, during playback, without touching any of the recording before or after that portion. You punch in to interrupt playback and make the recording, then punch out to return to playback mode. You can choose between two punch recording modes: Quick Punch-In mode and Autopunch mode.

Record multiple audio takes — Logic Pro X

When you’re recording, you can record multiple versions, or takes, of a phrase or section in quick succession. Take recording can be helpful especially when you’re improvising a lead or solo part and want to capture several versions while you’re feeling inspired.

⇧ SHIFT – ⌃ CONTROL – ⌥ OPTION – ⌘ COMMAND

- Global Commands
Select Previous Section for Realtime Comping ⌃⌥⇧7⃣

- Main Window Tracks and Various Editors
Snap Quick Swipe Comping On/Off

- Main Window Tracks
Rename Take or Comp ⇧T
Delete Take or Comp ⌥⇧⌫
Export Active Take or Comp to New Track
Move Active Take or Comp to New Track
Toggle Take Folder Quick Swipe Comping Mode ⌥Q
Create New Comp
Select Previous Take or Comp ⌥⇧↑
Select Next Take or Comp ⌥⇧↓
Slice at Comp Section Borders
Trim to Active Comp Sections