Toggle Hide View H — Logic Pro X keyboard command of the day

Logic Pro X keyboard command of the day. #LogicProX @StudioIntern1

  Toggle Hide View    H

Toggles the “hide” button available in the track header. The large “H” button is turned green, next press of “H” will hide tracks and make the “H” orange to indicate hidden tracks.

The whole matter of hiding and showing things is related to screen real estate. Really not a big issue for smaller projects, but it can get very crowded very quickly.

Group hiding is kind of handy. Quick key commands to completely hide tracks and corresponding channels.

I really wish I didn’t have to try to remember which group of tracks/channels got assigned to “1” or “7”.

⇧ SHIFT – ⌃ CONTROL – ⌥ OPTION – ⌘ COMMAND

Nudge Position Right ⌃⌥⌘→ — Logic Pro X keyboard command of the day

Logic Pro X keyboard command of the day. #LogicProX @StudioIntern1

  Nudge Position Right    ⌃⌥⌘→

Nudge the current note/region to the right by the “nudge amount”.

The temporary Nudge mode of the X-Touch lets you choose the size of the nudge, just turn the appropriate V-Pot.

I’m not convinced that I have figured out all of the default nudge functions on the X-Touch — time for homework.

Move regions in the Tracks area — Logic Pro X:

You can move regions to a different point in the same track, or move them to another track of the same type. You can move an audio region to another audio track, for example, but not to a software instrument track, or vice versa. You can also move regions between open Tracks area windows, or between different open projects.

Side note — nudging regions from X-Touch? The answer is yes.

Mackie Control Nudge button overview — Control Surfaces Help:

The NUDGE button allows you to move (nudge) selected audio or MIDI regions (or events) in Small, Large, or Temporary Nudge mode.

⇧ SHIFT – ⌃ CONTROL – ⌥ OPTION – ⌘ COMMAND

Go to Previous Transient ⌥← — Logic Pro X keyboard command of the day

Logic Pro X keyboard command of the day. #LogicProX @StudioIntern1

  Go to Previous Transient   ⌥←

Move the cursor to the previous transient. In the Audio File Editor.

For most of my purposes I find that I want to move region start points to transients so the ‘Forward by Transient’ command is the simplest way for me to get the playhead where I want it.

⇧ SHIFT – ⌃ CONTROL – ⌥ OPTION – ⌘ COMMAND

Edit Project Alternatives — Logic Pro X keyboard command of the day

Logic Pro X keyboard command of the day. #LogicProX @StudioIntern1

  Edit Project Alternatives

I use Project Alternatives a lot. I find them very valuable when working with long sessions like a live set. I create regions and markers for each “song” in the set and create a different alternative for working on each song.

When editing alternatives you can rename or remove them.

⇧ SHIFT – ⌃ CONTROL – ⌥ OPTION – ⌘ COMMAND

Select Folder Stack Tracks — Logic Pro X keyboard command of the day

Logic Pro X keyboard command of the day. #LogicProX @StudioIntern1

  Select Folder Stack Tracks

In the Arrange window (commonly called the Main Window in the documentation)

Select all of the Folder Stack tracks. There is a ‘Select Summing Stack Tracks’ command as well, which selects all of the Summing stacks.

One additional command that is of interest is the ‘Select Sub/VCA Tracks’. This command will select all of the Folder Stacks as well as VCA tracks, if any.

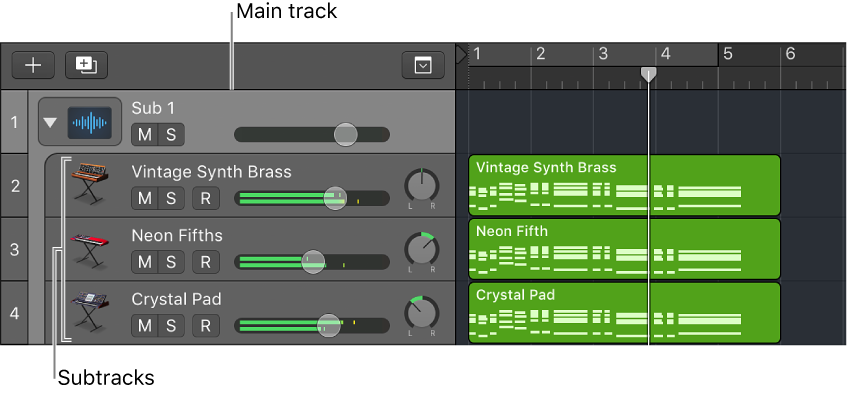
Folder Stacks get created as “Sub” tracks and have VCA channel strips created in the mixer. The nice feature of the Folder Stack is that the VCA channel strip/track is included in the Arrange window and can be moved around on the mixer.

You can create tracks for VCAs which you can position in the mixer, but the Folder Stack version makes for a convenient ‘spill’ of the tracks affected by the VCA.

Track Stacks overview — Logic Pro X

Folder stacks let you combine multiple tracks and control them as one unit, without changing the audio routing of the individual subtracks. When you create a folder stack, the channel strip assigned to the main track is called the stack master. Using the main track or the stack master channel strip, you can mute, solo, and adjust the volume level for the folder stack. This is similar to the way a VCA master fader functions on a hardware mixing console.

⇧ SHIFT – ⌃ CONTROL – ⌥ OPTION – ⌘ COMMAND