Set Default Region Parameters by Region/Folder — Logic Pro X keyboard command of the day

Logic Pro X keyboard command of the day. #LogicProX @StudioIntern1

  Set Default Region Parameters by Region/Folder

This command is not specifically documented, but reasonable assumptions can be made by reading the “Edit Region Parameters” section of the manual. I think I prefer the way the subject matter was treated in the Logic 9 manual with the discussion of common parameters, then audio and MIDI specific parameters.

My assumption was the executing the command would cause the “MIDI Defaults” and “Audio Defaults” for regions to be set to the values of the selected region. This is what happens. I could clearly confuse myself by making odd settings be default for regions.

I finally understand why sometimes the Region Inspector has the name of the region set to “MIDI Defaults” or “Audio Defaults”, and how to get those parameters set up. NB the default settings do not get retained when Logic Pro is quit. Starting back up I find the default region parameters to be as expected — nothing odd.

Region inspector — Logic Pro X

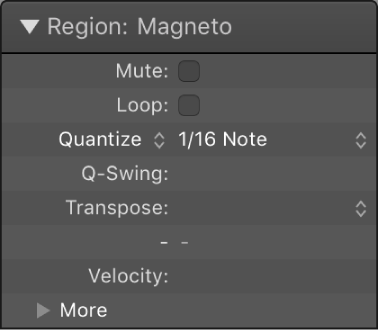
You can view and edit region parameters in the Region inspector, located in the upper part of the inspector. When a single region is selected, the title bar of the Region inspector shows the region name; when multiple regions are selected, the title bar shows the number of selected regions.

Logic Pro 9 User Manual: Setting Region Parameters

The parameters displayed in the Inspector’s Region Parameter box depend on the region type selected in the Arrange area. Some parameters are:

⇧ SHIFT – ⌃ CONTROL – ⌥ OPTION – ⌘ COMMAND
Open/Close MIDI Insert 3 Plug-in Window of focused Track — Logic Pro X keyboard command of the day

Logic Pro X keyboard command of the day. #LogicProX @StudioIntern1

  Open/Close MIDI Insert 3 Plug-in Window of focused Track

Opens or closes (toggle) the window for MIDI insert plugin 3. There sure are a lot of these commands. Currently there can only be eight MIDI inserts, so we either have a hint of things to come, or someone wasn’t paying attention when they programmed the commands.

There is no documentation for these commands. All behaviors are learned by trial and error.

I need to remember that we can get very deeply involved in working with very small sets of tools for long hours. It would actually make sense to define a set of key commands for the detailed work. Save the set of commands. Load them in when the task comes up the requires it.

Think full-time MIDI editing and programming.

⇧ SHIFT – ⌃ CONTROL – ⌥ OPTION – ⌘ COMMAND

Command    Key Touch Bar
- Global Commands
Open/Close MIDI Insert 1 Plug-in Window of focused Track
Open/Close MIDI Insert 2 Plug-in Window of focused Track
Open/Close MIDI Insert 3 Plug-in Window of focused Track
Open/Close MIDI Insert 4 Plug-in Window of focused Track
Open/Close MIDI Insert 5 Plug-in Window of focused Track
Open/Close MIDI Insert 6 Plug-in Window of focused Track
Open/Close MIDI Insert 7 Plug-in Window of focused Track
Open/Close MIDI Insert 8 Plug-in Window of focused Track
Open/Close MIDI Insert 9 Plug-in Window of focused Track
Open/Close MIDI Insert 10 Plug-in Window of focused Track
Open/Close MIDI Insert 11 Plug-in Window of focused Track
Open/Close MIDI Insert 12 Plug-in Window of focused Track
Open/Close MIDI Insert 13 Plug-in Window of focused Track
Open/Close MIDI Insert 14 Plug-in Window of focused Track
Open/Close MIDI Insert 15 Plug-in Window of focused Track

1/32 Note 6 — Logic Pro X keyboard command of the day

Logic Pro X keyboard command of the day. #LogicProX @StudioIntern1

  1/32 Note  6

The Step Input Keyboard can be used to easily insert notes and rests into a MIDI region. The “dot”, “triplet”, and “sustain” buttons have an odd keyboard assignment.

The “Sustain Inserted Notes” command is defined as a Global command, not in the Step Editor — doesn’t seem to work to change the key definition — can’t get it to work. It appears that clicking the “Sustain Inserted Notes” button doubles the length of the most recently inserted note.

There is a 1/128th note command that doesn’t have a button on the keyboard. Unlikely to be necessary.

The definitions of the buttons appear if you hover the mouse over one of them for “a while”.

Use step input recording techniques — Logic Pro X

Insert notes using the Step Input keyboard

⇧ SHIFT – ⌃ CONTROL – ⌥ OPTION – ⌘ COMMAND
- Step Input Keyboard
Note “C” A
Note “C#” W
Note “D” S
Note “D#” E
Note “E” D
Note “F” F
Note “F#” T
Note “G” G
Note “G#” Y
Note “A” H
Note “A#” U
Note “B” J
Rest ˽
Next note will be sharp ⇧3
Next note will be flat ⇧B
Chord Mode `
Delete ⌃⌫
Step Backwards ←
Step Forward →
Octave 0
Octave 1
Octave 2
Octave 3
Octave 4
Octave 5
Octave 6
Octave - 2 ⇧Z
Octave - 1 Z
Octave + 1 X
Octave + 2 ⇧X
1/1 Note 1
1/2 Note 2
1/4 Note 3
1/8 Note 4
1/16 Note 5
1/32 Note 6
1/64 Note 7
1/128 Note 8
Triplets on/off 0
Dotted note values on/off 9
Velocity 16 (ppp) C
Velocity 32 (pp) V
Velocity 48 (p) B
Velocity 64 (mp) N
Velocity 80 (mf) M
Velocity 96 (f) ,
Velocity 112 (ff) .
Velocity 127 (fff) /
Quantize note starts On/Off Q

Plug-in Redo — Logic Pro X keyboard command of the day

Logic Pro X keyboard command of the day. #LogicProX @StudioIntern1

  Plug-in Redo

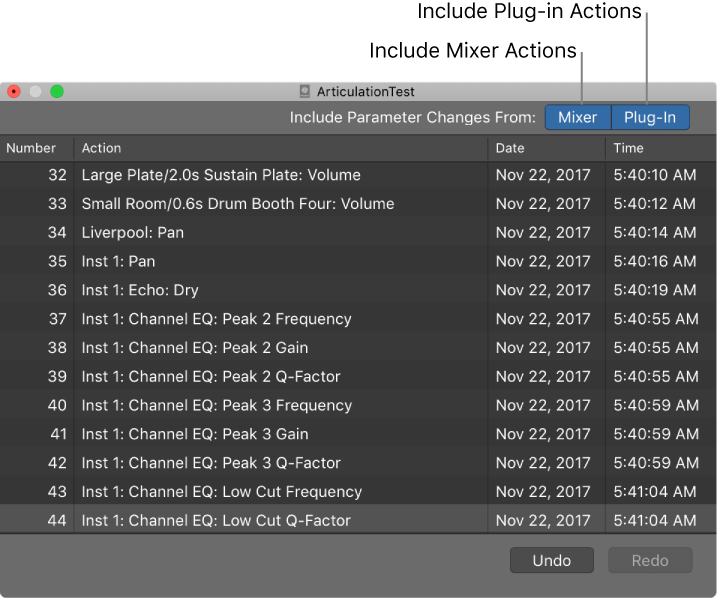
Plug-in windows have Undo and Redo buttons. They can be used to adjust changes. Plug-in changes are remembered, so you can make a number of changes and undo/redo for comparisons. It’s easy to assign key commands to plug-in undo and redo.

In newer versions of Logic mixer and plug-in changes can be kept in the undo list, so the normally available Undo (⌘Z) and Redo (⇧⌘Z) can be used if desired.

It might be interesting to provide separate plug-in and mixer undo/redo commands. Don’t know if it would really change the workflow in a significant way.

Currently have number of undo steps set to 150. That’s probably enough 😉

Undo and redo Mixer and plug-in adjustments — Logic Pro X

Using the Mixer Undo and Redo commands and the Undo History, you can undo and redo adjustments that you make to channel strips and plug-ins in the Mixer. Undoing or Redoing Mixer and plug-in adjustments is exactly like undoing adjustments in other areas of Logic Pro. The main difference is in the Undo History, where you can choose to include or remove changes from the Mixer and plug-ins from the Undo History action list. If you want to undo changes you make in the Mixer and to plug-ins, make sure that you have the buttons for Include Parameter Changes From for both Mixer and Plug-in turned on.

⇧ SHIFT – ⌃ CONTROL – ⌥ OPTION – ⌘ COMMAND

Cycle Through Window Views ⇥ — Logic Pro X keyboard command of the day

Logic Pro X keyboard command of the day. #LogicProX @StudioIntern1

  Cycle Through Window Views    ⇥

Only in the main window. The TAB key. Changes the focus between the various areas in a window. Movement is clockwise. In the main window you get Tracks, Lists, Mixer, and back to Tracks. Shift-TAB reverses the order, counter-clockwise.

Logic Pro 9 User Manual: Understanding the Window Types

The Arrange window can incorporate several other windows in different areas. These can be given key focus by clicking the background or title bar of the window (the area of the Arrange window you want to use), or by using a tool in the window.

Tip: You can also use Tab or Shift-Tab to cycle through the Arrange window areas: Tab cycles forward, Shift-Tab cycles backward.

The main characteristic of the key focus window (or area of the Arrange window) is that key commands only affect this window, and not any of the others.

Open and close windows — Logic Pro X

Only one window can have key focus at a given time, this is called the active window. When several normal windows overlap, the active window is the window in the foreground. The title of the window with key focus is black (the titles of other open windows are gray). Inside a window, the area with key focus (for example, the Tracks area) is bordered by a blue frame.

⇧ SHIFT – ⌃ CONTROL – ⌥ OPTION – ⌘ COMMAND