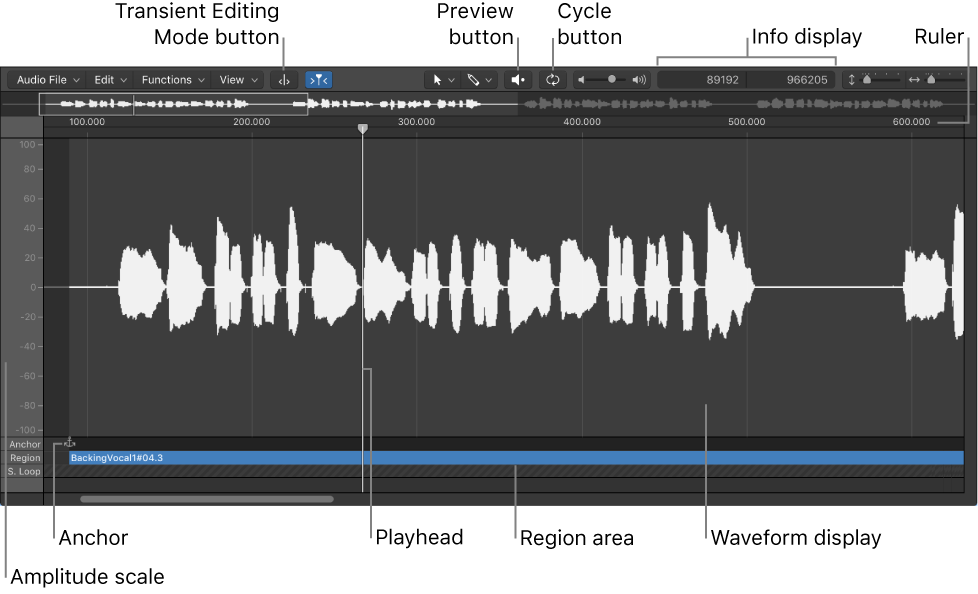
Logic Pro X keyboard command of the day. #LogicProX @StudioIntern1
Shift selected Zone(s)/Group(s) Right ⌥→
In the EXS24 Sampler. Shifts to the right. I am not much of a sampler user, more of a sample player. When I first was exposed to samplers (Fairlight) they were ludicrously expensive and severely limited in their capacity. I thought it much better to get people to play real instruments 😉 Silly me.
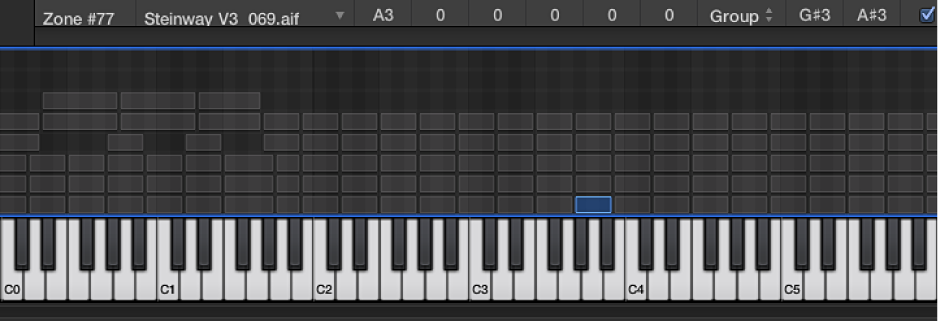
Graphically edit EXS24 mkII zones and groups — Logic Pro X
You are not limited to editing zones and groups in the Parameters area. You can also graphically edit a number of zone and group parameters in the Zones/Groups Display area above the keyboard. If you want to edit the audio file of a zone, see Edit samples in the Logic Pro X Audio File Editor.
From the November 2007! “Sound on Sound”
Expressive Sound Design With EXS24
EXS24 is a fully fledged virtual sampler that allows you to not only load and play extensive libraries of sounds, but to also edit them and use them as starting points for further sonic manipulation. All the controllers and modifiers you would expect to find on an advanced synthesizer are included here and they’re all available from the Editor view of the plug-in window, with the added benefit of a very flexible modulation matrix allowing for all sorts of control signal source routing to various parameters. A flexible Filter section with six switchable modes of operation (high-pass, band-pass and four types of low-pass) provides all the tone-shaping options desired, while the amplifier section is ‘hard-wired’ to velocity (although constant values are also possible via limitation of the range control). Three LFOs and two Envelopes can be freely assigned to any generator or modifier parameter — as well as to each other — using the available modulation matrix, while the Via field allows for assignment of a further modulation source (typically a MIDI controller number, although control signal sources are an option too). The routing possibilities are endless, as are the ways in which a static source sample can be modulated dynamically.
Below is the Groove3 course listing for learning to use the EXS24 (Emagic Xtreme Sampler 24 bit)
EXS24 In Action — Turbocharge Your EXS24 Skills
Get an overview of the main windows, where samples & sampler instruments are stored, and how the EXS 24 works.
EXS Overview (09:18) — Get an overview of the main windows, where samples & sampler instruments are stored, and how the EXS 24 works.
Browsing & Managing (09:12) — Learn the different ways of browsing, searching, organizing, and backing up sampler instruments, and sampler instrument settings.
Voice & Pitch Parameters (07:14) — Discover how to use Unison mode to thicken up a sound and create a fat chorused effect.
Glide & Pitcher Parameters (10:00) — Learn how to create subtle pitch envelopes with the glide and pitcher parameters to beef up both drum and bass parts.
The Filter section (09:11) — See how the different filter parameters work and how they can be used to create movement on static legato pad sounds as well as shape drum parts.
Volume & ADSR (10:06) — Explore the different areas on the front panel used to modulate velocity and volume, both statically and over time via the Env 2 ADSR parameters.
The LFO Section (07:52) — Learn about the different controls for shaping various waveform patterns over time that can be used as modulation sources in the Modulation Matrix.
Modulation Routing — Pt. 1 (13:53) — Discover how to set up fun and interesting musical modulation pathways using the EXS24’s modulation matrix.
Modulation Routing — Pt. 2 (05:33) — More wild and whacky modulation routings — learn to stretch your imagination!
Chorusing / Detuning Techniques (10:25) — Learn how to use the EXS24 transpose, tuning, and fine-tuning parameters to create interesting timber shifting and chorusing effects.
Creating an Instrument (11:32) — See how to create a simple single zone EXS24 instrument from scratch.
Using Velocity Layers (10:50) — Discover how to add more zones to the simple single zone instrument, assign them to a group, and set up a velocity layer.
Creating Multi-Zone Instruments (09:53) — Explore the different ways of loading in, creating, and working with multiple zoned instruments.
Using Rex Files (09:26) — Learn the different ways of loading and using REX files directly from within the EXS24.
Creative Rex File Techniques (13:39) — Explore different ways of varying and randomizing the triggering of REX file zones for more expressive results.
Using Multiple Outputs (12:51) — See how to assign zones and groups to separate virtual outputs by means of the routing parameter, so that they can be sent to separate mixer strips for unique processing.
Sample Loop & Glitch (15:23) — Discover how to use the looping function in the Instrument Editor to create smooth transitions, as well as rapid glitch like loop effects.
Drum Tips & Tricks — Pt. 1 (08:33) — Get a potpourri of various drum programming tips and tricks using the EXS24 front panel features as well as Instrument Editor offsets and groups.
Drum Tips & Tricks — Pt. 2 (08:53) — Learn how to duplicate zones for easier MIDI input, set up monophonic groups for hi hats, and listen to the effect of velocity to attack offsets on various drum parts.
Crossfading & Key Switching (16:58) — See how to set up key switching.
⇧ SHIFT – ⌃ CONTROL – ⌥ OPTION – ⌘ COMMAND