Individual Track Zoom Reset for All Tracks ⌃⌥⇧⌘⌫ — Logic Pro X keyboard command of the day

  Individual Track Zoom Reset for All Tracks    ⌃⌥⇧⌘⌫

To be fair, this command is mentioned in the manual, but how to use Zoom effectively is no longer described in the documentation. The behavior of Zoom isn’t necessarily clear, and can appear to be almost magical in its behavior.

Another reminder to go read Chapter 4 of the Logic Pro 9 manual…

Zoom tracks in Logic Pro — Apple Support

Individual Track Zoom Reset for All Tracks: Resets all zoomed tracks to the window zoom level.

Logic Pro 9 User Manual: Zooming the Working Area

While zooming, the top-left (and selected) event or region is kept in the visible area of the screen. In other words, the first selected region or event is retained in the zoomed window. If no selected region or event is visible, zooming is centered around the playhead. If the playhead isn’t visible, the current center of the window is retained.

Zoom to fit Locators, store Navigation Snapshot ⌃⇧Z — Logic Pro X keyboard command of the day

  Zoom to fit Locators, store Navigation Snapshot    ⌃⇧Z

It’s like breadcrumbs — follow a path backwards and forwards at levels of zoom for task focus.

When our screens graduated from 1024×768 lots of the zooming for focus became less necessary. Unfortunately we have lost the documentation and the lore about really using the Logic displays to help with our tasks. The entire section of the manual “Customizing Your Window Setup” got lost between version 9 and version 10.

Now we add chapter 4 as required reading along with chapter 8 (Basic Operations) which ideally would be done way early in the process of learning to use Logic.

I think I would be more inclined to zoom to fit both horizontally and vertically…

Logic Pro 9 User Manual: Zooming the Working Area

You can set, and recall, up to 30 zoom level and scroll bar positions for each window. These allow you to navigate through a number of window zoom levels and scroll bar positions, making repetitive editing tasks much faster.

Command    Key Touch Bar
- Various Windows
Zoom to fit Selection vertically and horizontally, store Navigation Snapshot ⌃⌥⇧⌘Z
Zoom to fit Selection horizontally, store Navigation Snapshot
Zoom to fit Selection vertically, store Navigation Snapshot
Zoom to fit Locators, store Navigation Snapshot ⌃⇧Z
Zoom to fit All Contents, store Navigation Snapshot
Toggle Zoom to fit Selection or All Contents Z

Convert Regions to New Regions ⌥⌘R — Logic Pro X keyboard command of the day

  Convert Regions to New Regions    ⌥⌘R

It is a simple matter to create a “clone” of a region. Hold down Shift and Option while dragging a region. There are now copies of the region, located at different points in the timeline, that play the same audio. If you adjust the “original” region start or end point all of the clones are adjusted as well.

More than likely the regions should be made independent so they can be adjusted individually. Use the ‘Convert Regions to New Regions’ command.

The documentation (and the menu command itself) do not agree. The documentation and menu read ‘Audio Region to New Region’ as a sub-menu item of Convert. “Edit->Convert->Audio Region to New Region”.

Clone audio regions in the Logic Pro Tracks area — Apple Support

You can clone audio regions in the Tracks area. Cloning an audio region is similar to creating an alias of a MIDI region; the clone doesn’t contain any audio data, but is only a reference to the original, and any changes to the original apply to its clones.

Part of the documentation reduction debacle of the conversion from Logic Pro 9 to Logic Pro X…The Logic Pro X documentation turned into something other than a user manual, more like a guide…sigh

Logic Pro 9 User Manual: Creating Your Arrangement

Once you have added your audio and MIDI regions to the Arrange area, you can edit and reorganize them to create an overall arrangement, or project. Most arranging and editing techniques work identically for both audio and MIDI regions. Apple Loops are also handled in a similar fashion. Where handling differs, variations are pointed out in the appropriate sections of this chapter. Note that all operations described with a pluralized heading (regions, for example), apply to one or more selected region(s).

Arranging overview — Logic Pro X

After adding audio, MIDI, and Drummer regions to your project (by recording, adding loops, using Drummer or adding media files), you build the project by arranging the regions in the Tracks area. As you work in the Tracks area, you can play the project at any time to hear your latest changes.
Set Right Locator by Playhead — Logic Pro X keyboard command of the day

#LogicProX @StudioIntern1

  Set Right Locator by Playhead

The “Set Right/Left Locator by Playhead” commands are buttons that can be added to the control bar. Some very useful documentation in Logic Pro 9 manuals describing how to use cycle modes. Skip cycle is kind of interesting.

I need to use cycle areas to create markers a lot more than I do. Define the cycle area — typically select something and use the ‘Set Locators/Loop by Regions/Events/Marquee and Enable Cycle/Loop ⌘U’ command. Grab the cycle area in the ruler and drag it down to the marker ruler. A new marker is created waiting for text input…ideal.

Logic Pro 9 User Manual: Using Cycle Mode

Set Left Locator by Playhead and Set Right Locator by Playhead: The current playhead position is used to define the left or right locator value. Also available as key commands.

⇧ SHIFT – ⌃ CONTROL – ⌥ OPTION – ⌘ COMMAND

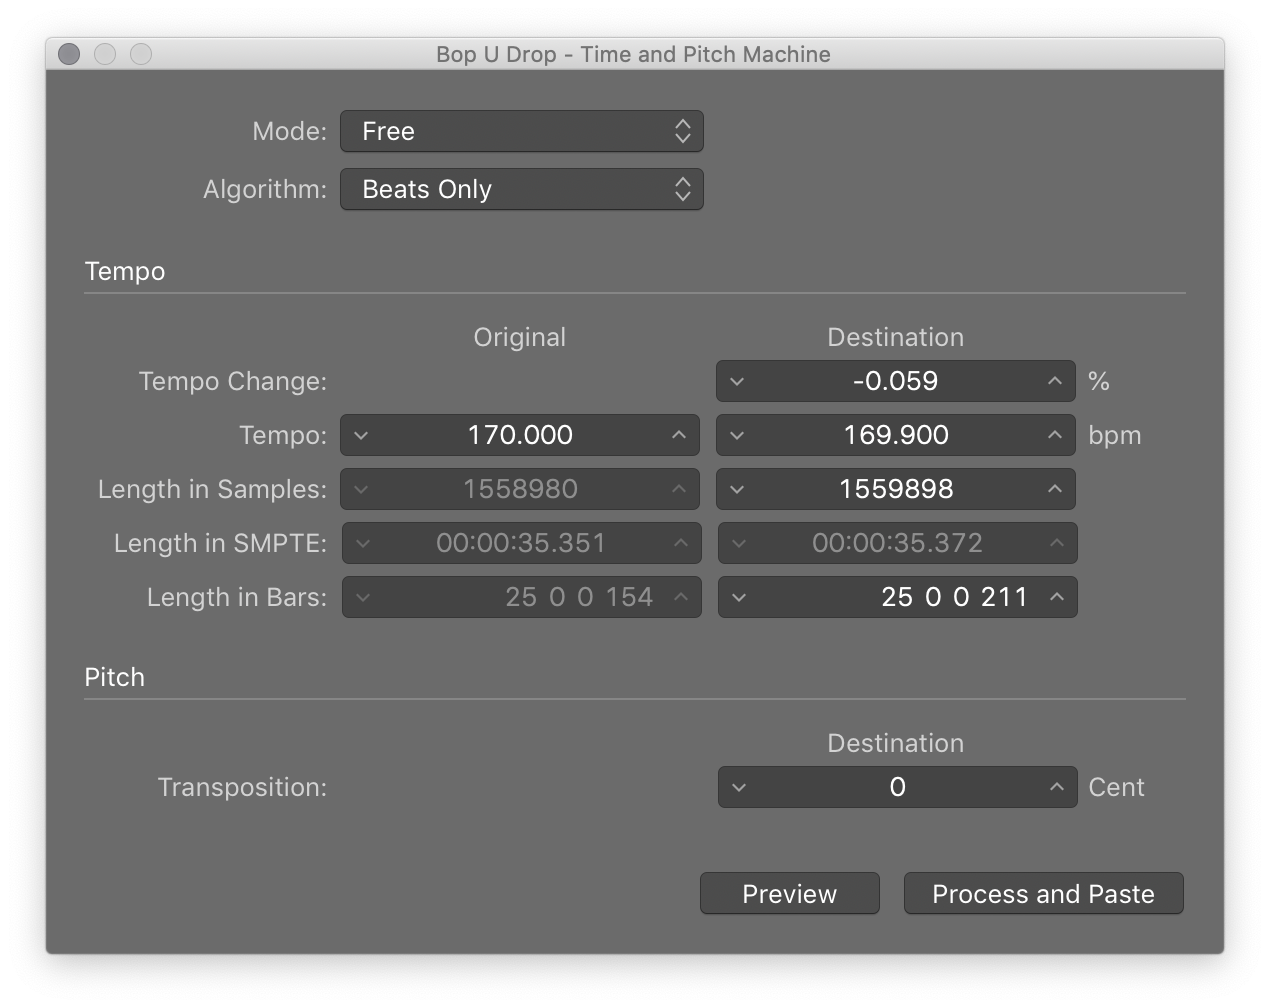
Time and Pitch Machine… ⌃P — Logic Pro X keyboard command of the day

#LogicProX @StudioIntern1

  Time and Pitch Machine…    ⌃P

The entirety of information about the Sample Editor has been removed from Logic Pro X documentation. I guess they thought that no one edits audio anymore.

I am very slow in my reading of the Logic Pro 9 manual(s), having only reached the “Basic Operations” chapter where I am at “Working with Help Tags”. It’s a long slog.

Logic Pro 9 User Manual: Editing Audio in the Sample Editor

You can use the Arrange area or the Sample Editor to make incredibly fine adjustments to audio files. In this chapter you will see why the Sample Editor is the ideal tool for removing pops and clicks in audio material, setting accurate crossover points for looped playback, correcting phase cancelation errors, and much more.

You will also take a look at transient markers, which denote significant points—or transients—in an audio file. The audio on a track is analyzed for transients the first time you enable that track for Flex Time editing. Any detected transients in the file are marked with transient markers.

Finally, you will learn about some audio processing tools—collectively known as the Digital Factory—that are unique to the Sample Editor. These include time stretching and pitch shifting, audio quantization, and extraction of pitch and rhythmic information from audio—which can be applied to other audio or MIDI parts.

Logic Pro 9 User Manual: Using the Sample Editor’s “Time and Pitch Machine”

You can use the “Time and Pitch Machine” to radically alter the time structure of audio files, including time compression or expansion, and pitch transposition. When changing the pitch, you can also correct any alteration of the formants—the vocal characteristics of the pitch-shifted audio. Pitch shifting without formant correction causes a phenomenon commonly known as the Mickey Mouse effect.

⇧ SHIFT – ⌃ CONTROL – ⌥ OPTION – ⌘ COMMAND