Show/Hide Marker Track ⇧⌘K — Logic Pro X keyboard command of the day

Logic Pro X keyboard command of the day. #LogicProX @StudioIntern1

  Show/Hide Marker Track    ⇧⌘K

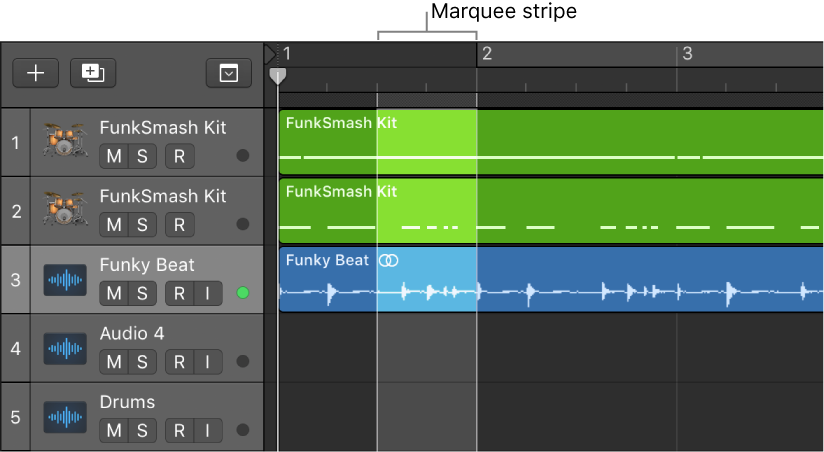
Reveal the Marker track at the top of the Arrange window below the rulers. With the Marker track visible you can create markers — click with the Scissors or Pencil tools, and edit the text of markers using the Text tool.

I like to create markers using the option-single-quote keypress to mark places of interest in the music. With the Marker list open text can be added to the marker describing the area of interest. Significant amount of text can be added to the marker. Tested to in excess of 16,000 characters. The text is stored as RTF.

NB Project Notes and Track Notes can contain images which can be annotated using the markup tools. Very handy if you need to snap a picture of some external gear, or just for a fine picture of a studio 😉

⇧ SHIFT – ⌃ CONTROL – ⌥ OPTION – ⌘ COMMAND

Move Locators Forward by 1 Bar — Logic Pro X keyboard command of the day

Logic Pro X keyboard command of the day. #LogicProX @StudioIntern1

  Move Locators Forward by 1 Bar

Change the locator positions forward by one bar.

Setting the locators based on the Marquee selection makes a lot of sense for my workflow. I need to remember to keep the Marquee ruler visible. Many commands are available from the contextual menu (control-click) on the Marquee menu.

Use the cycle area — Logic Pro X

By Marquee Selection: The locators (and the cycle area) are set to the borders of the marquee selection in the marquee stripe.

Select parts of regions in the Tracks area — Logic Pro X

Control-click the marquee stripe, then choose Set Locators by Regions/Events/Marquee from the shortcut menu.

⇧ SHIFT – ⌃ CONTROL – ⌥ OPTION – ⌘ COMMAND

Convert Loops to Regions ⌃L — Logic Pro X keyboard command of the day

Logic Pro X keyboard command of the day. #LogicProX @StudioIntern1

  Convert Loops to Regions    ⌃L

When you convert loops to regions you can edit any of the occurrences of the loop to make changes. If you edit the loop without conversion every copy of the loop changes.

⇧ SHIFT – ⌃ CONTROL – ⌥ OPTION – ⌘ COMMAND

Forward by Transient ⌃. — Logic Pro X keyboard command of the day

Logic Pro X keyboard command of the day. #LogicProX @StudioIntern1

  Forward by Transient   ⌃.

Handy. Move the playhead forward to the next transient. Very useful when I am trying to align tracks made on different recording devices.

⇧ SHIFT – ⌃ CONTROL – ⌥ OPTION – ⌘ COMMAND

Open Chord Grid Library… — Logic Pro X keyboard command of the day

Logic Pro X keyboard command of the day. #LogicProX @StudioIntern1

  Open Chord Grid Library…

Open the Chord Grid Library window. It’s in the Global Menus, but difficult to find. The menu command is located in the Preferences section of the Logic Pro menu.

Bonus tip — turn on the audition button at the bottom of the selector, then click on a chord. You can choose ‘chord, arpeggio up, arpeggio down’ and ‘fast, medium, slow’ — very nice!

Chord grids overview — Logic Pro X

The Chord Grid Library window contains three panes: the Instrument Editor, Chord Grid Selector, and Chord Grid Editor. The Instrument Editor may not be available, depending on which method you use to open the Chord Grid Library.

⇧ SHIFT – ⌃ CONTROL – ⌥ OPTION – ⌘ COMMAND