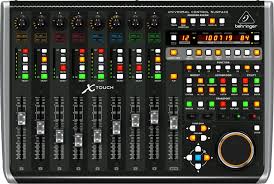
All about markers, especially creating them from the MCU.
Press the “Marker” button and hold. The secrets of the V-pots are revealed.
I use “Large Marker” mode to listen to new tracks.
Easiest to “quote” the relevant pages from the Control Surfaces manual
Mackie Control Marker button
Mackie Control Marker button overview
Press the MARKER button to activate one of three marker modes: Small Marker mode, Large Marker mode, and Temporary Marker mode. You can use these modes to create or delete markers and jump to markers in your project.
Note: The Marker and Nudge modes are mutually exclusive; activating one deactivates the other.
Small Marker mode: Press the MARKER button to activate Small Marker mode. Small Marker mode is useful if you want to jump to markers while using the V-Pots for other purposes. In this mode, pressing the FAST FWD or REWIND button moves the playhead to the next or previous marker. Pressing the MARKER button again reverts to the default behavior of the FAST FWD and REWIND buttons. (See Mackie Control transport buttons overview.)
Large Marker mode: Hold down the SHIFT button, then press the MARKER button to show three create options on the LCD, assigned to the three rightmost V-Pot buttons. (See Large Marker mode.)
Temporary Marker mode: Hold down the MARKER button if you want to enter Marker mode temporarily to quickly perform a few marker functions. Press one (or more) of the V-Pot[…]”
Excerpt From: Apple Inc. “Logic Pro X Control Surfaces Support.” iBooks.
Control
— Action
V-Pot 1 to 5
— Displays the first five markers by name. Pressing a V-Pot button moves the playhead to the corresponding marker. When the playhead position is inside a marker, the lower line displays INSIDE, and the V-Pot LED ring is lit.
V-Pot 6
— Cr w/o—Creates a marker, without rounding to the nearest bar.
V-Pot 7
— Create—Creates a marker, rounded to the nearest bar.
V-Pot 8
— Delete—Deletes the marker above the current playhead position.
A recommended workflow for creating or deleting markers is to use the Jog/Scrub Wheel. Turn the wheel to move the playhead to the required project position, and then press the appropriate V-Pot to create or delete a marker.
For coarse placement, use the wheel to move the playhead.
For fine placement, press the SCRUB button, then use the wheel to precisely position the playhead. (This technique is only appropriate if creating or deleting an unrounded marker.)
For more information about using the Jog/Scrub Wheel, see Mackie Control Jog/Scrub wheel.
Large Marker mode is ended by pressing the MARKER button again.
Excerpt From: Apple Inc. “Logic Pro X Control Surfaces Support.


