Rewind one 1/16 Note — Logic Pro X keyboard command of the day

  Rewind one 1/16 Note

Move the playhead (play position) backwards one sixteenth note. Useful when programming music from the keyboard.

A lot of the interface is muscle memory. We see an image, click on it, something happens. It’s hard to learn keyboard commands for doing lots of things because we don’t have an image on screen that we can associate to the keyboard action. It takes __lots__ of practice.

Kinesthetic learning…important concept.

Get started with project playback in Logic Pro — Apple Support

You can play back the project at any time to hear your latest changes. You control playback and navigate the project using the playhead, the ruler, and the transport buttons, located in the control bar.

Use transport keyboard shortcuts in Logic Pro — Apple Support

Some transport functions are available as key commands. Most of these transport key commands have no default assignment, and need to be assigned manually. See Assign key commands in Logic Pro.
Toggle Track On of all Tracks With Same Instrument of Project — Logic Pro X keyboard command of the day

  Toggle Track On of all Tracks With Same Instrument of Project

Tracks can be turned off to help control the consumption of resources. You can have multiple tracks that use the same instrument. When multiple tracks share an instrument they share the channel strip. Resource consumption is apparently controlled by the channel strips, at least for plugin loading and processing.

Using the ‘Toggle Track On’ of all tracks command will ensure that the channel strip resources will be deactivated or activated as needed.

In complex projects I would imagine that it is very easy to lose track of all of the tracks that might point to the same instrument.

I wonder what might be the harm in changing the ‘Toggle Track On – ⌥M’ keyboard shortcut to invoke the ‘Toggle Track On of all Tracks With Same Instrument of Project’ command. It certainly seems to perform the same function for an Audio track or an External MIDI track…

Turn off tracks in Logic Pro — Apple Support

When no other track is assigned to the same channel strip, turning off a track also saves processing power, because plug-ins on the channel strip are no longer processed. Turning a track off (or turning it back on) takes slightly longer than muting or unmuting the track, due to internal pre-processing. Unlike muting a track, turning off a track can not be automated.

Set Finger Tool ⌥8⃣ — Logic Pro X keyboard command of the day

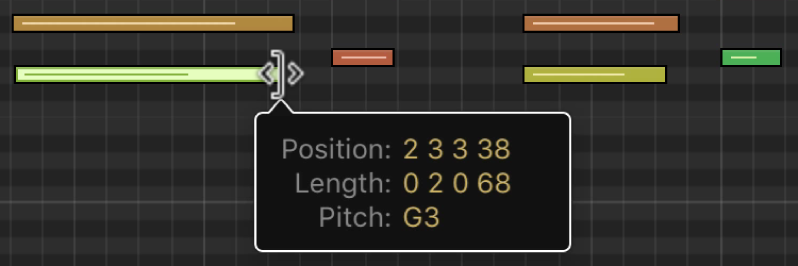
resize event
  Set Finger Tool        ⌥8⃣

Use the Finger Tool to change the length of events in the Piano Roll, or move steps in the Step Editor.

Only visible in the Tool Menu for the Piano Roll and Step Editor. Keyboard quick access is ‘T’-‘F’

Resize notes in the Piano Roll Editor in Logic Pro — Apple Support

You can resize notes in the Piano Roll Editor to change their length (duration). Notes can be resized from either their start or end point using the Pointer, Finger, or Pencil tool.

Play Next Scene — Logic Pro X keyboard command of the day

  Play Next Scene

Play the next scene (to the right) on the Live Loops grid.

Here we document _scene_ — a column in the grid

Start and stop Live Loops cells in Logic Pro — Apple Support

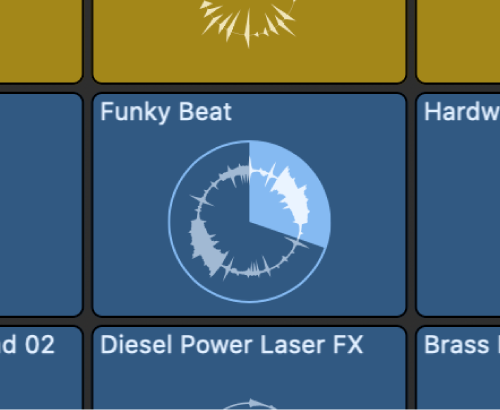
You can start and stop cells individually, or start and stop all the cells in a scene (a column in the grid) simultaneously. Only one cell can play on a track at any time. You can select one or more cells in different scenes and queue them to play together. While a cell is playing, a circular indicator in the middle of the cell shows the current playback position.

Novation Launchpad buttons overview — Apple Support

In Session mode you use the Scene buttons along the bottom of the Launchpad to trigger scenes in Live Loops. You also use the Scene buttons in Mixer mode to perform different functions. The Scene buttons are labeled slightly different, depending on the Launchpad model you are using. Unless noted otherwise, this document refers to the Scene buttons labeled from left to right as follows:

In the land of Ableton scenes are horizontal and made up of clips. In Logic scenes are vertical and contain cells.

Session View — Ableton Reference Manual Version 10 | Ableton

The horizontal rows are called scenes. The Scene Launch buttons are located in the rightmost column, which represents the Master track (see 15.4). To launch every clip in a row simultaneously, click on the associated Scene Launch button. This can be very useful in organizing the live performance of a song with multiple parts.