Duplicate Screenset… — Logic Pro X keyboard command of the day

Logic Pro X keyboard command of the day. #LogicProX @StudioIntern1

  Duplicate Screenset…

Found in the “Screenset” menu — the number in the menu bar on the right.

Enter a number and a name. Modify new screenset to fit.

Screensets are very useful. Open windows, size them, position them, make the screen work for you. Save the settings, I tend to “lock” my screensets, and recall with the press of a key.

Create, recall, and switch screensets — Logic Pro X:

You position windows in a layout that suits the way you work. This layout of various windows, including their display size, zoom levels, position, and other settings, is called a screenset. Once defined, you can save, and freely switch between different screensets, much as you might between different computer displays.

The “Orchestral” template has a large number of screensets that show good examples of how to use them to your advantage.

One of the first online resources I found and paid for in my search for Logic tutorials was about using screensets.

Logic Studio Training — Logic Pro Tutorials:

Watch the Logic Pro X Quick Start Video Guide and learn how to use Logic Pro X in under 13 minutes. Enter your email address to watch!

⇧ SHIFT – ⌃ CONTROL – ⌥ OPTION – ⌘ COMMAND
Set Track and MIDI Thru Parameters by Region/Folder — Logic Pro X keyboard command of the day

Logic Pro X keyboard command of the day. #LogicProX @StudioIntern1

  Set Track and MIDI Thru Parameters by Region/Folder

This was hard to track down.

My current description is…with a region (or multiple regions) selected the command will set the defaults for track and MIDI regions to the settings of the selected region(s).

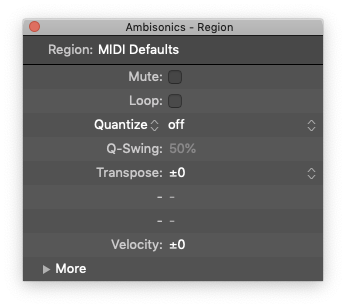
Much confusion occurred. Documentation refers to “MIDI Thru” as the region name. I have seen that. I tested the command and changed some MIDI defaults. Now the defaulted region is named “MIDI Defaults”. The latest documentation doesn’t reference “MIDI Thru” and uses the term defaults.

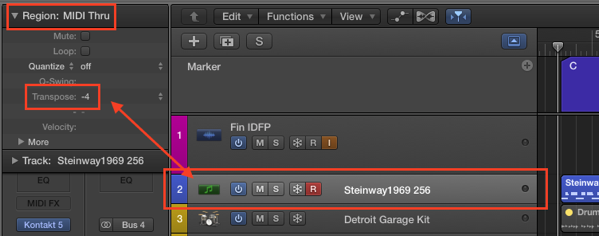
A “simpler” description is the region named “MIDI Thru” contains the MIDI settings that are applied to any MIDI coming in to Logic — like a MIDI Thru port — probably not the easiest thing for the non-MIDI generation to understand as the implication of the word “Thru”.

My Logic now reads “MIDI Defaults” — checking a different system to see what it looks like. My other Mac says “MIDI Defaults”. Following is an image from Apple…MIDI Thru Lives!

Region inspector — Logic Pro X:

The Region inspector shows parameters for the selected region or regions, including Quantize and other parameters. Some parameters are shared, while others are available for only audio or MIDI regions. There are additional advanced quantization parameters that you can view and edit by clicking the More disclosure triangle.

You can also open the Region inspector in a separate floating window.

⇧ SHIFT – ⌃ CONTROL – ⌥ OPTION – ⌘ COMMAND
MIDI Thru Lives!

1/8 Page Right — Logic Pro X keyboard command of the day

Logic Pro X keyboard command of the day. #LogicProX @StudioIntern1

  1/8 Page Right

Move the visible part of the current page in the Score Editor.

As far as I can tell “1/8 page” is 1/8 of the visible score. If your visible score is 8 bars wide then you can move the score a bar at a time. Handy.

Score layout overview — Logic Pro X:

You should use Linear Score view for editing, as screen redraws are much faster, especially on slower computers.

Notation overview — Logic Pro X:

You can view MIDI regions in software instrument (and external MIDI instrument) tracks as music notation in the Score Editor. Notes and other musical events are displayed as standard notation, along with common symbols such as time and key signature, bar lines, and clef signs. You can add and edit notes, add sustain pedal markings and other symbols, and print the score.

⇧ SHIFT – ⌃ CONTROL – ⌥ OPTION – ⌘ COMMAND
Replace with Overlapped Regions — Logic Pro X keyboard command of the day

Logic Pro X keyboard command of the day. #LogicProX @StudioIntern1

  Replace with Overlapped Regions

I have yet to come to a place in my work that I would use this type of command. As I read about overlapping regions/events, and the things that I might be able to do with them I start to get a glimmer of an idea. But mostly, no. I don’t see using this anytime soon.

Control positioning with drag modes — Logic Pro X:

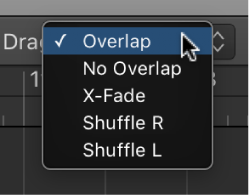
When Show Advanced Tools is selected in the Advanced preferences pane, the Drag pop-up menu is available in the Tracks area and in time-based editors (such as the Audio Track Editor and Piano Roll Editor). Using drag modes, you can control the results of moving, resizing, or deleting regions in the Tracks area.

⇧ SHIFT – ⌃ CONTROL – ⌥ OPTION – ⌘ COMMAND

Add Selected Channel Strips to Selected Groups — Logic Pro X keyboard command of the day

Logic Pro X keyboard command of the day. #LogicProX @StudioIntern1

  Add Selected Channel Strips to Selected Groups

Select a Channel Strips by clicking on it. Add strips to the selection by holding down the shift key and clicking on a second one. This will select all the strips in between the first and second. Use command click to select non-contiguous strips.

Show the Groups window (⌥⇧G) is the easiest way. Expand the Groups window so you can see the list of groups. Select groups with click, shift-click, or command-click. Choose “Add selected channel strips” from the gear menu, or use the keyboard equivalent.

I think I like the possibility of “Track Zoom” and “Hide”, along with automating the group.

Groups overview — Logic Pro X:

Prior to mixing, you may find it useful to define some logical channel strip groups. You could, for example, group all drum channel strips under one drum group. This would allow you to control the group meters (volume, pan, mute, solo, sends, and so on) using a single control, while still maintaining the relative parameter values of each channel strip.

You can also automate a group. This lets you easily set the change for parameters of a group of channel strips over the course of a project. For example, you may wish to group all of your guitar channel strips together and have all of their relative volumes change at the same time throughout your project.

⇧ SHIFT – ⌃ CONTROL – ⌥ OPTION – ⌘ COMMAND