Create, recall, and switch screensets — Logic Pro X

Create, recall, and switch screensets — Logic Pro X

Switch a screenset during playback

  1. Select the MIDI region into which you want to insert the meta event.
  2. Set the playhead to the point where you want the screenset to change.
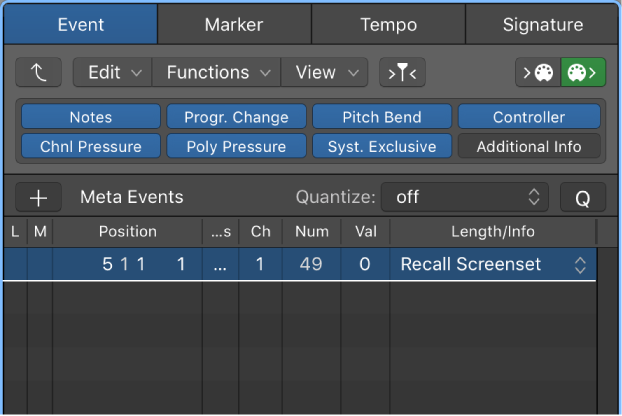
  3. Click the Create button in the Event List, then click the Meta Events button.
  4. The inserted meta event has a default value of 50 (Project Select).
  5. Alter the number in the Num column from 50 to 49.
  6. This changes the name to screenset.
  7. Enter the screenset number in the Val column.

You can stop screenset switching by muting the MIDI region that contains the meta 49 even

This is very intriguing thing. It can be disconcerting to have the screenset switch, but it could also be quite useful.

My templates usually contain a hidden MIDI track to provide some useful information. At the minimum, if there is a MIDI track, and you export it, the resulting MIDI file will have all of the markers embedded. Handy to provide feedback for other mixing environments that don’t have project/track notes.

NB the way to put notes into the project so they can be shared is using markers. Think of them as “tweets” of 127 characters or less.

Recall Screenset 5 5 — Logic Pro X keyboard command of the day

Logic Pro X keyboard command of the day. #LogicProX @StudioIntern1

  Recall Screenset 5    5

Think of Screensets as workspaces. You can display windows, position them, zoom tracks as needed for a part of a workflow and save everything in place.

Create, recall, and switch screensets — Logic Pro X

You position windows in a layout that suits the way you work. This layout of various windows, including their display size, zoom levels, position, and other settings, is called a screenset. Once defined, you can save, and freely switch between different screensets, much as you might between different computer displays.

⇧ SHIFT – ⌃ CONTROL – ⌥ OPTION – ⌘ COMMAND

Advanced Quantization Parameters — Logic Pro X keyboard command of the day

Logic Pro X keyboard command of the day. #LogicProX @StudioIntern1

  Advanced Quantization Parameters

Expose the advanced quantization parameters in the Region Inspector. Essentially this clicks the exposure triangle on the “More” section of the inspector. For MIDI regions you can see things like Q-velocity (see image). For audio regions you can expose the fade and delay settings.

Advanced quantization parameters — Logic Pro X

When Show Advanced Tools is selected in the Advanced preferences pane, you can quantize regions with greater precision using the advanced quantization parameters in the Region inspector. Using the advanced parameters, you can apply a swing or other quantize feel to MIDI regions. Not all advanced quantization parameters are available for audio regions.

⇧ SHIFT – ⌃ CONTROL – ⌥ OPTION – ⌘ COMMAND

Split Regions/Events at Playhead Position ⌘T ⌘1⃣ — Logic Pro X keyboard command of the day

Logic Pro X keyboard command of the day. #LogicProX @StudioIntern1

  Split Regions/Events at Playhead Position  ⌘T  ⌘1⃣

I have been splitting regions at the Playhead Position since my very first live recording mixed in Logic.

Position the playhead, select all the tracks/regions desired, and split.

Still learning the command(s) to do this with the Marquee tool, usually ⌘U to set the locators, and turn on cycle followed by ⌃⌘T to split the region(s) at the locators or Marquee selection.

⇧ SHIFT – ⌃ CONTROL – ⌥ OPTION – ⌘ COMMAND

Select And Operate using Transform User Preset 22 — Logic Pro X keyboard command of the day

Logic Pro X keyboard command of the day. #LogicProX @StudioIntern1

  Select And Operate using Transform User Preset 22

Serendipity. Yesterday we had ‘Apply Transform’ and I spoke to the ‘Select and Operate’ version of the command(s).

Today we get a ‘Select and Operate’. There are 32 of them.

MIDI Transform window examples — Logic Pro X:

This section provides several usage examples for the MIDI Transform window.

⇧ SHIFT – ⌃ CONTROL – ⌥ OPTION – ⌘ COMMAND