Toggle Hide Group 11 — Logic Pro X keyboard command of the day

Logic Pro X keyboard command of the day. #LogicProX @StudioIntern1

  Toggle Hide Group 11

Hmm. 32 groups. The keyboard commands for 1 through 9 are ⌃⇧1 to ⌃⇧9 .

The commands do what I expect. If there is a group numbered ‘n’ the command toggles the view of the tracks/channels. Hidden, but not like “Hide Track”.

Groups appear to be very useful. I should use them more. I fooled around with them a bit to try and change colors more easily, but they do so much more.

Groups are “mixer groups”. The overview helps us get started.

Groups overview
The Mixer groups feature is only available when Show Advanced Tools is selected in the Advanced preferences pane.

Prior to mixing, you may find it useful to define some logical channel strip groups. You could, for example, group all drum channel strips under one drum group. This would allow you to control the group meters (volume, pan, mute, solo, sends, and so on) using a single control, while still maintaining the relative parameter values of each channel strip.

Excerpt From: Apple Inc. “Logic Pro X User Guide.” iBooks.

⇧ SHIFT – ⌃ CONTROL – ⌥ OPTION – ⌘ COMMAND
Recall Screenset 5 5 — Logic Pro X keyboard command of the day

Logic Pro X keyboard command of the day. #LogicProX @StudioIntern1

  Recall Screenset 5    5

Think of Screensets as workspaces. You can display windows, position them, zoom tracks as needed for a part of a workflow and save everything in place.

Create, recall, and switch screensets — Logic Pro X

You position windows in a layout that suits the way you work. This layout of various windows, including their display size, zoom levels, position, and other settings, is called a screenset. Once defined, you can save, and freely switch between different screensets, much as you might between different computer displays.

⇧ SHIFT – ⌃ CONTROL – ⌥ OPTION – ⌘ COMMAND

Advanced Quantization Parameters — Logic Pro X keyboard command of the day

Logic Pro X keyboard command of the day. #LogicProX @StudioIntern1

  Advanced Quantization Parameters

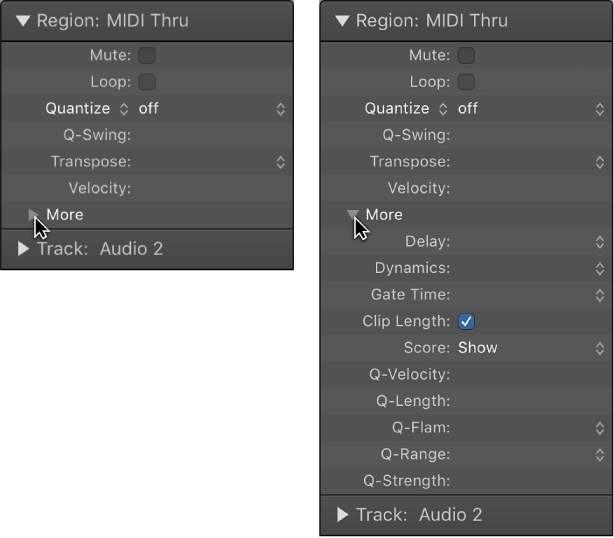
Expose the advanced quantization parameters in the Region Inspector. Essentially this clicks the exposure triangle on the “More” section of the inspector. For MIDI regions you can see things like Q-velocity (see image). For audio regions you can expose the fade and delay settings.

Advanced quantization parameters — Logic Pro X

When Show Advanced Tools is selected in the Advanced preferences pane, you can quantize regions with greater precision using the advanced quantization parameters in the Region inspector. Using the advanced parameters, you can apply a swing or other quantize feel to MIDI regions. Not all advanced quantization parameters are available for audio regions.

⇧ SHIFT – ⌃ CONTROL – ⌥ OPTION – ⌘ COMMAND

Split Regions/Events at Playhead Position ⌘T ⌘1⃣ — Logic Pro X keyboard command of the day

Logic Pro X keyboard command of the day. #LogicProX @StudioIntern1

  Split Regions/Events at Playhead Position  ⌘T  ⌘1⃣

I have been splitting regions at the Playhead Position since my very first live recording mixed in Logic.

Position the playhead, select all the tracks/regions desired, and split.

Still learning the command(s) to do this with the Marquee tool, usually ⌘U to set the locators, and turn on cycle followed by ⌃⌘T to split the region(s) at the locators or Marquee selection.

⇧ SHIFT – ⌃ CONTROL – ⌥ OPTION – ⌘ COMMAND

Select And Operate using Transform User Preset 22 — Logic Pro X keyboard command of the day

Logic Pro X keyboard command of the day. #LogicProX @StudioIntern1

  Select And Operate using Transform User Preset 22

Serendipity. Yesterday we had ‘Apply Transform’ and I spoke to the ‘Select and Operate’ version of the command(s).

Today we get a ‘Select and Operate’. There are 32 of them.

MIDI Transform window examples — Logic Pro X:

This section provides several usage examples for the MIDI Transform window.

⇧ SHIFT – ⌃ CONTROL – ⌥ OPTION – ⌘ COMMAND