Cycle Preview On/Off ⌃C — Logic Pro X keyboard command of the day

Logic Pro X keyboard command of the day. #LogicProX @StudioIntern1

  Cycle Preview On/Off    ⌃C

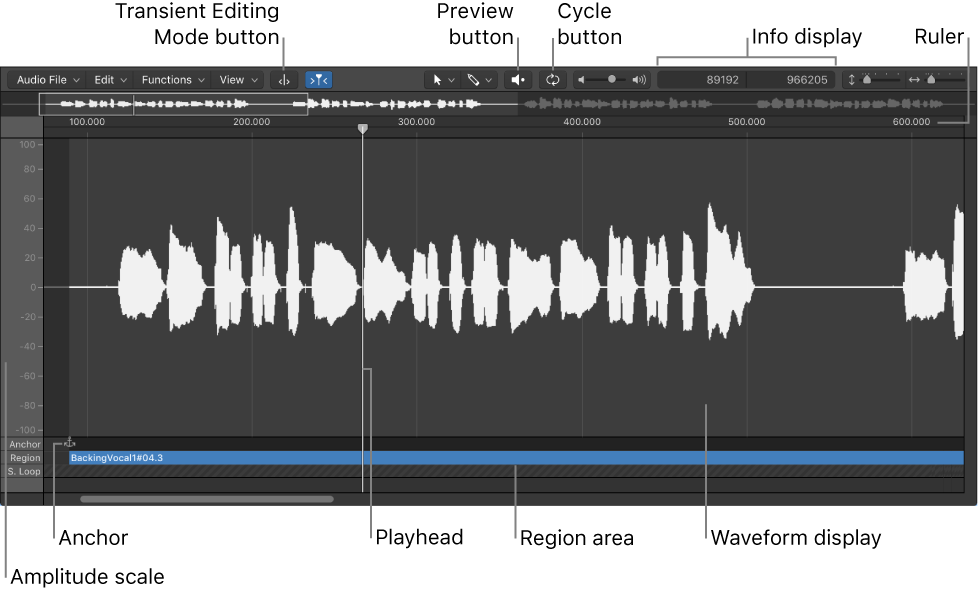
There is a Preview button in the Audio File Editor, the Smart Tempo Editor, and the Project Audio window. When it is on and you press Play the selected audio will loop.

Audio File Editor interface overview — Logic Pro X

Cycle button: Loops playback of the selected area.

Work in the Smart Tempo Editor — Logic Pro X

Cycle button: Turn Cycle mode on or off. If a selection exists, the Cycle region matches the selection. If no selection exists, Cycle mode extends the length of the audio file.

Project Audio Browser interface — Logic Pro X

Cycle button: Loops playback of the selected audio file or region. Use in combination with the Play button.

⇧ SHIFT – ⌃ CONTROL – ⌥ OPTION – ⌘ COMMAND

Show Detailed Help ⌘/ — Logic Pro X keyboard command of the day

Logic Pro X keyboard command of the day. #LogicProX @StudioIntern1

  Show Detailed Help    ⌘/

This is the fastest way to find out how something works. Open the Key Commands Edit window (⌥K), type in a bit of the command name so it appears in the list. Move the cursor over the command and type ⌘/ — if there is help available it will open in the help window.

Remarkably useful.

How to get help — Logic Pro X

Logic Pro provides several ways for you to get answers to questions, learn about controls and functions while you’re working, and view detailed information about all aspects of the app. You can also view information directly in the app using the Quick Help feature.

⇧ SHIFT – ⌃ CONTROL – ⌥ OPTION – ⌘ COMMAND

Select Equal Colored Channel Strips ⇧C — Logic Pro X keyboard command of the day

Logic Pro X keyboard command of the day. #LogicProX @StudioIntern1

  Select Equal Colored Channel Strips    ⇧C

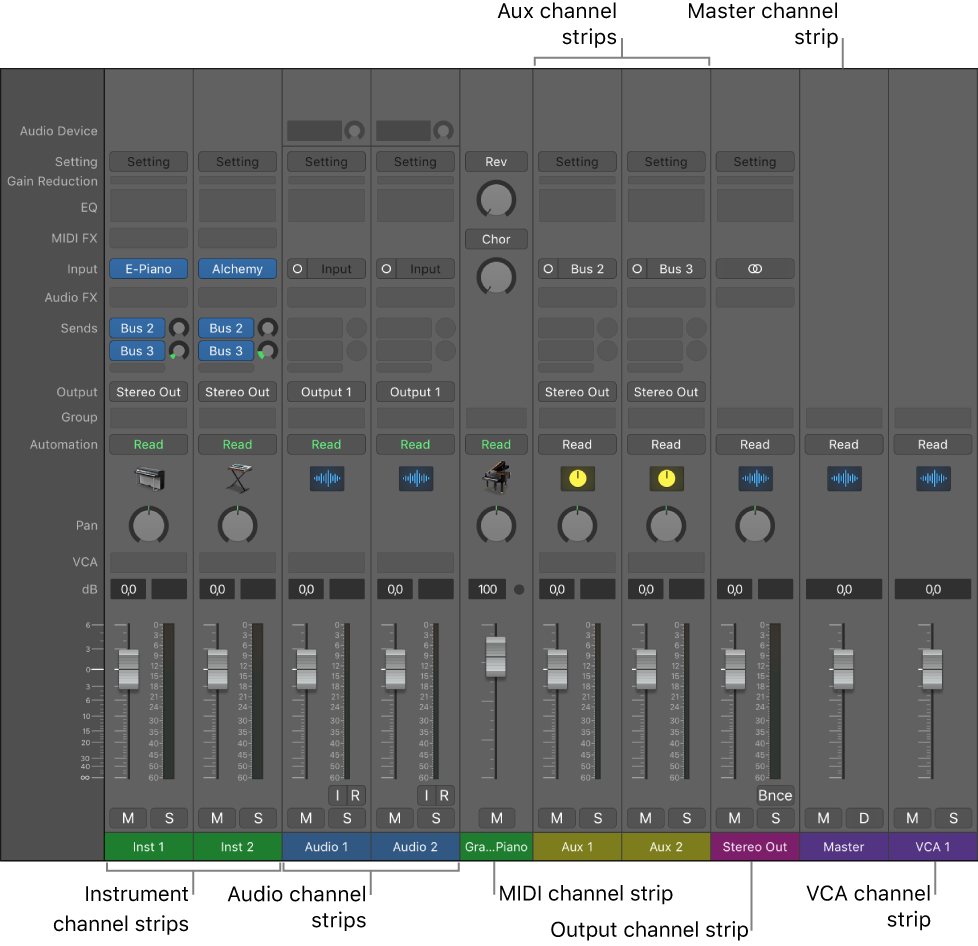
In the Mixer. Using the visual cues to help work with a project seems more useful with larger/multiple screens. Certainly handy when trying to grab all the AUX channels.

This makes a case for being consistent with color coding.

Channel strip types — Logic Pro X

You use channel strips to process audio or MIDI information that is routed from tracks. The Mixer shows all channel strips in your project, including track channel strips, auxiliary and output channel strips, VCA channel strips, and the master channel strip. When you create a new project, the Mixer already includes channel strips for any audio, instrument, and MIDI tracks in your template, as well as the master channel strip and one or more output channel strips depending on your audio interface. As you add audio, instrument, and MIDI tracks to your projects, channel strips are added to the Mixer for each new track.

⇧ SHIFT – ⌃ CONTROL – ⌥ OPTION – ⌘ COMMAND

Add Selected Models — Logic Pro X keyboard command of the day

Logic Pro X keyboard command of the day. #LogicProX @StudioIntern1

  Add Selected Models

Control Surfaces Setup. Adds the selected control surface models.

Add a control surface to Logic Pro — Apple SupportSome control surfaces such as Mackie Control are detected automatically when you open Logic Pro. You can add other devices that are not detected automatically using the Setup window. Installation is covered in the setup section for your particular device. Some devices may require different or additional steps, but in most cases you only need to select the name of the device you want to use with Logic Pro, then add it. When you add a control surface device, it is represented by an icon in the Device area of the Control Surface Setup window.

Older versions of the online help documentation have been removed (checked 2020-09-29). Added link to new support version of the documentation. I am not a fan of the modern support version of the help documentation.

⇧ SHIFT – ⌃ CONTROL – ⌥ OPTION – ⌘ COMMAND

Nudge Region/Event Position Left by SMPTE Bit — Logic Pro X keyboard command of the day

Logic Pro X keyboard command of the day. #LogicProX @StudioIntern1

  Nudge Region/Event Position Left by SMPTE Bit

One of the many nudge commands that can be used without having to set the Nudge Value before using. I would program keyboard commands for the nudge events, probably arrow keys with modifiers. Another useful possibility would be to program the keypad in an arrow pattern — 8 (up) 2 (down) 4 (left) 6 right.

Move regions in the Tracks area — Logic Pro X

You can move regions to a different point in the same track, or move them to another track of the same type. You can move an audio region to another audio track, for example, but not to a software instrument track, or vice versa. You can also move regions between open Tracks area windows, or between different open projects.

The X-Touch (MCU) has nudge features pre-defined. I would probably use this if I had the X-Touch in front of a display. Currently it is not feasible.

Mackie Control Nudge button overview — Control Surfaces Help

The NUDGE button allows you to move (nudge) selected audio or MIDI regions (or events) in Small, Large, or Temporary Nudge mode.

⇧ SHIFT – ⌃ CONTROL – ⌥ OPTION – ⌘ COMMAND

Command    Key Touch Bar
- Main Window Tracks and Various Editors
Nudge Region/Event Position Right by Nudge Value ⌥→
Nudge Region/Event Position Left by Nudge Value ⌥←
Nudge Region/Event Position Right by Tick
Nudge Region/Event Position Left by Tick
Nudge Region/Event Position Right by Division
Nudge Region/Event Position Left by Division
Nudge Region/Event Position Right by Beat
Nudge Region/Event Position Left by Beat
Nudge Region/Event Position Right by Bar
Nudge Region/Event Position Left by Bar
Nudge Region/Event Position Right by SMPTE Frame
Nudge Region/Event Position Left by SMPTE Frame
Nudge Region/Event Position Right by SMPTE Bit
Nudge Region/Event Position Left by SMPTE Bit
Nudge Region/Event Position Right by 1/2 SMPTE Frame
Nudge Region/Event Position Left by 1/2 SMPTE Frame
Nudge Region/Event Position Right by 5 SMPTE Frames
Nudge Region/Event Position Left by 5 SMPTE Frames
Nudge Region/Event Position Right by Sample
Nudge Region/Event Position Left by Sample
Nudge Region/Event Position Right by 1 ms
Nudge Region/Event Position Left by 1 ms
Nudge Region/Event Position Right by 10 ms
Nudge Region/Event Position Left by 10 ms
Nudge Region/Event Length Right by Nudge Value ⌥⇧→
Nudge Region/Event Length Left by Nudge Value ⌥⇧←
Nudge Region/Event Length Right by Tick
Nudge Region/Event Length Left by Tick
Nudge Region/Event Length Right by Division
Nudge Region/Event Length Left by Division
Nudge Region/Event Length Right by Beat
Nudge Region/Event Length Left by Beat
Nudge Region/Event Length Right by Bar
Nudge Region/Event Length Left by Bar
Nudge Region/Event Length Right by SMPTE Frame
Nudge Region/Event Length Left by SMPTE Frame
Nudge Region/Event Length Right by SMPTE Bit
Nudge Region/Event Length Left by SMPTE Bit
Nudge Region/Event Length Right by 1/2 SMPTE Frame
Nudge Region/Event Length Left by 1/2 SMPTE Frame
Nudge Region/Event Length Right by 5 SMPTE Frames
Nudge Region/Event Length Left by 5 SMPTE Frames
Nudge Region/Event Length Right by Sample
Nudge Region/Event Length Left by Sample
Nudge Region/Event Length Right by 1 ms
Nudge Region/Event Length Left by 1 ms
Nudge Region/Event Length Right by 10 ms
Nudge Region/Event Length Left by 10 ms