Create 2 Track Automation Points at Region Borders ⌃⇧⌘2 — Logic Pro X keyboard command of the day

Logic Pro X keyboard command of the day. #LogicProX @StudioIntern1

  Create 2 Track Automation Points at Region Borders    ⌃⇧⌘2

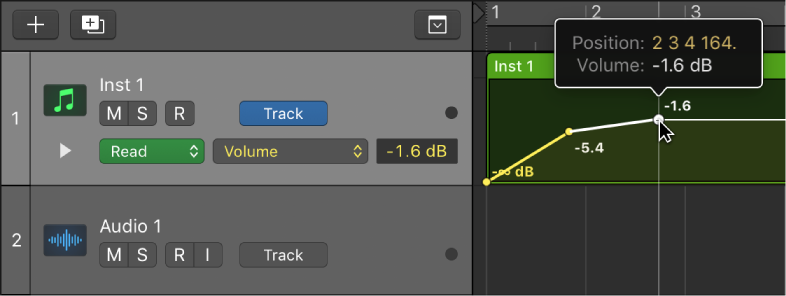
This creates automation points that effectively give you an automation ‘curve’ for the region selected, and an automation ‘curve’ for the before-region and the after-region. Basically you can simply adjust the automation ‘inside’ the region.

The ‘Automate mix and effect settings’ section of the manual is a very good read.

Add and adjust automation points — Logic Pro X

To add two automation points at each region border: Select the region, then choose Mix > Create Track Automation > Create 2 Automation Points at Region Borders.

This pointer to a video from Eli Krantzberg is very enlightening about automation points.

Logic Pro Expert | Learn The Secret Handshake and Become a Member of Logic’s Hidden Automation Key Combination Elite — learning at the elbow of the internet

⇧ SHIFT – ⌃ CONTROL – ⌥ OPTION – ⌘ COMMAND

Show/Hide Signature Track — Logic Pro X keyboard command of the day

Logic Pro X keyboard command of the day. #LogicProX @StudioIntern1

  Show/Hide Signature Track

Displays time signature and key signature below the rulers. Sometimes it’s nice to be able to see where you are at a glance. I’m used to printed scores, so seeing the Signature track is a bit different.

Time and key signatures overview — Logic Pro X

Time and key signatures are global events that affect all tracks in a project. When you create a new project, you can set the time and key signature in the Project Chooser. You can view time and key signatures in the Signature track, the Signature List, and the Score Editor, and add and edit signature changes in a variety of ways.

⇧ SHIFT – ⌃ CONTROL – ⌥ OPTION – ⌘ COMMAND

Snap Mode: Quarter Frames — Logic Pro X keyboard command of the day

Logic Pro X keyboard command of the day. #LogicProX @StudioIntern1

  Snap Mode: Quarter Frames

Sets the ‘snap to grid’ value to quarter frames. I often wondered how people got the music and the video to line up so well. Frames (and fractional frames) are just the thing.

Work with absolute time code — Logic Pro X

The production process for video, film, or TV commercials is different from music production. Synchronization is always used, unlike in music production, where it is not always required. You need to work in absolute time: hours, minutes, seconds, and frames, rather than in bars and beats. Edits to the video, including changes to scene length, additional cuts, the use of slow or fast motion, and dialogue changes (or “redos”) are among the many situations that you will encounter when creating or editing a soundtrack.

⇧ SHIFT – ⌃ CONTROL – ⌥ OPTION – ⌘ COMMAND

Go to Next Marker And Set Locators ⌥. — Logic Pro X keyboard command of the day

Logic Pro X keyboard command of the day. #LogicProX @StudioIntern1

  Go to Next Marker And Set Locators ⌥.

Move to the next marker (you did make markers, didn’t you?) and set the locators. This makes it easy to move to the next section of the project and have the transport all ready for work.

I don’t use markers well enough. I should remember my piano training (Dr. Erlings) and do the 50,000 ft overview followed by finding the sections of the project. Set the markers to help make sense of things.

I need serious work in identifying song structure in the current world of music.

Dedicate some hours to working with markers — and the X-Touch!

⇧ SHIFT – ⌃ CONTROL – ⌥ OPTION – ⌘ COMMAND

Snap to Grid On/Off ⌘G — Logic Pro X keyboard command of the day

Logic Pro X keyboard command of the day. #LogicProX @StudioIntern1

  Snap to Grid On/Off    ⌘G

Disable Snap mode. Sometimes you don’t necessarily want the event to move. Using the key command is almost essential since the pointer is occupied with the positioning of the event.

Snap items to the grid — Logic Pro X

The Tracks area includes a grid that helps you align regions, automation points, and other items with the time divisions in the ruler. When you perform any of the following actions, the items move according to the current Snap value:

⇧ SHIFT – ⌃ CONTROL – ⌥ OPTION – ⌘ COMMAND