Select Members of Selected Groups — Logic Pro X keyboard command of the day

  Select Members of Selected Groups

This is a command that is found in the gear menu of the Groups inspector. Select one or more goops in the list of groups. Using the ‘Select Members of Selected Groups’ command will select all the channels that are contained in the group(s).

Overview of groups in Logic Pro — Apple Support

Prior to mixing, you may find it useful to define some logical channel strip groups. You could, for example, group all drum channel strips under one drum group. This would allow you to control the group meters (volume, pan, mute, solo, sends, and so on) using a single control, while still maintaining the relative parameter values of each channel strip.

Open Group Settings… — Logic Pro X keyboard command of the day

Logic Pro X keyboard command of the day. #LogicProX @StudioIntern1

  Open Group Settings…

Opens the Group Inspector in a separate window and expose the settings (disclosure triangle).

You can drag the Group Inspector out of the inspectors area in the main window. The state of the Settings disclosure remains unchanged.

Very useful if you have a screenset without the main window open and want to get to the group settings.

The Key Commands entry indicates that this is only available as a Key Command, but I have found that clicking on the Groups channel strip component brings up a menu with this command in it.

Groups inspector — Logic Pro X

You use the Groups inspector to define the behavior of each Mixer group. The Groups inspector appears in the Track inspector when one or more groups have been created, and it can be opened as a floating window as well. It contains the following settings:

⇧ SHIFT – ⌃ CONTROL – ⌥ OPTION – ⌘ COMMAND

Toggle Hide View H — Logic Pro X keyboard command of the day

Logic Pro X keyboard command of the day. #LogicProX @StudioIntern1

  Toggle Hide View    H

Toggles the “hide” button available in the track header. The large “H” button is turned green, next press of “H” will hide tracks and make the “H” orange to indicate hidden tracks.

The whole matter of hiding and showing things is related to screen real estate. Really not a big issue for smaller projects, but it can get very crowded very quickly.

Group hiding is kind of handy. Quick key commands to completely hide tracks and corresponding channels.

I really wish I didn’t have to try to remember which group of tracks/channels got assigned to “1” or “7”.

⇧ SHIFT – ⌃ CONTROL – ⌥ OPTION – ⌘ COMMAND

Toggle Hide Group 17 — Logic Pro X keyboard command of the day

Logic Pro X keyboard command of the day. #LogicProX @StudioIntern1

  Toggle Hide Group 17

Hmm. 32 groups. The keyboard commands for 1 through 9 are ⌃⇧1 to ⌃⇧9 .

The commands do what I expect. If there is a group numbered ‘n’ the command toggles the view of the tracks/channels. Hidden, but not like “Hide Track”.

Groups appear to be very useful. I should use them more. I fooled around with them a bit to try and change colors more easily, but they do so much more.

Groups are “mixer groups”. The overview helps us get started.

Groups overview
The Mixer groups feature is only available when Show Advanced Tools is selected in the Advanced preferences pane.

Prior to mixing, you may find it useful to define some logical channel strip groups. You could, for example, group all drum channel strips under one drum group. This would allow you to control the group meters (volume, pan, mute, solo, sends, and so on) using a single control, while still maintaining the relative parameter values of each channel strip.

Excerpt From: Apple Inc. “Logic Pro X User Guide.” iBooks.

⇧ SHIFT – ⌃ CONTROL – ⌥ OPTION – ⌘ COMMAND

Toggle Hide Group 6 ⌃⇧6 — Logic Pro X keyboard command of the day

Logic Pro X keyboard command of the day. #LogicProX @StudioIntern1

  Toggle Hide Group 6    ⌃⇧6

Shows/hides all channel strips and tracks that are in Group 6.

Using numbers for groups makes sense, but doesn’t really help. When you look at the group setting in the mixer you can see both the number and the name (if specified) which helps a whole bunch.

Using groups to control sends to things like reverb and delay makes a lot of sense.

One very important thing to know about is the “group clutch”. In earlier versions of Logic ‘group clutch’ was used to describe temporarily disabling group controls so a single channel could be altered without affecting the entire group. Press the clutch in to disengage, release the clutch to engage. I have read about “clutch buttons” in mixer windows, but have never seen one. The important command is

Enable/Disable Groups ⇧G

which does the trick. The group indicators dim when they are disabled. Very few people use clutches these days. Clutch was changed to Enable/Disable in Logic Pro X. My keyboard cover has the right key sequence — ⇧G — but calls it ‘Group Clutch’.

The Control Surface manual still describes group clutch. The Mackie Control uses the ‘CONTROL’ keep to engage the clutch. Hold down ‘CONTROL’ while changing a setting on a member of a group.

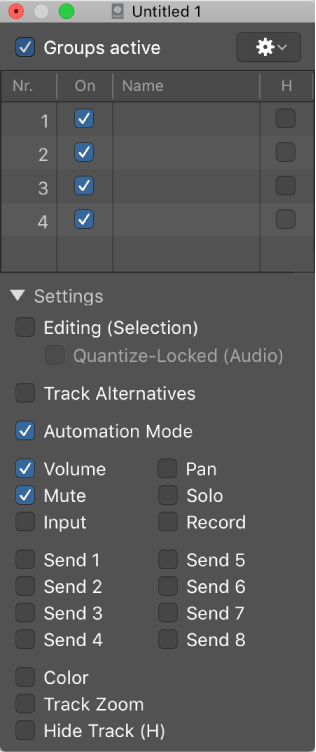
Groups inspector — Logic Pro X:

You use the Groups inspector to define the behavior of each Mixer group. The Groups inspector appears in the Track inspector when one or more groups have been created, and it can be opened as a floating window as well. It contains the following settings:

⇧ SHIFT – ⌃ CONTROL – ⌥ OPTION – ⌘ COMMAND