Tap Tempo — Logic Pro X keyboard command of the day

Logic Pro X keyboard command of the day. #LogicProX @StudioIntern1

  Tap Tempo

There are multiple places where Tap Tempo can be used. It is a Global Command not assigned to any key, a specific tool in the Smart Tempo editor.

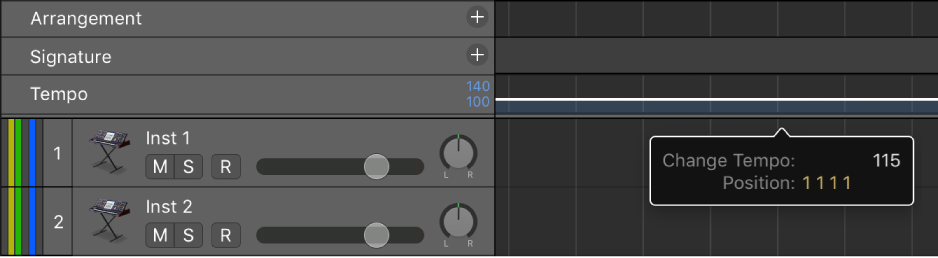
Set the project tempo — Logic Pro X:

Assign a key command to Tap Tempo, then use the key command to set the tempo.

The first time you tap the tempo, an alert appears, asking if you want to enable Tap Tempo.

Handy way to get a tempo “idea” out of your head and into the project. Most frequently I take drum tracks or drums and bass tracks and analyze the tempo. It’s easier if the tempo is known, but hey…

Work in the Smart Tempo Editor — Logic Pro X:

You can make adjustments in two different ways: by playing the file or selection and tapping the D and T keys on your computer keyboard to indicate downbeats (D) and beats (T), or by editing beat markers in the main display. When tapping in a selection, only the downbeats or beats in the selected area are changed.

⇧ SHIFT – ⌃ CONTROL – ⌥ OPTION – ⌘ COMMAND

Toggle Hide Group 16 — Logic Pro X keyboard command of the day

Logic Pro X keyboard command of the day. #LogicProX @StudioIntern1

  Toggle Hide Group 16

Hmm. 32 groups. The keyboard commands for 1 through 9 are ⌃⇧1 to ⌃⇧9 .

The commands do what I expect. If there is a group numbered ‘n’ the command toggles the view of the tracks/channels. Hidden, but not like “Hide Track”.

Groups appear to be very useful. I should use them more. I fooled around with them a bit to try and change colors more easily, but they do so much more.

Groups are “mixer groups”. The overview helps us get started.

Groups overview
The Mixer groups feature is only available when Show Advanced Tools is selected in the Advanced preferences pane.

Prior to mixing, you may find it useful to define some logical channel strip groups. You could, for example, group all drum channel strips under one drum group. This would allow you to control the group meters (volume, pan, mute, solo, sends, and so on) using a single control, while still maintaining the relative parameter values of each channel strip.

Excerpt From: Apple Inc. “Logic Pro X User Guide.” iBooks.

⇧ SHIFT – ⌃ CONTROL – ⌥ OPTION – ⌘ COMMAND

Set Scissors Tool ⌥:three: — Logic Pro X keyboard command of the day

Logic Pro X keyboard command of the day. #LogicProX @StudioIntern1

  Set Scissors Tool        ⌥:three:

I don’t edit audio very much. I typically put the playhead where I want to split a region, and use the split region command — ⌘T. It would probably be better for my workflow to start using the Marquee tool to select the area I want split apart and use the “Split Regions/Events at Locators or Marquee selection” — ⌃⌘T

If I had a touch bar that would speed things up as well.

It is important to remember to cross-fade between regions if there is sound happening. I have the fade tool and marquee tool enabled when the pointer tool is in the proper location. Makes fades easy. If I set the Scissors tool via the above command I now have to switch back to the pointer tool to do a simple fade.

We shall see how this works out.

Common tools — Logic Pro X:

The most common tools are briefly described in the following section. Tools for specific working areas or editors are covered in the respective chapters.

⇧ SHIFT – ⌃ CONTROL – ⌥ OPTION – ⌘ COMMAND

Toggle Track On ⌥M — Logic Pro X keyboard command of the day

Displays some of the buttons and tools available in the track header

Logic Pro X keyboard command of the day. #LogicProX @StudioIntern1

  Toggle Track On    ⌥M

Tracks can be turned on and off. This command toggles the on/off state of the track. If the on/off button is not currently being displayed in the track header using this command will cause the on/off button to be displayed. Regions in a track that is turned off have their color changed to gray.

I have started to use on/off control of tracks to un-clutter my mixes. Tracks that are printed with effects, or are parallel processing tracks are likely candidates. I will typically protect these tracks as well so I cannot modify them. They got printed this way for a reason, I shouldn’t presume to know better.

Turn off tracks — Logic Pro X:

When no other track is assigned to the same channel strip, turning off a track also saves processing power, because plug-ins on the channel strip are no longer processed. Turning a track off (or turning it back on) takes slightly longer than muting or unmuting the track, due to internal pre-processing. Unlike muting a track, turning off a track can not be automated.

⇧ SHIFT – ⌃ CONTROL – ⌥ OPTION – ⌘ COMMAND