9 Tips for Producing and Mixing House Music

9 Tips for Producing and Mixing House Music

by Daniel Dixon, iZotope Contributor July 3, 2019

We’ve already covered tips for mixing jazz, rock, and hip-hop. Today, we’re diving into house music.

Covering a wide range of styles within the genre—from classic anthems to vocal cuts to minimal, techy jams—these tips will be of service to house producers, engineers, and even DJs.

5 Ways to Boost Bass in a Mix

5 Ways to Boost Bass in a Mix

by Daniel Dixon, iZotope Contributor July 1, 2019

Learn how to boost bass in a mix with these five tips
Some songs seem to have a physical presence that sets them apart from the rest. This powerful sound and physical feeling are often created by a careful treatment of low and mid-range frequencies. Today, I’ll cover some tips for boosting bass and adding weight to a mix.

Selection Start and End to Previous Transient and Play ⌥⌘← — Logic Pro X keyboard command of the day

Logic Pro X keyboard command of the day. #LogicProX @StudioIntern1

  Selection Start and End to Previous Transient and Play    ⌥⌘←

In the Audio File Editor. Cleaning up drum bleed could be remarkably simple using the transients as guidelines. I am not the person to go to for editing advice, being performance oriented, but this is mighty handy.

Use transient markers to make selections — Logic Pro X

You can use transient markers to select part of an audio file for editing purposes.

⇧ SHIFT – ⌃ CONTROL – ⌥ OPTION – ⌘ COMMAND

Friday Tip — Panning Laws: Why They Matter — PreSonus Blog

Friday Tip — Panning Laws: Why They Matter — PreSonus Blog

You pan a mono signal from left to right. Simple, right? Actually, no. In the center, there’s a 3 dB RMS volume buildup because the same signal is in both channels. Ideally, you want the signal’s average level—its power—to have the same perceived volume, whether the sound is panned left, right, or center. Dropping the level when centered by 3 dB RMS accomplishes this. As a result, traditional hardware mixers tapered the response as you turned a panpot to create this 3 dB dip.

Definitely in the “rocket science” category. The final takeaway of the article is that pan laws will effect audio processed in different DAWs. If the panning is set “the same” in Logic Pro X and Studio One the output might not be identical.

In Logic Pro X the pan law is set on a project level. Normal is -3 dB compensated, not applied to stereo balancers.

Show/Hide List Editors D — Logic Pro X keyboard command of the day

Logic Pro X keyboard command of the day. #LogicProX @StudioIntern1

  Show/Hide List Editors    D

List Editors (Event, Marker, Tempo, Signature) appear on the right hand side of the Arrange window. Use the toolbar button (looks like a list) to show the viewer, or use the keyboard command.

Each of the List Editors can be in a separate window. Drag the name of the list from the Arrange window view into the tracks area to select the list.

Another odd behavior (to me) — there can be multiple Event List windows open, and multiple Signature List windows. Those lists can be opened from the Window menu. Marker and Tempo do not have separate commands in the menus. You can drag multiple Marker and Tempo windows out from the Arrange window viewer.

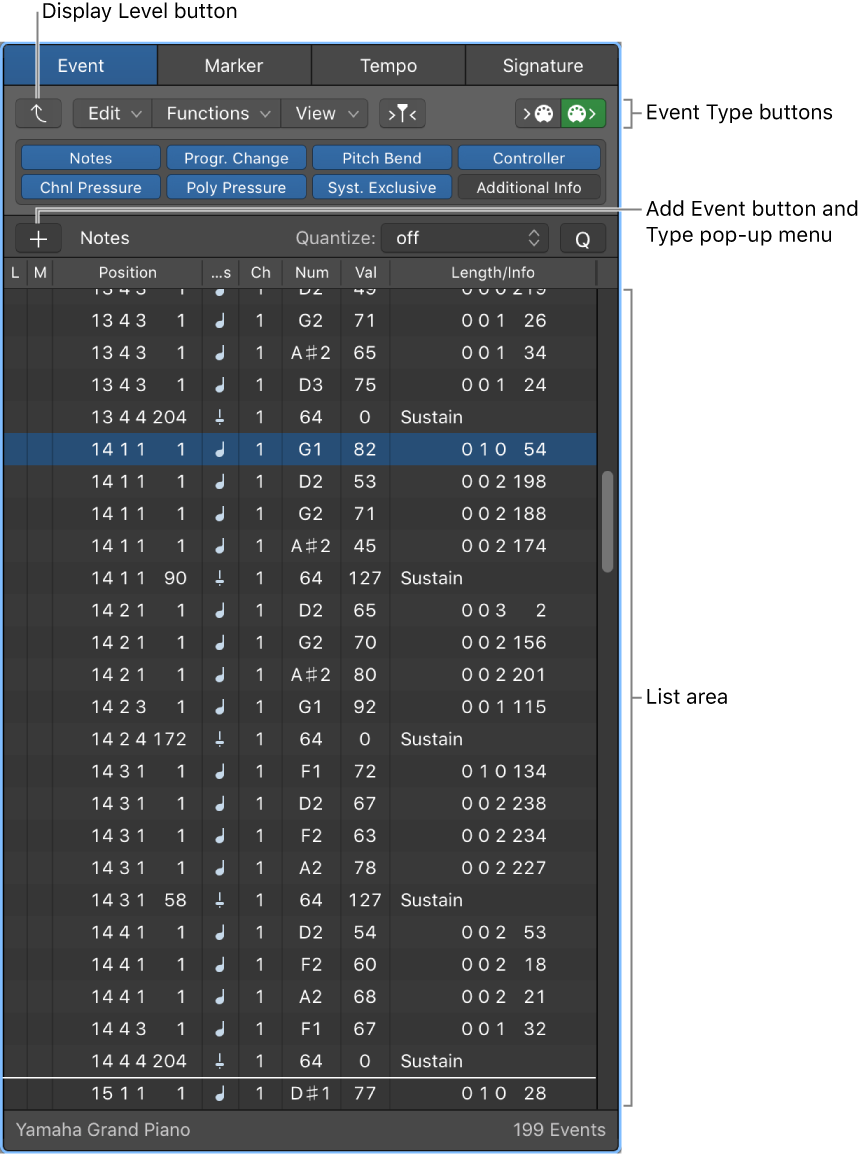
Event List interface — Logic Pro X

The Event List shows all the events in your project, such as MIDI note events or region start events, in a vertical list format. You can use it to make precise edits, and for other tasks better suited to numeric rather than graphic edits. You can display all events or limit them by category.

⇧ SHIFT – ⌃ CONTROL – ⌥ OPTION – ⌘ COMMAND