Create 1 Track Automation Point each for Volume, Pan, Sends — Logic Pro X keyboard command of the day

#LogicProX @StudioIntern1

  Create 1 Track Automation Point each for Volume, Pan, Sends

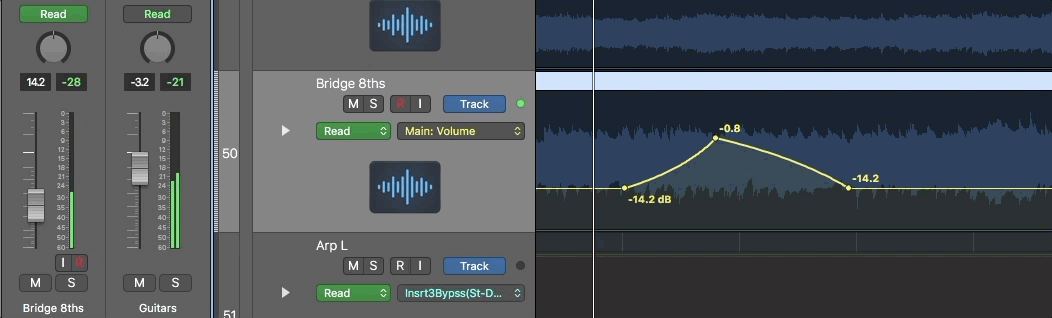
Set up automation points for a “typical” set of parameters.

Add and adjust automation points in Logic Pro — Apple Support

To create changes over time to volume, pan, and effects settings, you add automation points to a track’s automation curve at different places, and then adjust the automation points so the value of the setting changes. You can adjust automation points by moving them up or down to a new value or by moving them left or right to a new point in the timeline. Numerical values are displayed alongside each automation point. You can also raise or lower the value of MIDI parameters associated with notes in instrument tracks or Drummer tracks. Note and numerical values are displayed alongside each MIDI data point. You can also add automation points at selection area or region borders.

⇧ SHIFT  –  ⌃ CONTROL  –  ⌥ OPTION  –  ⌘ COMMAND

Drum Synth: Exploring Logic Pro X’s new drum synthesizer- 9to5Mac

Drum Synth: Exploring Logic Pro X’s new drum synthesizer- 9to5Mac

Apple introduced a collection of amazing new features and products in Logic Pro X 10.5, and Drum Synth is not to be overlooked. While the latest overhaul of Apple’s flagship DAW is jam-packed full of big-time features — Live Loops, the new EXS24 replacement, Sampler, and more — there are several enhancements that might not make it on the marquee. We previously touched on some of these features like instant sampling and enhancements to the powerhouse Alchemy instrument, and now it’s time to delve into the new Logic Pro X Drum Synth.

Use The Waves Scheps Omni Channel To Mix Fast Completely In The Box | Production Expert

Use The Waves Scheps Omni Channel To Mix Fast Completely In The Box | Production Expert

In this free 4 part tutorial series, brought to you with the kind support of Waves, we show you how you can tackle a live band mix quickly using Waves Scheps Omni Channel plug-in. Watch to see and hear how this channel strip differs from more traditional console emulations and generic modular based channel strips. Scheps Omni’s secret sauce is found in both its flexibility and sonic performance which harness some of the best bits of working with analog gear and digital workflows.

I like the Omni Channel for exploring. Works in all the DAWs and I can use it with SoundSource and AudioHijack.

Set Right Locator by Playhead — Logic Pro X keyboard command of the day

#LogicProX @StudioIntern1

  Set Right Locator by Playhead

The “Set Right/Left Locator by Playhead” commands are buttons that can be added to the control bar. Some very useful documentation in Logic Pro 9 manuals describing how to use cycle modes. Skip cycle is kind of interesting.

I need to use cycle areas to create markers a lot more than I do. Define the cycle area — typically select something and use the ‘Set Locators/Loop by Regions/Events/Marquee and Enable Cycle/Loop ⌘U’ command. Grab the cycle area in the ruler and drag it down to the marker ruler. A new marker is created waiting for text input…ideal.

Logic Pro 9 User Manual: Using Cycle Mode

Set Left Locator by Playhead and Set Right Locator by Playhead: The current playhead position is used to define the left or right locator value. Also available as key commands.

⇧ SHIFT – ⌃ CONTROL – ⌥ OPTION – ⌘ COMMAND

3 Tips for Mastering Indie Rock

‘[3 Tips for Mastering Indie Rock](https://www.izotope.com/en/learn/3-tips-for-mastering-indie-rock.html)’

3 Tips for Mastering Indie Rock

by Jett Galindo, iZotope Contributor May 28, 2020

Rock music has stood the test of time, making it one of the most enduring genres of the modern era. With today’s production tools becoming more and more advanced—and more accessible to a wider audience—one particular rock subgenre is thriving more than ever. In this article, we’ll take a look at some tips and tools for mastering indie rock and nailing the indie rock aesthetic.