Set Step Color by Row Color — Logic Pro X keyboard command of the day

  Set Step Color by Row Color

Set the color of the selected step to the color of the row. Akin to setting region colors according to track colors.

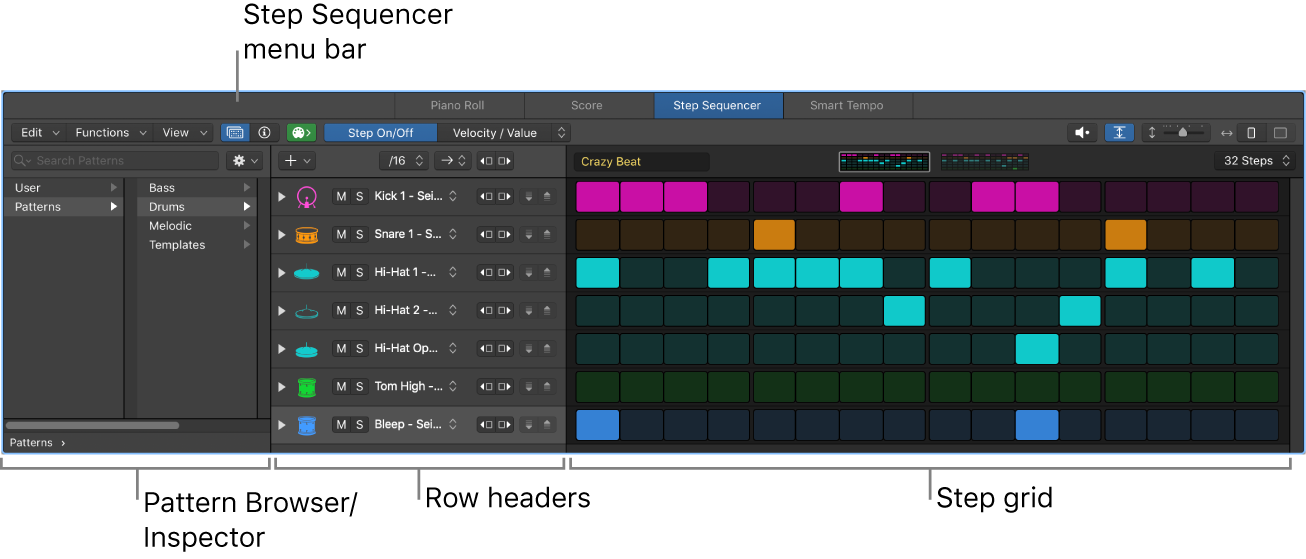
Everything old is new again. Step Sequencing. NB each cell in a sequence can be a sequencer.

Logic Pro Step Sequencer overview — Apple Support

Each pattern region or cell functions as an independent step sequencer, with its own configuration and settings. You can copy and move pattern regions like other regions in the Tracks area, while pattern cells can be copied, moved, triggered, and queued like other Live Loops cells. You can modify pattern region and cell parameters in the Region inspector or Cell inspector, respectively.

Stems In Music Production — Everything You Need To Know | Production Expert

Stems In Music Production — Everything You Need To Know | Production Expert

The main thing to bear in mind is that you’ll need to duplicate some resources here. On a regular mix you only need one of every effect, say reverb and one delay. But when stemming you need one of these for every stem, routed to the relevant stem bus. Otherwise, you’d have the effects of all the different stems on one stem, and the point is to separate things. So if you’re creating four stems you’ll need four sets of effects busses. You can imagine how quickly this will start to take up system resources if you’re printing a lot of stems, and especially if you’re working in 5.1 or 7.1

Simple enough to create effects tracks for each stem. Just have to remember to do it when mixing the project.

In the Logic Pro X world, if you’re using summing stacks, you might simply want to insert the effects on the stack and use the mix control knob to adjust the levels appropriately. If the recipient of the stems insists on separate effects tracks per stem, well, OK…that’s just not that hard to do.

A good practice would be to create a track for the effects bus (need to do this anyway if you want to bounce the stems) and place it right along with the summing stack in the arrange area.

Settings: Chords and Grids ⌃⌥⇧C — Logic Pro X keyboard command of the day

  Settings: Chords and Grids    ⌃⌥⇧C

Open the Score Editor settings in “Project Preferences” to the ‘Chords and Grids’ section.

Chord settings

  • Root Font field: Defines the font for the chord symbol’s root note.

  • Extension Font field: Defines the font for the chord symbol’s extensions.

  • “Follow staff size” checkbox: Displays chord symbols according to staff size.

  • Slash Note Position pop-up menu: Defines the position of the slash note.

  • Accidental Scale field: Changes the accidental size, in relation to the font size setting: positive values result in an increased size, negative values in a diminished size of chord symbol accidentals.

  • Language pop-up menu: Choose which language to use for accidentals and other chord symbols.

  • Alignment pop-up menu: Determines the general horizontal alignment of chord symbols—with an Align parameter set to def (default)—in relation to their bar position.

Grid settings

  • Font field: Sets the general grid font.

  • Grid Scaling: Reduced field: Sets the size of the first chord grid when added in the Score Editor.

  • Grid Scaling: Normal field: Sets the size of the second chord grid when added in the Score Editor.

  • Grid Scaling: Enlarged field: Sets the size of the third chord grid when added in the Score Editor.

  • Chord Scaling: Reduced field: Sets the size of the chord on the first chord grid when added in the Score Editor.

  • Chord Scaling: Normal field :Sets the size of the chord on the second chord grid when added in the Score Editor.

  • Chord Scaling: Enlarged field: Sets the size of the chord on the third chord grid when added in the Score Editor.

  • Show Fingering checkboxes: Select to show the fingering numbers on the chord grid symbols in the Score Editor.

  • Minimum Number of Frets field: Defines the number of frets (four, five, or six) on chord grids.

  • Barre buttons: Define the Barre style on chord grids, whether Tie or Block.

  • Thumb buttons: Define the representation of the Thumb fingering marking on chord grids. It can be represented by a 5 or a T.

  • Left-Handed checkbox: Changes the chord grid orientation for a left-handed user.

Chords & Grids settings in Logic Pro - Apple Support

These settings define the font, position, and scaling of chords and grids, and other settings.

Open General Preferences… — Logic Pro X keyboard command of the day

  Open General Preferences…

Opens the Preferences settings window with the “General” tab selected. If you use the command-comma key command to open the Preferences settings window it will open with the most recently selected tab.

Not really a candidate for its own keyboard sequence, but you can if you need to.

Overview of preferences in Logic Pro — Apple Support

In Logic Pro, you can define and modify preferences that apply to all projects. You do this in the Preferences window. These preferences are automatically saved whenever you quit the application. A general preferences file, named com.apple.logic10.plist, is found in the ~/Library/Preferences folder. A separate preferences file for control surfaces, named com.apple.logic.pro.cs, is stored in the same location. You can’t edit either file directly. Any changes must be made in Logic Pro. If you delete a preferences file, a new one is created the next time you open Logic Pro. All preferences are reset to their default values.